Powered by Blogger.
Showing posts with label Samsung S3. Show all posts

Thursday, 30 October 2014

, ,

How To Set Galaxy S3 Notification LED Color and Flashing Frequency | AMANAHAD Tech

how to set galaxy s3 notifications
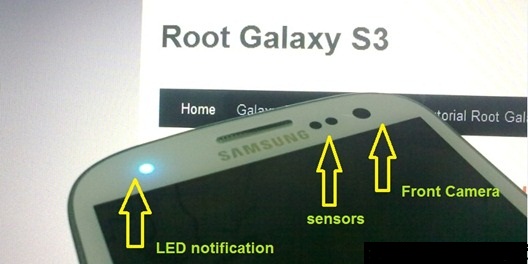
We know that Samsung galaxy s3 today is very popular. And the graphic sells of galaxy s3 from mei until june 2012 has sell out for more than 10 millions. In my opinion galaxy s3 also has an awesome design. Galaxy S3 has a LED notification that followed by a sensor and a front face camera On the top of it. the part that i very like most is LED notification. Galaxy S3 LED notification will make you easy to know the status of your phone. whether you receive email, Gmail, miss call, low battery and more. And it will provided to you without press the power button (turn on s3 screen from sleep) and enter password, you can get all of the status just by looking at flashing frequency and the LED notification light color.

to enable LED notification is very easy just go and set at settings>LED indicator. On there, you can enable the LED Light up when device is connected to charger, when you has missed call, battery is low, messages or any application events.


It sound good right?. But unfortunately this galaxy S3 LED notification default system setting doesn't allows you to set flashing frequency and the LED notification color. If you have rooted your galaxy s3 (see tutorial how to root Galaxy S3), will let you go set the LED notification by go to the system file and manually set it. But if you don’t want to root your galaxy s3 because it will remove your warranty, you can use application- Light Manager to set the LED notification and flashing frequency on your Galaxy S3. Light Manager is an application that you can find on google play store that will allows you to give control of your the flashing Frequency and notification LED colors. I have tested it, this is free application, Light Manager on my Galaxy S3, it works perfectly. hope you enjoy will love it too :D.

download light manager


Download Light Manager

Important: If you want install Light Manager apk, remember to do this before, please go to Settings > Security and lock screen > Unknown Sources to allow installation of non-Market apps.

by Triple A A-@-A
Publisher: Unknown - 13:35

Sunday, 26 October 2014

, ,

[Official Firmware] Samsung Galaxy S3 Neo+ GT-I9301I I9301IXXUANC6 Official 4.4.2 KitKat Firmware | AMANAHAD Tech


[Official Firmware] Samsung Galaxy S3 Neo+ GT-I9301I I9301IXXUANC6 Official 4.4.2 KitKat Firmware


[Official Firmware] Samsung Galaxy S3 Neo+ GT-I9301I I9301IXXUANC6 Official 4.4.2 KitKat Firmware


Manufacturer: Samsung
Model: Galaxy S3 Neo+ GT-I9301I
Android Version: 4.4.2 KitKat
PDA: I9301IXXUANC6
CSC: I9301IPHNAND1
Modem: I9301IXXUANC6
Changelist: 1036356
Status: Official
Downloads:


"Learn How To Flash An Official Firmware For Samsung Devices"

Well guyz this is the complete tutorial/guide that "How an Official Samsung Firmware is Installed/Flashed on a Samsung smartphone/tablet" , the method is very easy to perform and I have made it more easy for the newbies who don't know what is flashing, Odin etc. Some time the phone software update is late or not available in the area so with this tutorial you can Install the latest Official Samsung released firmwares on your device.


1. Drivers Setup
Well for connecting any device to PC it is must to first install its drivers for the device than connect that. so for Samsung Devices you should install these both.


2. Odin
This is a software through which we can flash a custom .tar etc files. Now it is must to have this software on PC
a. Odin (second link if first didnt work) All versions all available in folder.


3. Flashing A Firmware
To flash an official firmware for Samsung Device. first you should put your phone in download mode. By pressing Volume Down + Power Button + Home Button (varies with deviceat the same time for some time when the Warning! screen appears. then leave them and press Volume Up button so download mode starts. as shown in image.
                          [the first Warning!]                                        [After pressing Volume Up button]

When the second screen appears so connect your phone/tablet to PC. and then Open Odin tool. any version. as shown in image
[ this is a 3.4 version of odin you can try any one ]


When you connect your phone so there will be a message shown in message box i.e <ID:0/010> Added so it means that your phone is connected properly if Added not shown so try it again, then check on PDA check box and click PDA button and pick up that firmware file which is .tar/.md5 etc and wait if it was checking it. then click Start. the progress will be done and your phone will be restarted several times during flashing. after completion Pass message will be shown in above boxes. thats it.


by Triple A A-@-A
Publisher: Unknown - 19:35

Saturday, 20 September 2014

, , , ,

Samsung Galaxy S3 and Galaxy S4 rumored to get Kit-Kat treatment, no time is given


Android 4.4 Kit-Kat and the new family member of the Nexus family Nexus has just become official few days back and everyone is waiting for the Android 4.4 Kit-Kat update for their Smartphones. After the release of the Android 4.4 Kit-Kat, the Smartphones manufacturer came into the race of updating their flagships to the latest Android Chocolate Bars. A few days back, a tweet revealed that Samsung testing the Android 4.4 Kit-Kat on the Galaxy Note 3 which makes clear that the Galaxy Note 3 will be the first Smartphone from Samsung to get the Android 4.4 update.

Galaxy S3 and Galaxy S4 Android 4.4 KitKat

Samsung has just released the Android 4.3 JellyBean for the Galaxy S3 and the Galaxy S4 but now we have some great news to share with you which came from the rumors that the Samsung Galaxy S3 and the Galaxy S4 will also get the Android 4.4 Kit-Kat treatment in the future but unfortunately no particular month or day is given in the rumors. Rumor also added that this update is going to be huge and will bring major changes to the system of the Samsung Galaxy S3 and the Galaxy S4. All of this information is just a rumor but it also makes a sense because the Korean OEM is doing very well on their update platform and these two devices will definitely get the Android 4.4 treatment but again we could stop here because as said by the Google that the devices that are more than 18 months older on the markets will not get the taste of Kit-Kat bars and the Samsung Galaxy S3 is now 18 months old, so here is a doubt on the Galaxy S3 Kit-Kat treatment.

We are looking to get some words on it by some official or reliable sources though this information has the ability to make the users of the Galaxy S3 and Galaxy S4 happier.

Please be noted that this information is not linked to any official or reliable sources, so don't take it too seriously.
by Triple A A-@-A
Publisher: Unknown - 12:41

Sunday, 14 September 2014

, , , , , , , , ,

How to Speed Up Android Smartphone (The Ultimate Guide) | AMANAHAD Tech


Android Smartphones has gained lot of popularity in recent years. Many people around the globe now owns an Android Smartphone. Everyday more and more Android Smartphones are poured into market. It is available from high end to low end smartphones But even with newer versions of Android OS , even with high end smartphones,one thing remains same, their user experiences sluggish phones in short amount of time. The Android development are still under construction. So you can either sit around hoping for a update or patch to solve lagging issues. In meantime, you can use your smartphone as paperweight or something like that till patch comes, but it is a long shot Or you can take matters into your own hand and fix the issues using steps given below.


1.Do It Daily!

  • Restart your phone daily once or twice. Yeah,it's sounds weird but restarting phone means all application process will restart too. It will remove any unnecessary process,clear clipboard and some other things which don't matter. All matters is you will have fast smartphone.
  • If your smartphone have high heating issues, keep it off for few minutes. When many processes are running same time,it increases the heat. You will experience lot of lagging under that condition. This method is not very effective but it helps.
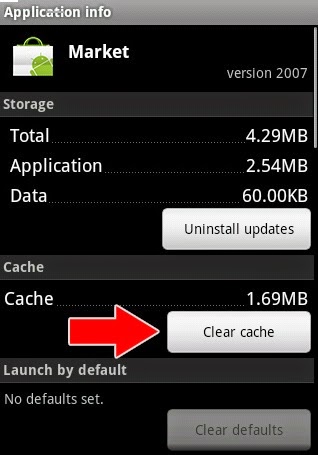
  • Clear App Cache: Clear the cache of application you using more than any other. Those apps will have more data cache than any other cache. App cache is data of particular app. You can remove it by Settings > Applications > [ Select your App ] > Clear Cache Note: Don't clear cache of any Game App. It could clear all your game progress and reset your account.

clear_app_cache
  • Check your Smartphone storage: Check your smartphone's internal storage space. Try to keep minimum 1 GB storage space free. Also check your external Storage space. If the SD card is full, remove some stuff or get new SD class with higher class.If your storage space is full, your smartphone will lag..a lot.        

2.Get Rid Of It

  • Uninstall any unused apps. Uninstalling the apps you don't use will free up some internal storage space and also removes extra processes of that app. If the app is bloatware [ what is bloatware? More info in next steps] , Disable it.
  • Remove all widgets. If you don't want to remove all widgets,try to limit widgets on your home screen. It depends on your smartphone how much widgets you can use without taking toll on it.But best option would be to delete all widgets.
  • Switch to static wallpapers. Using live wallpaper will slow down the smartphone and also it takes lot of battery power. So static wallpaper is better option than live wallpaper.
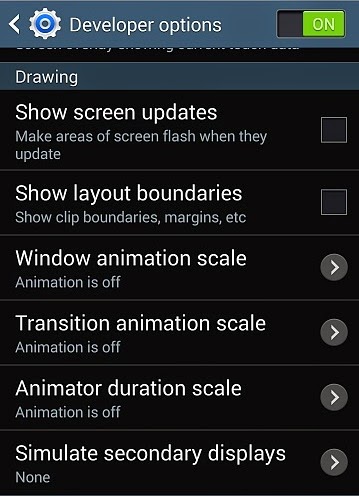
  • Disable all Animations. You can find its option under Settings > Developer's option.

disable_animation_android
  • Use stock app-launcher. Stock app-launcher is default launcher. Using any third-party app launcher with lot of animation is not good choice. If you still want to use third-party app launcher, just disable all animation. That will improve the performance.


 3.Apps to Avoid


  • Avoid any antivirus apps.
  • Avoid any battery saver apps. Usually these apps slow downs the phones and also eats precious batter power. There are other ways to save battery than those apps.
  • Carefully select any performance booster apps for your smartphone. Not all apps are suitable for your phone. Try different apps to find suitable app otherwise avoid it.
  • Avoid any third-party launcher. Any launcher with lot of effects and animation will require more resources which will ultimately reduce phone performance. So keep it simple or better avoid it.
I am not saying this types of apps are useless and doesn't work. It is just not every app is suitable for all different smartphones. Experiment with different app to find out which one is suitable for you. But it would be best not to use it.

4.Compatibility Issues

  • If you have powerful processor and high RAM in your smartphone,than avoid reading this topic.
  • Update your smartphone to latest Firmware. A new firmware version can improve the performance but remember newer is not always better.
  • If you have medium range smartphone[includes low range phones], think before updating to newer version of Android. If you are satisfied with running version of Android in your smartphone,than there is no need to update it.
  • Every newer version of Android will have more features than older version. It will use more resources than previous version and you will left out with a sluggish phone. 
  • Revert to stock Android version if possible. They are and would be the most suitable for your smartphone.
  • Update to newer version of apps.
  • Take a backup [more to that in next step] of app before updating it. So in case newer version of app is eating more resources or not compatible, you can switch back to older working version. 

5.Benefits of Rooted Phone

Rooting will give you master control over your phone. Sure it is little difficult , but it's worth it. There are various methods for rooting which you can find on net for your phone. There are different methods for rooting. Some of them requires unlocked Bootloader which will void your warranty. Read all steps of rooting process or take an expert advise before rooting your phone. It can brick your phones. A bricked phone is useless and hard to repair. The benefit of rooting is that you can always unroot your phone.So let's get started. 
  • Root your phone.You can find more about it on forum.xda-developers.com .They are the largest Android community on net.
  • You can overclock your phone processor for speed-up but it will eat more battery power.
  • Custom-ROM: They are the unofficial version of Android for your phone. Custom ROM gives many options to personalize the phone according to your will. Note that not all custom ROM s are good.Before installing any custom ROM, read all the instructions. Check all requirements. Also check for any existing bugs or any missing features. If you are okay with it than install it. Custom-ROM can increase your performance at wide scale.But again, not all are suitable for your smartphone
  • Can remove Bloatware on rooted phone.Bloatware are per-installed apps of your phone. Facebook,voice to text app ,voice dialer , google map are some of examples of bloatware. Bloatware apps are different for different phone. Not rooted phone can not uninstall it.With rooted phone,you can remove all bloatware, hence full control over phone.
  • Can install and use more advanced app. There are many good apps that requires rooted phone. Keep reading for some of examples of rooted apps.  

6.Uncategorized stuff

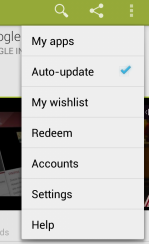
  • Turn-off auto-update of app. It will check again and again for available update.It will eat your internet, battery and also make your phone laggy. To turn it off go-to Playsore app > Menu from top left > My apps > select app . you can find tick-mark option there. 

disable_auto_update
  • Disable data synching of different social account like Facebook,Twitter. Also disable synching of  email,gmail etc. To disable it Just go to Settings > Accounts.It could be different for other Android version.
  • There is something you should check out if you are using Android version lower than 4.3. It is called Solid-State Drive TRIM.
  • Last option is - Reset your phone. Reseting the phone will clear everything from contacts to all apps. You will have than out-of-box phone.

7.Playstore

Here is a list of some app that can help you with phone lagging issues. You can download it from Google Playstore. Like I said earlier,try different apps to find suitable app for your phone.
  • App Cache Cleaner : Delete data cache of all apps at once.
  • Automatic Task Killer : An app to kill different task at once.
  • Clean Master : A free optimizer to clean junk files.
  • CCleaner : A powerful windows clean up tool now available for Android.Still in Beta phase.
  • AppMgr III : Move apps to SD card & Hide apps.A smart File Manager.
  • Watchdog : A task manager that monitor and kills process.Free and paid versions are available.
  • App Backup & Restore : Make a backup of any installed app as .apk and stores it to SD card.
  • Titanium Backup : An ultimate backup and restore app.Root Required.Free and paid version are available.
These steps will definitely fix all lagging issues. Your Android smartphone will run like a horse. Since your phone is working greatly again, you can install some popular awesome apps.
Publisher: Unknown - 15:12

Thursday, 4 September 2014

, , , , ,

How to Transfer Media from one Samsung Galaxy device to another Galaxy Device - Samsung Geeks AMANAHAD

One of our favourite things about the launch of the Galaxy S4 is the high quality support which Samsung has provided with it. Although this isn’t perfect [yet], Samsung are really moving in the right direction – trying to help consumers understand the technology they provide and simplify what might have been quite complicated processes. Along with the Galaxy S4 launch, they have provided “Samsung Smart Switch” Mobile which lets you quickly and easily transfer you data from one Samsung Galaxy Device to another.
Currently this will only work with devices such as the Galaxy Note 2, Galaxy S3 and Galaxy S4, which have NFC chips. Quite frankly – this software is awesome.

Tutorial

Samsung Smart Switch Mobile TutorialSamsung Smart Switch QR Code
Download Samsung Smart Switch onto both of your Galaxy Devices. You can find it by either scanning the QR code above, or following this link.

Step 2: 

Samsung Smart Switch Mobile Tutorial
Ensure that NFC is turned on on both Galaxy Devices and run the application.

How to Turn on NFC:

Turn on NFC by Navigating to “Settings”. On the Galaxy S3 and Note 2, you should be able to Find it by going to Settings > More Settings > NFC Toggle 
Samsung Smart Switch - NFC
One the Galaxy S4, you will be able to toggle NFC from the “Connections” tab in Settings:
Samsung Smart Switch - NFC

Step 3: Samsung Smart Switch Mobile Tutorial

Touch the back of the devices together. You should feel them vibrate and, if you have the sound on, a little “ding” to confirm that the device are in contact with each other. At this point, you’ll need to tap on the screen of either of the device to set up the WiFi Direct connection which will allow you to migrate your data. Leave the devices touching while it does this.
Samsung Smart Switch Tutorial

Step 4:

Samsung Smart Switch Tutorial
Select exactly what it is that you want to transfer. Samsung Smart Switch Mobile will allow you to transfer Contacts, Calendar, SNotes, Pictures, Music, Videos and Documents – so it’s pretty comprehensive. For music and video – it will only transfer files which are DRM Free. DRM (Digital Rights Management) is security software put into the music/video files which is supposed to stop piracy, though more often than not it just stops you being able to use content you have paid for on your own devices. Herumph.
Samsung Smart Switch Tutorial

Step 5:Samsung Smart Switch Mobile Tutorial

The final step is to press “Transfer” on the device where your content is and then press “OK” to confirm on the device you want to send the content to. Once this is done, sit back and let all the data transfer across from one Galaxy Device to Another. If you are transferring a lot of video files, music and images, this can take quite a long time – so go and put your feet up and check out some of the other cool features of the Galaxy S4 while you wait!
If you have any problem then leave comments I'll solve it.
by
AmanAhad
Publisher: Unknown - 01:12

Monday, 1 September 2014

,

Samsung Galaxy S3 tips and tricks | AMANAHAD

Samsung Galaxy S III for AT&T

Make the most of your Samsung Galaxy S3 with these top tips and tricks

Even though Samsung's Galaxy S4 has been on the market for most of this year, its Galaxy S3 predecessor remains a fantastic -- and ever popular -- device.
That's why we've decided to update our lengthy list of Galaxy S3 tips and tricks (especially since we know some of you are expecting a Galaxy S3 under the tree this year). Below you'll find a complete guide to help you get the most out of your Android-powered handset. Oh, and if you've already moved on to the Galaxy S4, we've got you covered there too:

How to change your Home screen to "Easy mode"

First-time smartphone users can breathe easy with Samsung's Galaxy S3, as the company has included the option to switch your home screen over to a more simplified option. Samsung's Easy mode home screen offers a stripped down layout with bigger icons and less clutter. Seasoned smartphone users need not bother with this one, but it's a welcome addition for folks who are making the transition for the first time. The larger layout is also nice for older people who may not have the sharp vision often required for standard mode.
To switch over to simpler times, simply go to Settings and locate the Home screen options. From there, you'll be able to change the look with a few simple taps. Once you're comfortable with the device, you can switch right back over to standard mode.

How to add home screens

Speaking of the home screen, did you know you can add more than what's offered right out of the box? Samsung Galaxy S3 lets you add up to seven home screens, which you can use to fill with apps and widgets. But it doesn't start off that way. To add more home screens, use a pinching gesture (pinch inward) on the home screen and then tap on the "+" button. This will let you add up to seven screens. While seven screens may seem like a lot at first, you'll be thrilled that the option exists once you start downloading countless apps.

How to set mobile data limits

The Samsung Galaxy S3 is a great device for browsing the web, downloading apps, streaming music and watching videos but some of you may have a data cap. When this is the case, you might want to be warned when you're approaching your limit.
Luckily, it's very simple to do with the Samsung Galaxy S3. Simply dive into your Settings, tap on the Data usage tab and then hit the Set mobile data limit column. From there, you can set how much data you want to use before getting a warning.

How to back up your photos online

The Samsung Galaxy S3 has a fantastic camera and you should take advantage of that with some online storage services. The Samsung Galaxy S3 comes with 50GB of free Dropbox storage and the latest app will let you automatically upload photos to it.
That's not the only way, as you can use the Google+, Facebook and SugarSync apps to automatically upload your pictures. These can be shown publicly but the default is to upload these privately.

How to change the font on your Samsung Galaxy S3

Let's face it, the default fonts on the Samsung Galaxy S3 can get a bit boring after a while, so why not give your Samsung Galaxy S3 a facelift and change the font?
To do this, first head to Google Play where you can find a range of fonts and font apps available to download. Once you've downloaded and installed your favorite font, head to Settings>Display and you should see an option to change the font.
Select the font you've just downloaded from the list and voila, your device will be transformed.
Here's a pick of our favorite font apps available to download:
  • Fontomizer SP
  • iFont
  • CleanPack for FlipFont
  • Gothic Pack for FlipFont

How to organize your apps in folders

When you've downloaded a ton of apps, it can be a bit of a pain to have to keep flipping through multiple home pages to keep getting the apps you want. Luckily, organizing your apps into folders is quite easy to do with the Samsung Galaxy S3.
To create folders on your home screen, simply long press an app and then drag it on top of another. This will create a folder with those two apps and you can easily rename the folder, as well as add more apps.

How to switch to vibrate mode on the Samsung Galaxy S3

The Samsung Galaxy S3 supports a number of sound modes, for ringtones, text messaging, emails and any other alert. It's easy to switch between silent mode, sound mode and vibrate mode.
Just tap the volume down button on the side of your device while you're on the homescreen and a volume bar will show up. Keep pressing until you see the vibrate icon appear and your device vibrates slightly.

How to switch of text message alerts on the Samsung Galaxy S3

If your device is in silent mode, but still makes a noise when you receive text messages, you'll need to head to the sound settings to change it and ensure you won't hear a peep from your phone when you get an alert.
  1. From the home screen, tap on Messaging.
  2. Now, select the Menu key, then settings. Now choose Select ringtone. A pop up will appear. From this list, select Silents, then OK.
  3. Your device should now not utter a sound when you receive a text message.

How to improve Google Now cards on the Samsung Galaxy S3

One of the cool things about the Samsung Galaxy S3 with Android 4.1 Jelly Bean is that you can activate Google Now, the contextual "search" feature, which uses the data it knows about you to deliver important information quickly. You can make Google Now even better by adding and customizing your cards.
One way to do this is to enable your Web history. Go to history.google.com and tap on the "Turn Web history on" box and it will have a bit more data to pull from. Be sure that you understand this will be opening up your privacy to Google more but it may help your Google Now experience, so think about the benefits and downsides.

How to install a new keyboard on the Samsung Galaxy S3

If you want to try a new keyboard on your Galaxy S3, it's very simple to change. Go into Settings, tap on Language and input and then tap on Default. Depending on which new keyboard you've downloaded, you'll be able to make that the standard input method on your Galaxy S3.

How to multitask on the Samsung Galaxy S3

You can use multiple applications at once on the Samsung Galaxy S3 really easily. To enter the multitasking screen where you can see all of the apps you have open, tap the Home key and then task manager.
From here, you can tap the Active applications to see the apps you have running. Tap end or End all to close individual or all applications.
Tap the Downloaded tab to see all the apps you have downloaded. From here, you can uninstall them.
You can see how much RAM is being used by each application in the RAM tab and clear the memory to free up space and speed up your device, while the storage tab tells you how much space you have on your device.
Help will give you tips and tricks to help you save battery and free up RAM to get your Nexus 4 working to its best.

How to take a screen shot on the Samsung Galaxy S3

We're always taking screen shots to use for our reviews but you'd be surprised at how often it can come in handy. Maybe you want to preserve a picture of your high score in Angry Birds Friends or share an image of how your phone is freaking out. Luckily, this is a very simple thing to do: simply hold down the power and home button at the same time and a screen shot animation will take place.
You'll then get a notification at the top of your screen and the screen shot will be saved to your gallery. You can share it via your social networks by going into your Gallery, clicking on it and then hitting the Share button.
There's another way to take a screen shot on the Samsung Galaxy S3. Go into the Settings, tap on Motion, go down to find Hand Motion and then click on Palm Swipe to Capture. Now, whenever you want to take a screen shot, do a swiping motion across the screen with your hand and you should take a screen shot.

How to select a screen lock on the Samsung Galaxy S3

Putting a screen lock will help secure your Galaxy S3 and this can be done by going into the Settings and then tapping on Security. Tap Screen Lock and you'll then have the option to put in Swipe, Motion, Face unlock, Face and Voice, Pattern, PIN or Pinword.

How to customize your lock screen on the Samsung Galaxy S3

If you've set up a screen lock, you'll also be able to control what info appears on it.
To add your own apps to the lock screen simply follow our short step-by-step guide below:
  1. From the Galaxy S3 home screen, navigate to and open the Settings app.
  2. Now scroll down the settings menu and tap Security, then Lock screen options.
  3. Once inside, confirm that the shortcut button is turned on and then tap Shortcuts.
  4. Now you will be presented with four icons. Drag to the trash those that you want to remove from the lock screen and use the + symbol to add new app shortcuts.

How to encrypt device, SD card on the Samsung Galaxy S3

If you encrypt your Samsung Galaxy S3, go into Settings, tap on Security and then tap on either Encrypt device or Encrypt SD card. Once you've tapped these, you'll go through the on-screen instructions for securing your device further.

How to use Share Shot on the Samsung Galaxy S3

The Galaxy S3 has an amazing camera and one of the coolest features is called Share Shot, which enables you to quickly share shots with nearby Samsung users in real time. In the Camera app, tap on the shooting mode button (in the middle) and then scroll down and check Share shot. Have your other Samsung-toting friends do the same and as long as you're within 100 meters of each other, shared images will be stored in a Share Shot album on the device.
This can come in handy in a variety of situations and one of the most obvious is when you're taking a group photo. We've all been in that situation where we're posing and the shooter then has to take photos with various people's phones. If everyone has a compatible Samsung device, you can just take it with one Galaxy S3 and then Share Shot it.

How to use Group Cast on the Samsung Galaxy S3

The Group Cast feature on the Galaxy S3 lets multiple users interact with the same image at once -- including the ability to have real-time markups on an image or PDF file. To launch this with other devices on the same Wi-Fi network, open an image, tap on the Share button and then tap on Group Cast.

How to use AllShare Play on the Samsung Galaxy S3

The Samsung AllShare Play lets you use DLNA to "automagically" transmit content from your Galaxy S3 to other devices like a television or a computer. You have to sign up for an AllShare account but once you do, launch the AllShare Play app and then follow the on-screen instructions for adding other devices or for utilizing Web storage.

How to take HDR photos on the Samsung Galaxy S3

You can set a variety of shooting options on the Galaxy S3. To turn on things like HDR or Panorama, open up the Camera app and then tap on the Shooting mode button. From there, you'll be able to choose from Single shot, Burst shot, HDR, Smile shot, Beauty, Panorama, Cartoon, Share shot and Buddy photo share.
How to take better shots on the Samsung Galaxy S3 This is probably the one aspect that will take the most time to learn but it's definitely worth it. Basically, when you're taking photos with your iPhone 4S, keep in mind the lighting, composition and angles. We've dedicated multiple sections to helping you take better smartphone photos, so go ahead and check out how to capture light and how to properly compose your pictures.

How to install apps on the Samsung Galaxy S3

In order to install a free Android application on the Samsung Galaxy S3, proceed with the following:
  1. From the Galaxy S3 home screen, select the Google Play Store app.
  2. From the main Google Play Store screen, select the Apps panel on the left.
  3. Here, any mobile app can be accessed and installed. You can either browse or conduct a search using the magnifying glass icon in the top right of the screen.
  4. After you find a free app that interests you, tap Download.
  5. Then tap Accept & Download to accept the permissions for the app (or press Back if you change your mind) -- your item will start downloading immediately.
  6. After downloading it will install in the background and will be instantly available for use.
  7. That's it! You're now well on your way to using apps and games.
To install a paid Android application on the Samsung Galaxy S3, proceed with the following:
    1. From the home screen, select the Google Play Store app.
    2. From the main Google Play Store screen, select the Apps panel on the left.
    3. Now go ahead and find any paid app you want. You can either browse or conduct a search using the magnifying glass icon in the top right of the screen.
    4. After you find a paid app that interests you tap on the blue box with the price.
    5. You will then be brought to a screen with the total and payment method. If no credit card is shown it should allow you to add a card.
    6. When finished confirming or adding a payment method tap Accept & Buy to accept the permissions for the app (or press Back if you change your mind) -- your item will start downloading immediately.
    7. After downloading it will install in the background and will be instantly available for use.
You can also download free and paid apps directly from your computer. Just go to play.google.com and search for the app you want to download. Click on the Install button and if it's compatible with your device, the app will be installed over the air automatically.

How to install apps from your computer on the Samsung Galaxy S3

You can install apps on your Galaxy S3 directly from your computer. Go to play.google.com when you're signed into your Google account, choose the app you want to download, click Install and there will be an option that says "Send To Another Device…" Tap on the "Choose another device on which to install," scroll down to the Samsung Galaxy S3 option and the app will be automatically installed a few seconds later.

How to install apps from non-Play Store on the Samsung Galaxy S3

The Google Play Store is a great way to add apps but so is the Amazon Appstore or GetJar. To install apps from third-party markets on the Galaxy S3, go into Settings, tap Security and then check the "Unknown sources" box. This does come with some security risks, so be sure you want to do this.
Still, this opens you up to third-party stores and the ability to install apps that you find in other places. Be sure that you trust where you're getting the apps from because this could make your device more vulnerable to malware and privacy violations.

How to put an app on your home screen on the Samsung Galaxy S3

After you've downloaded an app, you can easily put it on your home screen of the Galaxy S3. Open the app tray and simply hold down on an app icon for a second or two. You'll then be able to drag it to the home screen you want it to be on.

How to delete apps on the Samsung Galaxy S3

If you want to get rid of an app, it's pretty easy to do on the Galaxy S3. Open the app menu and then tap and hold an app icon like you were going to place it on the home screen. Drag it to the App info icon on the bottom of the screen and then click on the Uninstall icon.

How to root your Galaxy S3

Note: This guide is for the AT&T, Sprint, T-Mobile and international variants of the Galaxy S3.
Requirements
  1. A Samsung Galaxy S3
  2. A Windows PC
  3. Galaxy S3 USB drivers installed
  4. A fully charged battery
Part I - Setting up your Galaxy S3
  1. Download CMW_SuperUser_v3.07.zip and transfer it to your Galaxy S3's internal storage.
  2. Download Odin3-v3.04.zip , extract it and install it. You will also need to download clockworkmod.tar. AT&T models of the Galaxy S3 will be required to download fixboot.tar.
  3. It is now time to put your Galaxy S3 in download mode. You can do this by holding down the volume and home buttons together until a warning message appears. When you see this warning message appear press the volume up button. If you entered download mode correctly your Galaxy S3 should be displaying a green Android and say Downloading.
  4. Now navigate to and open the Odin program from step 2.
Part II - Flashing recovery
  1. Once your Galaxy S3 is connected to your PC via a USB cable and Odin is open, click on PDA and then select the clockworkmod.tar file you downloaded in step 2. If you have the AT&T Galaxy S3, choose fixboot.tar.
  2. Next you will need to ensure that Auto Reboot and Reset Time options are selected in Odin and then you can click go.
  3. Next up, you will boot into ClockworkMod Recovery. To do this you will simply need to shut down your Galaxy S3, press and hold Volume Up, Home and Power buttons at the same time.
Part III - Rooting your Galaxy S3
  1. Once you are inside ClockworkMod, make sure to flash CMW_SuperUser_v3.07.zip that you copied to the Galaxy S3 earlier. Once this is flashed, your will be rooted.
  2. Finally, reboot and and you are good to go!
Your Galaxy S3 is now rooted and ready for custom ROMs! Now head on over to XDA-Developers and start flashing some awesome ROMs and mods. The Galaxy S3 already has an awesome development community, so you should find plenty of ROMs to mess around with.
Enjoy, but flash with caution, Android fans!


A-@-A
Publisher: Unknown - 15:13