Powered by Blogger.
Showing posts with label Android. Show all posts

Saturday, 20 September 2014

, , , ,

Samsung Galaxy S3 and Galaxy S4 rumored to get Kit-Kat treatment, no time is given


Android 4.4 Kit-Kat and the new family member of the Nexus family Nexus has just become official few days back and everyone is waiting for the Android 4.4 Kit-Kat update for their Smartphones. After the release of the Android 4.4 Kit-Kat, the Smartphones manufacturer came into the race of updating their flagships to the latest Android Chocolate Bars. A few days back, a tweet revealed that Samsung testing the Android 4.4 Kit-Kat on the Galaxy Note 3 which makes clear that the Galaxy Note 3 will be the first Smartphone from Samsung to get the Android 4.4 update.

Galaxy S3 and Galaxy S4 Android 4.4 KitKat

Samsung has just released the Android 4.3 JellyBean for the Galaxy S3 and the Galaxy S4 but now we have some great news to share with you which came from the rumors that the Samsung Galaxy S3 and the Galaxy S4 will also get the Android 4.4 Kit-Kat treatment in the future but unfortunately no particular month or day is given in the rumors. Rumor also added that this update is going to be huge and will bring major changes to the system of the Samsung Galaxy S3 and the Galaxy S4. All of this information is just a rumor but it also makes a sense because the Korean OEM is doing very well on their update platform and these two devices will definitely get the Android 4.4 treatment but again we could stop here because as said by the Google that the devices that are more than 18 months older on the markets will not get the taste of Kit-Kat bars and the Samsung Galaxy S3 is now 18 months old, so here is a doubt on the Galaxy S3 Kit-Kat treatment.

We are looking to get some words on it by some official or reliable sources though this information has the ability to make the users of the Galaxy S3 and Galaxy S4 happier.

Please be noted that this information is not linked to any official or reliable sources, so don't take it too seriously.
by Triple A A-@-A
Publisher: Unknown - 12:41

Sunday, 14 September 2014

, , , ,

How To Monitor Mobile Phone Remotely – Complete Guide

How to monitor mobile phone:
This post is based on How To Monitor Mobile Phone Remotely, Mspy is basically the best & cheapest Cellphone spyware currently used in market. This review is step by step guide on how to use Mspy to monitor Mobile phones Remotely. mSpy is the latest innovation in monitoring software, It’s functionality works seamlessly across all these platforms. It give’s you much better visibility & control of what’s going on in your home and the lives of people you care about.
.
Untitled

What Is a Cellphone Spyware:

Spyware or we can say key-logger is a kinda tracking software which once installed on mobile phone will record all the data e.g sms, calls, mms, emails and other useful information which is then sent to a hacker. Attacker can easily gain access to credential and track location.
Untitled

Why Mspy:

Mspy is basically most featured Cellphone Spyware which takes full control on victim’s mobile with outstanding functionality.
Following features in Mspy
  • Listen to incoming and outgoing calls
  • Skype and WhatsApp tracking
  • Monitor Internet Activities
  • Read Chats & Instant message ( Facebook, messenger )
  • SPY on Calls, Sms & Emails
  • Track GPS Location
  • Record Surroundings
  • Control apps and Program
  • Multimedia files
  • Easy To access Remote Control
  • Completely  Undetectable
  • View Online Logs
  • Compatible with almost every Smartphones (IOS, Android, Blackberry, Symbian , Windows )
and much more. !!!
.

Download Link :

You can download Mspy from the following link Download here
Number of months are to be selected, select according to that.
Untitled
.

Can I Monitor Multiple Cellphones:

Yes by selecting Business plan from below link, Multiple Mobile Phones can be Monitored Download Mspy Business 
                                                   
.
.

How To Install Mspy on Victim’s Phone:

.
Step 1:
  • After Purchasing Mspy, You’ll get an E-mail containing password of Control panel.
  • Check out Demo Version : here
  • Logging in to your Control panel to follow Wizard’s instructions.
.
Step 2:
  • Wizard will ask for Selecting Operating System of victim’s mobile.
  • install the surveillance software on that mobile, It might takes several minutes.
.
Step 3:
  • Combination code will be shown by wizard.
.
Step 4:
  • Dial the Combination Code you received from Victim’s mobile.
.
Step 5:
  • Data captured can be viewed by the software online.
 Untitled
.
Step 6:
  • If settings are fully configured then you’ll start receiving logs in few minutes.
  • Congratulations! Target Phone has been Hacked and every single activity is now being monitored.
.
No Anti-Virus is capable to detect mSpy software. It’s main popularity reason is it’s undetectability. Once it is installed on Victim’s mobile then it cant be detected.

Untitled

Publisher: Unknown - 15:57
, , , ,

How To Download Android APK Files Directly From Google Play? | AMANAHAD Tech

  Regularly, people get applications for their android system by downloading them from Google Play Store. The downloader gets the app installed for you, without bothering you with unnecessary details like the files required for installation etc. But what if you don’t have access to internet and you want an app installed on your phone? Confidently you can’t do so without downloading stuff required for the installation. The key to this problem is simple - just get the APK package of the desired applications, and keep it beforehand for later when you need.

  It’s a package which contains all the files required for connection. In other words, it’s a ‘standalone’ installer for your app which doesn't require internet connectivity. You can get APK package of an android application from Google Play Store by simply adding an extension called ‘APK Downloader’ to your Google browser. Here we have a step by step procedure which will tell you how to add APK Downloader to your Google Chrome and subsequently, use it for getting APK packages


  For download this extension goto apk-downloader-1.4.3_2 


  After downloaded, the extension is to be added to your Google Chrome Extensions. To do so, follow these steps.
  How to install:
- For Chrome 33 or later:
1.      Extract downloaded zip to a folder
2.      Enable Developer mode in Extension page
3.      Click the “Load unpacked extension” button

4.      Locate the folder you create above and click OK

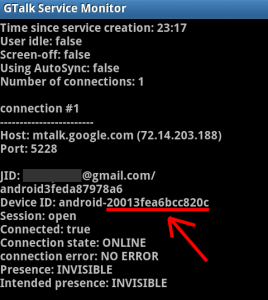
Open dial pad, call *#*#8255#*#* ( 8255 = TALK ). If it opens “GTalk Service Monitor”, find lines that begin with JID and Device ID. Your email is JID, and your device id is a string that after android- prefix
For example: if it shows android-1234567890abcdef , then your device ID is 1234567890abcdefDevice ID
After this Enter your email’s password, then press Login. If everything is ok, now you can use APK Downloader
After finished two steps above, you can start using APK Downloader. Open Android Market, view any FREE apps, then press the APK Downloader icon on address bar ( see screenshot )

Publisher: Unknown - 15:48
, , , , , , , , ,

How to Speed Up Android Smartphone (The Ultimate Guide) | AMANAHAD Tech


Android Smartphones has gained lot of popularity in recent years. Many people around the globe now owns an Android Smartphone. Everyday more and more Android Smartphones are poured into market. It is available from high end to low end smartphones But even with newer versions of Android OS , even with high end smartphones,one thing remains same, their user experiences sluggish phones in short amount of time. The Android development are still under construction. So you can either sit around hoping for a update or patch to solve lagging issues. In meantime, you can use your smartphone as paperweight or something like that till patch comes, but it is a long shot Or you can take matters into your own hand and fix the issues using steps given below.


1.Do It Daily!

  • Restart your phone daily once or twice. Yeah,it's sounds weird but restarting phone means all application process will restart too. It will remove any unnecessary process,clear clipboard and some other things which don't matter. All matters is you will have fast smartphone.
  • If your smartphone have high heating issues, keep it off for few minutes. When many processes are running same time,it increases the heat. You will experience lot of lagging under that condition. This method is not very effective but it helps.
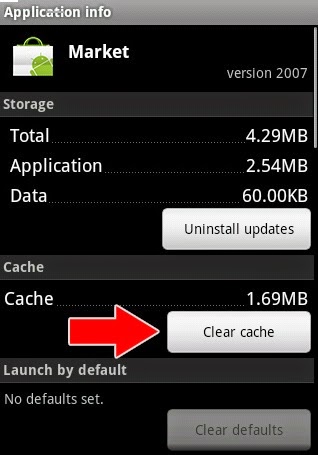
  • Clear App Cache: Clear the cache of application you using more than any other. Those apps will have more data cache than any other cache. App cache is data of particular app. You can remove it by Settings > Applications > [ Select your App ] > Clear Cache Note: Don't clear cache of any Game App. It could clear all your game progress and reset your account.

clear_app_cache
  • Check your Smartphone storage: Check your smartphone's internal storage space. Try to keep minimum 1 GB storage space free. Also check your external Storage space. If the SD card is full, remove some stuff or get new SD class with higher class.If your storage space is full, your smartphone will lag..a lot.        

2.Get Rid Of It

  • Uninstall any unused apps. Uninstalling the apps you don't use will free up some internal storage space and also removes extra processes of that app. If the app is bloatware [ what is bloatware? More info in next steps] , Disable it.
  • Remove all widgets. If you don't want to remove all widgets,try to limit widgets on your home screen. It depends on your smartphone how much widgets you can use without taking toll on it.But best option would be to delete all widgets.
  • Switch to static wallpapers. Using live wallpaper will slow down the smartphone and also it takes lot of battery power. So static wallpaper is better option than live wallpaper.
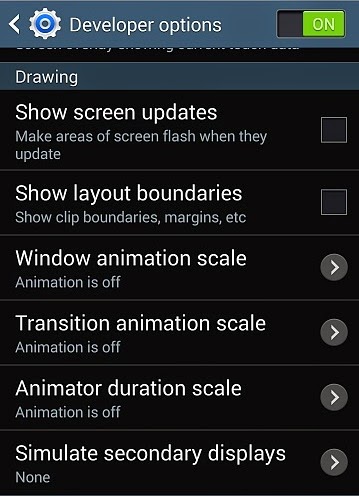
  • Disable all Animations. You can find its option under Settings > Developer's option.

disable_animation_android
  • Use stock app-launcher. Stock app-launcher is default launcher. Using any third-party app launcher with lot of animation is not good choice. If you still want to use third-party app launcher, just disable all animation. That will improve the performance.


 3.Apps to Avoid


  • Avoid any antivirus apps.
  • Avoid any battery saver apps. Usually these apps slow downs the phones and also eats precious batter power. There are other ways to save battery than those apps.
  • Carefully select any performance booster apps for your smartphone. Not all apps are suitable for your phone. Try different apps to find suitable app otherwise avoid it.
  • Avoid any third-party launcher. Any launcher with lot of effects and animation will require more resources which will ultimately reduce phone performance. So keep it simple or better avoid it.
I am not saying this types of apps are useless and doesn't work. It is just not every app is suitable for all different smartphones. Experiment with different app to find out which one is suitable for you. But it would be best not to use it.

4.Compatibility Issues

  • If you have powerful processor and high RAM in your smartphone,than avoid reading this topic.
  • Update your smartphone to latest Firmware. A new firmware version can improve the performance but remember newer is not always better.
  • If you have medium range smartphone[includes low range phones], think before updating to newer version of Android. If you are satisfied with running version of Android in your smartphone,than there is no need to update it.
  • Every newer version of Android will have more features than older version. It will use more resources than previous version and you will left out with a sluggish phone. 
  • Revert to stock Android version if possible. They are and would be the most suitable for your smartphone.
  • Update to newer version of apps.
  • Take a backup [more to that in next step] of app before updating it. So in case newer version of app is eating more resources or not compatible, you can switch back to older working version. 

5.Benefits of Rooted Phone

Rooting will give you master control over your phone. Sure it is little difficult , but it's worth it. There are various methods for rooting which you can find on net for your phone. There are different methods for rooting. Some of them requires unlocked Bootloader which will void your warranty. Read all steps of rooting process or take an expert advise before rooting your phone. It can brick your phones. A bricked phone is useless and hard to repair. The benefit of rooting is that you can always unroot your phone.So let's get started. 
  • Root your phone.You can find more about it on forum.xda-developers.com .They are the largest Android community on net.
  • You can overclock your phone processor for speed-up but it will eat more battery power.
  • Custom-ROM: They are the unofficial version of Android for your phone. Custom ROM gives many options to personalize the phone according to your will. Note that not all custom ROM s are good.Before installing any custom ROM, read all the instructions. Check all requirements. Also check for any existing bugs or any missing features. If you are okay with it than install it. Custom-ROM can increase your performance at wide scale.But again, not all are suitable for your smartphone
  • Can remove Bloatware on rooted phone.Bloatware are per-installed apps of your phone. Facebook,voice to text app ,voice dialer , google map are some of examples of bloatware. Bloatware apps are different for different phone. Not rooted phone can not uninstall it.With rooted phone,you can remove all bloatware, hence full control over phone.
  • Can install and use more advanced app. There are many good apps that requires rooted phone. Keep reading for some of examples of rooted apps.  

6.Uncategorized stuff

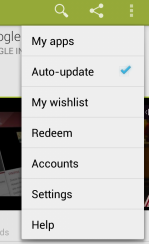
  • Turn-off auto-update of app. It will check again and again for available update.It will eat your internet, battery and also make your phone laggy. To turn it off go-to Playsore app > Menu from top left > My apps > select app . you can find tick-mark option there. 

disable_auto_update
  • Disable data synching of different social account like Facebook,Twitter. Also disable synching of  email,gmail etc. To disable it Just go to Settings > Accounts.It could be different for other Android version.
  • There is something you should check out if you are using Android version lower than 4.3. It is called Solid-State Drive TRIM.
  • Last option is - Reset your phone. Reseting the phone will clear everything from contacts to all apps. You will have than out-of-box phone.

7.Playstore

Here is a list of some app that can help you with phone lagging issues. You can download it from Google Playstore. Like I said earlier,try different apps to find suitable app for your phone.
  • App Cache Cleaner : Delete data cache of all apps at once.
  • Automatic Task Killer : An app to kill different task at once.
  • Clean Master : A free optimizer to clean junk files.
  • CCleaner : A powerful windows clean up tool now available for Android.Still in Beta phase.
  • AppMgr III : Move apps to SD card & Hide apps.A smart File Manager.
  • Watchdog : A task manager that monitor and kills process.Free and paid versions are available.
  • App Backup & Restore : Make a backup of any installed app as .apk and stores it to SD card.
  • Titanium Backup : An ultimate backup and restore app.Root Required.Free and paid version are available.
These steps will definitely fix all lagging issues. Your Android smartphone will run like a horse. Since your phone is working greatly again, you can install some popular awesome apps.
Publisher: Unknown - 15:12

Friday, 5 September 2014

, ,

Buyers Beware: There’s a Fake Version of The Galaxy S5S

goophone-02 It didn’t take very long for a knockoff of the Samsung Galaxy S5 to show up on the market. Just two days after the South Korean company unveiled their latest flagship smartphone, the ‘Goophone S5‘ (yes, that’s really the name of it) was being marketed to consumers. So, what makes the Goophone S5 different than the actual Galaxy S5?
As you can see in the photo to the right, the Goophone S5 looks nearly identical to the Samsung Galaxy S5. They both feature the same rectangular-shaped body with slightly rounded corners, a soft texture back, and even the same front design with a physical home button. With the exception of the word “Goophone” printed on the back, most people would probably assume it’s an authentic Galaxy S5.
But don’t let the Goophone S5′s appearance fool you into thinking its the real deal. One minor nuance between the two devices is screen size. The Samsung Galaxy S5 features a 5.1″ diagonal screen, whereas the Goophone S5′s screen is 5″. The major differences between the two devices, however, lies in the hardware. You can kiss the Samsung Galaxy S5′s ultra-powerful 2.5 GHz quad-core Snapdragon 801 processor goodbye, as the Goophone is powered by a measly 2GHz octa-core MediaTek chip. The Goophone also uses a 13-megapixel rear-facing cameras as opposed to the Galaxy S5′s 16-megapixel camera.
Another major drawback to the so-called Goophone is its lack of LTE; it uses strictly 3G technology. This will likely be a huge disadvantage for most U.S. residents, but individuals living in countries where LTE is nonexistent won’t find any issue with the Goophone’s pure 3G technology.
So, how much does the Goophone cost? While their website states the device is currently out of stock, it’s priced at $299.99. There’s still no word yet on pricing for the Samsung Galaxy S5, but reports suggest will cost around $699.99 without a contracting. The Goophone may seem attractive with such a low price, but you have to ask yourself if it’s really worth it. Personally, I don’t believe the savings alone is enough to make me choose it, but apparently it’s popular enough for the knockoff device to sell out.
Goophone has always been forward best smartphone. With new design, this new generation Goophone S5 you have never seen it. Goophone S5 is world’s first smartphone powered 2GHz MediaTek MT6592 true octa-core processor, along with 2GB DDR3 RAM, bring better operating experience to us.”

What do you think about the new Galaxy S5 knockoff? Let us know in the comments section below!
Publisher: Unknown - 21:58

Thursday, 4 September 2014

, , , , ,

How to Transfer Media from one Samsung Galaxy device to another Galaxy Device - Samsung Geeks AMANAHAD

One of our favourite things about the launch of the Galaxy S4 is the high quality support which Samsung has provided with it. Although this isn’t perfect [yet], Samsung are really moving in the right direction – trying to help consumers understand the technology they provide and simplify what might have been quite complicated processes. Along with the Galaxy S4 launch, they have provided “Samsung Smart Switch” Mobile which lets you quickly and easily transfer you data from one Samsung Galaxy Device to another.
Currently this will only work with devices such as the Galaxy Note 2, Galaxy S3 and Galaxy S4, which have NFC chips. Quite frankly – this software is awesome.

Tutorial

Samsung Smart Switch Mobile TutorialSamsung Smart Switch QR Code
Download Samsung Smart Switch onto both of your Galaxy Devices. You can find it by either scanning the QR code above, or following this link.

Step 2: 

Samsung Smart Switch Mobile Tutorial
Ensure that NFC is turned on on both Galaxy Devices and run the application.

How to Turn on NFC:

Turn on NFC by Navigating to “Settings”. On the Galaxy S3 and Note 2, you should be able to Find it by going to Settings > More Settings > NFC Toggle 
Samsung Smart Switch - NFC
One the Galaxy S4, you will be able to toggle NFC from the “Connections” tab in Settings:
Samsung Smart Switch - NFC

Step 3: Samsung Smart Switch Mobile Tutorial

Touch the back of the devices together. You should feel them vibrate and, if you have the sound on, a little “ding” to confirm that the device are in contact with each other. At this point, you’ll need to tap on the screen of either of the device to set up the WiFi Direct connection which will allow you to migrate your data. Leave the devices touching while it does this.
Samsung Smart Switch Tutorial

Step 4:

Samsung Smart Switch Tutorial
Select exactly what it is that you want to transfer. Samsung Smart Switch Mobile will allow you to transfer Contacts, Calendar, SNotes, Pictures, Music, Videos and Documents – so it’s pretty comprehensive. For music and video – it will only transfer files which are DRM Free. DRM (Digital Rights Management) is security software put into the music/video files which is supposed to stop piracy, though more often than not it just stops you being able to use content you have paid for on your own devices. Herumph.
Samsung Smart Switch Tutorial

Step 5:Samsung Smart Switch Mobile Tutorial

The final step is to press “Transfer” on the device where your content is and then press “OK” to confirm on the device you want to send the content to. Once this is done, sit back and let all the data transfer across from one Galaxy Device to Another. If you are transferring a lot of video files, music and images, this can take quite a long time – so go and put your feet up and check out some of the other cool features of the Galaxy S4 while you wait!
If you have any problem then leave comments I'll solve it.
by
AmanAhad
Publisher: Unknown - 01:12

Monday, 1 September 2014

, ,

How to Install Ubuntu on Your Nexus One/Android! AMANAHAD


 UPDATE: I’ve made a new site called AndroLinux.com to dedicate to Android on Ubuntu.

(World’s first installation of Ubuntu on an Android smartphone! WHOOHOO!)
This guide is for those of you who want to install Ubuntu as a sub-system under your Nexus One or any other rooted Android smartphone, I’ve tried to make it easy as possible for everyone.
UPDATE: Now Ubuntu is also available on HTC Evo 4G!
As you can see, I’ve used a rooted Nexus One here but you could have trouble with other Android phones as not all Android phones are built exactly alike but might work well also, you never know until you try it.
I am also working on Ubuntu on my rooted HTC Evo 4G, that should be available later this month over at HTCEvoHacks.com.
You could probably also run Ubuntu directly off your Nexus One/Android phone but that probably means not being able to use it as a phone and you probably would lose your camera.
To be on the practical side, I think it’s ideal to run Ubuntu along with your Nexus One/Android phone as I will be showing you here.
This Ubuntu install will not affect your existing Android system, the Ubuntu terminal will run in the background while the Ubuntu X11 graphical user interface will run as an app under Android VNC app.

Why are you installing Ubuntu on your Nexus One/Android phone?

Being able to have Ubuntu on your Nexus One/Android phone means that you can run native Ubuntu/linux applications off your phone!
I also see many uses in college engineering classes when they are studying Ubuntu/linux.  Instead of heading to the lab or having dual-boot on their computer, students will be able to use their Nexus One/Android phone as a test device.
Even for web designers, their Android phone can become a portable test web server to test out their new designs.
The list will go on and there’s absolutely no reason why we shouldn’t run Ubuntu or other linux systems on Android phones.
Lastly, for open-source people like me, free code is priceless, it’s going to be what’s driving the world in the next 10-20 years, if it ain’t already.
I don’t want to bore you with my philosophy so let me show you step-by-step how to install Ubuntu on your Nexus One.

How to Install Ubuntu on your Nexus One/Android Phone!

Before anything, download ubuntu.zip and unzip it:
Download ubuntu.zip
(Please feel free to mirror other places if you’d like!)
1. First, you will need a rooted Nexus One/Android phone.  If you have a Nexus One, go follow these directions and root your phone first!
UPDATE: Also, you need to install the latest Busybox, try this guide here to install Busybox.
2. Once you have a “rooted” Android phone, you will be able to run Ubuntu under Chroot.
What is Chroot?
I just found about this myself the other day while doing this but Chroot in layman’s terms is basically the ability to run other operating systems under your current system (in this case Android).  Chroot was initially developed to test new operating systems in a virtual environment but will work perfectly in this case for our project here as it will allow us to use Ubuntu as a “virtual” machine under Android system.  Yes, just think of it like Sun Virtualbox or VMWare for Android and other linux systems.
On one more note, you can only “chroot” another operating system made for your system’s architecture.  For example, most new Android smartphones including Nexus One, HTC Evo 4G, and Droid X all use ARM architecture CPU, meaning you can only use ARM-based linux systems/ports.
In this case, we are lucky because Ubuntu has an ARM-port.   It’s most likely the case that you can also “chroot” other linux devices that support ARM.  I am also working on chrooting other popular distros like Fedora, Gentoo, and more.
3. Now you understand what Chrooting is, let’s copy over the files we need for chroot.   These files include an image file of Ubuntu ARM (basically root filesystem that can be mounted onto Android phone using the command mount), setup script file (ubuntu.sh), chroot boot/launch file (bootubuntu), unionfs, fsrw, and mountonly.
Copy these six files over into your SD card’s root folder under folder name “ubuntu“.  Or you can just unzip the file I provided and copy the ubuntu folder over to your SD card’s root folder.

(Yup, I am already working on other Linux distros!  But Ubuntu is my favorite.)
The script files were modified (by myself) from other instructions on the web on installing Debian to a G1 phones (thanks to Saurik).   Btw, Debian and Ubuntu are pretty much the same linux as Ubuntu is just an extension of Debian so you should be able to easily run Debian too using the same method, just change the file names.
4. Before we go any further, make sure to “Turn off USB storage” on your phone so we can access the SD card from ADB Shell.  Let’s also make sure your USB Debugging mode is checked under Settings->Applications->Development.  (And yes, don’t forget to connect your Nexus One/Android phone to your computer via USB!)
5. I am assuming you’ve already installed the Android SDK (while you were rooting your phone) so let’s head to your Android SDK directory and load up ADB Shell.
For Windows, go to your Android SDK Tools directory such as c:\sdk\tools and type “adb shell“.

(FYI, cd is the command you can use to browse to your sdk\tools directory.  For Windows, do cd \sdk\tools and for Mac/Linux, do cd /sdk/tools.
For linux and Mac, go to your Android SDK Tools directory such as /sdk/tools and type “./adb shell” or it can also be “sudo ./adb shell” for Ubuntu.
6. Once you are in the ADB shell, you should see a “#”symbol.  Great, let’s start bootin’ Ubuntu right away.
7. Type “su” to enter superuser mode.  Btw, if you get error on this part, that means you have not rooted your phone! (or you might have to installed a rooted ROM.)
8. Next, type “cd /sdcard/ubuntu“, which will take you to the directory where you’ve copied the Ubuntu files over to.
9. Type “sh ./ubuntu.sh” to run the setup script.  You only have to run this once or whenever you change the script file bootubuntu.

10. Once that completes, type “bootubuntu” to “chroot” or boot into your new Ubuntu on your Android!

If you get the “localhost” sign, congratulations!  You’ve just installed Ubuntu on your Nexus One/Android phone!
If you didn’t get that and you got an error falling back to the ground at 200MPH back at the “#” symbol, don’t worry, I did that about a thousand times for 2 days straight, you are not alone.
Try rebooting your phone and repeat steps 5 through 10 CAREFULLY and I am sure you will get it working.  A lot of times, our eyes can lie to us while following step-by-step directions, really!
Also, if you are not using a Nexus One here, you could be running into other problems as I have still not yet been able to chroot into Ubuntu on my HTC Evo 4G.

How to Get X11 GUI up and running on your Nexus One/Android Phone!

11. I actually prefer the command line over GUI because it saves so much memory and I am pretty proficient doing things in the terminal but the GUI gives you a full desktop experience over Ubuntu so first, you will need to download the latest version of Android VNC Viewer in form of .apk file.  After downloading it on your phone (or copy it over to your SD card after you download it on your computer), open it up and install the app.
12. You will next need to install some files via Ubuntu apt-get installer.  Go back to the chrooted Ubuntu terminal and type:
apt-get update
to update your Ubuntu packages then:
apt-get install tightvncserver

to install the TightVNCServer and:
apt-get install lxde

to install the LXDE.
13. Next type:
export USER=root
vncserver -geometry 1024×800

Here you can set your password to VNCserver like I did as “123123123“.
*Note – You can also change 1024×800 to the exact resolution of your Android phone’s LCD resolution but I found that a bit higher resolution gives you better display, so the Nexus One has 800×480 but I set it to 1024×800 for better viewing.
Next, we are going to add the following to /root/.vnc/xstartup file using cat command:
cat > /root/.vnc/xstartup
#!/bin/sh
xrdb $HOME/.Xresources
xsetroot -solid grey
icewm &
lxsession

Then hit Ctrl+D twice and Enter key.

14. Next open up the Android VNC app on your Nexus One/Android phone and enter the password you set earlier in step 13 and set the Port to 5901.
15. Next hit connect and voila, you should get something like this, a cool GNome Ubuntu screen!!!
16. Now, let’s setup your chrooted Ubuntu so you can make the VNCserver run everytime you start the chrooted Ubuntu.
17. Next, let’s add some code to the /root/.bashrc file, which runs at every boot of your Ubuntu so the VNCServer runs automatically when you start the Ubuntu.
cat > front
export USER=root
cd /
rm -r -f tmp
mkdir tmp
cd /
vncserver -geometry 1024×800

Then hit Ctrl+D twice and Enter key.

Next, we will concatenate the file we just made front and /root/.bashrc into a new file called temp:
cat front /root/.bashrc > temp
Then we will copy the new file temp over the existing /root/.bashrc.
cp temp /root/.bashrc

(I used Windows command.com terminal, which keeps echoing things twice.  It only happens on Windows because of echo!)
*Note – The reason why I used cat command to do everything here is for Windows users because the vi text editor doesn’t function correctly within Windows shell.  But you can always just use your favorite Ubuntu text editor if you are using Linux or Mac.  (Just add contents of file front into the beginning of /root/.bashrc This way, I only have to write one howto manual that works for every platform.  For Windows users, you can also install SSH (do “apt-get install openssh-server“) and use an SSH client such as PuTTy.)
To check that it’s working you can exit out of Ubuntu back into Android shell:
exit
then boot Ubuntu back up:
bootubuntu
Now everytime you chroot/boot your Ubuntu, the VNCServer is start automatically at start-up.
You can use Terminal Emulator app (freely available on Android market) to start the Ubuntu chroot by entering:
su
bootubuntu

so you don’t need to connect  to ADB shell to launch Ubuntu, giving you the freedom to use Ubuntu along with Android whereever you go.
That’s it!

BOOTUBUNTU UPDATE FIX

UPDATE: For people having trouble getting it to work (thanks to people testing it at XDA Developers), try downloading the new bootubuntu file here then:
Go run the ubuntu.sh by doing on ADB shell:
su
cd /sdcard/ubuntu
sh ./ubuntu.sh
then
bootubuntu
Publisher: Unknown - 16:32

Friday, 17 January 2014

, ,

Top 5 New Photo Editing Apps For Your Android

Graphic designing and photo editing applications are widely used to enhance the look and feel of photos and to make changes like deleting or changing background, increasing brightness, cropping pictures or any other changes. Due to all these photo editing apps, now a day’s most of the people having a semi-professional camera take pictures or may be taking pictures with their Smartphone camera. Such photo editing tools have minimized various expenditures involved in photography by large. If you have Android, you may simply download the desired photo editing app from Google Play Store.
Each photo editing app is explained blow to give you a clear idea about various features and packages:

Color Palette Applications

1. Image Color Picker

 apps for photo editing Top 5 New Photo Editing Apps For Your Android
With your Android, now detect and identify the true color(s) that appeals you. The identification about your favorite color may simplify its usage in apps. Simple touch for the desired color, you will get full details from its built-in library. The information may consist of its full name, range, and color number etc

2) Magic Color Picker

photo editing app Top 5 New Photo Editing Apps For Your Android
Magic Color Picker is an enhanced color selection tool and is very useful for designers, artists and programmers for selecting their target colors from color models. The app supports 7 different color modes including RGB, HSV, HSL and YUV. Palette and sliders are available for quick adjustment. Colors are coded in both decimal and HEX.

3) Superdry Color Picker Demo

photo edit android Top 5 New Photo Editing Apps For Your Android
Rich color library is a must for graphic designers as they use colors from available library. Superdry Color Picker is such color picker library for Android and contains a huge color vocabulary.

4) Color Pal

android app for photo Top 5 New Photo Editing Apps For Your Android
Color palettes are essential while dealing with different graphics. Whether you’re a professional designer or occasional user and are just looking to paint your son’s room, you all need a complete color palette for different coloring schemes. The app contains HEX, RGB and CMYK color values for reference and quick use.

5) Color Palette – Iromihon

android apps Top 5 New Photo Editing Apps For Your Android
While working on a design project, often it is required to have a flashlight. Iromihon is a color tool used to adjust and to see picture on full screen.  In addition, the app works as color light (flashlight). It comes in three color modes namely RGB, HSB(HSV) and HSL(HLS) with two categories as Web Color Names and User Colors.
 Post by AmanAhad about me
Publisher: Unknown - 02:56

Wednesday, 18 September 2013

, , ,

How to Install Android on Your PC | AMANAHAD Tech


How to Install Android on Your PC

It used to be the case that PC users had the choice of installing Windows or, if they were feeling adventurous, a version of Linux. This is still true, but it is now also possible to install OS X without owning a Mac and virtualization means that you can do all of this alongside your main operating system in a virtual computer.
This being Android.AppStorm, you may well wonder what virtualization has to do with your phone or tablet. Well, how would you feel about the chance of installing and running Android on your PC? Using a free copy of VirtualBox and the information in this guide, you can run a fully functioning – and legal – version of Jelly Bean on your computer.

Like the article? You should  follow us on twitter.

It’s a Simple Process

First, you’ll need to grab yourself a copy of VirtualBox. This powerful virtualization utility can be used to install a second operating system alongside your primary one, and while this usually means running a second copy of Windows or trying out Ubuntu, there’s no reason why you shouldn’t be able install a mobile operating system as well.
Android may have been designed for your phone and tablet , but that doesn’t mean it needs to stay there.
Once you have the virtualization software up and running, you’ll need to get hold of a copy of Jelly Bean to install. This does not mean that you need to obtain an illicit copy of the operating system from an untrustworthy website, or rip a copy of your phone’s ROM – it is actually freely available.

Step 1: Grab an Android ROM

There are various versions of Android available for download, but it makes sense to work with the most recent version – Jelly Bean. Head over to the Android-x86 website scroll down to the Android-x86-4.2-devel section and click the View link for the most up to date version (at time of writing this is 4.2 20130228).
There are several Android ROMs available to download including the latest version of Jelly Bean.
Weighing in at just under 200MB, the download will take a moment to transfer. Once you have the ISO file on your hard drive, you’re ready to set about the task of installing it in VirtualBox.

Step 2: Going Virtual

Pay a visit to the VirtualBox download page and click the link to download the software. Here, I’m working with Windows 8, but VirtualBox is compatible with older versions of Microsoft’s operating system, and there are also versions available for OS X and Linux.
VirtualBox can be used to install a second operating system on your computer, including Android.
Once downloaded, run through the installation of the program  – just accept all of the default options. Don’t be concerned when you’re asked to install a new network adaptor as this is part if the usual installation process.
A virtual network adaptor will be installed by VirtualBox to allow virtual machines to get online.
Once installation is complete, launch VirtualBox and you’re ready to move to the next stage.

Step 3: Create a Virtual Machine

You’ll need to start by creating a new virtual machine onto which you will install Android. Click the New button. Name the virtual machine whatever you like, and (as Android is based on Linux) select  Linux from the first drop down menu. From the Version menu select Other Linux and then click Next.
Android is a Linux-based operating system and it needs to be correctly identified in VirtualBox.
Move the memory slider to the right so that 512MB or more of RAM is set aside for VirtualBox and click Next. Make sure that the Create a virtual hard drive now option is selected and click Create. Select VDI, click Next and then select the Fixed size option before clicking Next.
You can then use the slider to choose how large a disk should be assigned to the virtual machine, and you can use the folder button to choose where it should be stored. Click Create when you’ve configured your settings — it might take a few minutes for the virtual disk to be created.
Your virtual Android device can be assigned a drive capacity of your choice -- go wild!
Your virtual Android device can be assigned a drive capacity of your choice — go wild!

Step 4: Install Android

Make sure that you have your newly created virtual machine selected and then click the Settings button in the toolbar. Click the Storage link to the left hand side of the dialog and then towards the center click the Empty entry in the Storage Tree section.
To the right of this, click the small disc button and select Choose a virtual CD/DVD disk file from the menu that appears. Navigate to the ISO file you have downloaded, select it and click Open followed by OK.
The ISO files you've downloaded can be used as a virtual CD to install Android.
The ISO files you’ve downloaded can be used as a virtual CD to install Android.
Power up your virtual machine by clicking the Start button in the VirtualBox toolbar.
If this is the first time you’ve used the program you may see a message letting you know about mouse capturing. When you move the mouse cursor inside the virtual machine window you’ll find that you cannot move it back out to control Windows as you normally would – just remember to press the right hand Ctrl key to free up the mouse when you need to.
Use the arrow keys on your keyboard to scroll down to the Installation option and press Enter.
Android can be run without installation, but opting to install provides a better, faster experience.
Now you will need to configure the virtual hard drive so that there is somewhere to install Android to. Select the Create/Modify Partition option and press Enter.
Select New at the bottom of the screen and press Enter, and then select the Primary option before pressing Enter again. Press Enter to create a partition that occupies your entire virtual drive.
Configuring hard drives for Android may seem complex, but it takes just a few moments.
Now select the Bootable option and press Enter, select Write and press Enter, and then type the word yes before pressing Enter once again. Select Quit, choose the partition you’ve just created and press Enter.
When prompted, select the option to use the ext3 file system and select Yes to confirm your choice. The GRUB bootloader takes care of launching Android, so select Yes to install it and then select Yes again to make the /system directory writeable.
The correct drive format must be selected for Android to work properly, so take care during configuration.
It won’t be long before Android boots, and at this point you should remove the virtual CD from the drive. Click the Devices menu and select CD/DVD Devices followed by Remove disk from virtual drive.
It's a slightly time-consuming process, but getting Android on your PC is very rewarding.
It’s a slightly time-consuming process, but getting Android on your PC is very rewarding.

Step 5: Almost There!

You might find that Android takes a little while to boot up — at least the first time around — and you’ll then have to run through the initial configuration just like you did the first time you switched on your phone or tablet.
Should you find that your mouse does not work and you are unable to click within Android, click the Machine menu in Virtual Box and then click Disable Mouse Integration. You may also find it useful to click View followed by Switch to Scale Mode if you find the mouse acts erratically — you can switch back to regular mode by pressing the right Ctrl key and C at the same time.
The first time you run Android you'll have to set it up just like you did on your phone or tablet.
The first time you run Android you’ll have to set it up just like you did on your phone or tablet.
You can ignore any steps related to connecting to a wireless network as VirtualBox will just make use of your computer connection without the need for additional configuration.
Running Android within Windows can feel strange to start with, but it's also great fun!
Running Android within Windows can feel strange to start with, but it’s also great fun!
Now it’s time to pay a visit to Google Play and start downloading apps! Let us know how you get on, particularly if you think up any interesting uses for a virtualized copy of Android.

by AmanAhad
Publisher: Unknown - 04:02