Powered by Blogger.
Showing posts with label Android Tricks. Show all posts

Thursday, 30 October 2014

, ,

How To Set Galaxy S3 Notification LED Color and Flashing Frequency | AMANAHAD Tech

how to set galaxy s3 notifications
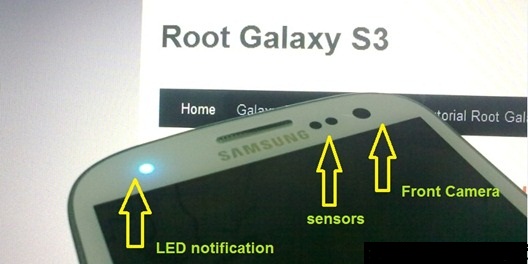
We know that Samsung galaxy s3 today is very popular. And the graphic sells of galaxy s3 from mei until june 2012 has sell out for more than 10 millions. In my opinion galaxy s3 also has an awesome design. Galaxy S3 has a LED notification that followed by a sensor and a front face camera On the top of it. the part that i very like most is LED notification. Galaxy S3 LED notification will make you easy to know the status of your phone. whether you receive email, Gmail, miss call, low battery and more. And it will provided to you without press the power button (turn on s3 screen from sleep) and enter password, you can get all of the status just by looking at flashing frequency and the LED notification light color.

to enable LED notification is very easy just go and set at settings>LED indicator. On there, you can enable the LED Light up when device is connected to charger, when you has missed call, battery is low, messages or any application events.


It sound good right?. But unfortunately this galaxy S3 LED notification default system setting doesn't allows you to set flashing frequency and the LED notification color. If you have rooted your galaxy s3 (see tutorial how to root Galaxy S3), will let you go set the LED notification by go to the system file and manually set it. But if you don’t want to root your galaxy s3 because it will remove your warranty, you can use application- Light Manager to set the LED notification and flashing frequency on your Galaxy S3. Light Manager is an application that you can find on google play store that will allows you to give control of your the flashing Frequency and notification LED colors. I have tested it, this is free application, Light Manager on my Galaxy S3, it works perfectly. hope you enjoy will love it too :D.

download light manager


Download Light Manager

Important: If you want install Light Manager apk, remember to do this before, please go to Settings > Security and lock screen > Unknown Sources to allow installation of non-Market apps.

by Triple A A-@-A
Publisher: Unknown - 13:35

Sunday, 26 October 2014

, ,

[Official Firmware] Samsung Galaxy S3 Neo+ GT-I9301I I9301IXXUANC6 Official 4.4.2 KitKat Firmware | AMANAHAD Tech


[Official Firmware] Samsung Galaxy S3 Neo+ GT-I9301I I9301IXXUANC6 Official 4.4.2 KitKat Firmware


[Official Firmware] Samsung Galaxy S3 Neo+ GT-I9301I I9301IXXUANC6 Official 4.4.2 KitKat Firmware


Manufacturer: Samsung
Model: Galaxy S3 Neo+ GT-I9301I
Android Version: 4.4.2 KitKat
PDA: I9301IXXUANC6
CSC: I9301IPHNAND1
Modem: I9301IXXUANC6
Changelist: 1036356
Status: Official
Downloads:


"Learn How To Flash An Official Firmware For Samsung Devices"

Well guyz this is the complete tutorial/guide that "How an Official Samsung Firmware is Installed/Flashed on a Samsung smartphone/tablet" , the method is very easy to perform and I have made it more easy for the newbies who don't know what is flashing, Odin etc. Some time the phone software update is late or not available in the area so with this tutorial you can Install the latest Official Samsung released firmwares on your device.


1. Drivers Setup
Well for connecting any device to PC it is must to first install its drivers for the device than connect that. so for Samsung Devices you should install these both.


2. Odin
This is a software through which we can flash a custom .tar etc files. Now it is must to have this software on PC
a. Odin (second link if first didnt work) All versions all available in folder.


3. Flashing A Firmware
To flash an official firmware for Samsung Device. first you should put your phone in download mode. By pressing Volume Down + Power Button + Home Button (varies with deviceat the same time for some time when the Warning! screen appears. then leave them and press Volume Up button so download mode starts. as shown in image.
                          [the first Warning!]                                        [After pressing Volume Up button]

When the second screen appears so connect your phone/tablet to PC. and then Open Odin tool. any version. as shown in image
[ this is a 3.4 version of odin you can try any one ]


When you connect your phone so there will be a message shown in message box i.e <ID:0/010> Added so it means that your phone is connected properly if Added not shown so try it again, then check on PDA check box and click PDA button and pick up that firmware file which is .tar/.md5 etc and wait if it was checking it. then click Start. the progress will be done and your phone will be restarted several times during flashing. after completion Pass message will be shown in above boxes. thats it.


by Triple A A-@-A
Publisher: Unknown - 19:35

Wednesday, 8 October 2014

, , ,

Top 5 Apps to Lock Down Your Text Messages And Images | AMANAHAD Tech

Privacy is a concern for most people these days. Whether you are looking to keep your information private from a snooping coworker or a nosey boyfriend or girlfriend, there are apps to help. The problem is, some of the apps are just plain awful. What I will go over today are some good apps to use for keeping texts and images from being easily accessed.
Some of the apps in this list have some built in functionality for just such a task. Others may need to be unlocked by purchasing the pro version. Others yet are made specifically for hiding SMS messages or images from any prying eyes.
GO SMS Pro is a really popular app. In fact, it is the one I have used off and on for couple of years. One feature I didn’t really know about was the ability to have private contacts. In a nutshell, you can take a contact, a potential employer for example, and place them in your private inbox. If they send you a text message, you will need to unlock the message before it can be read.
hide-sms-go-sms-pro
When you have the premium version of GO SMS Pro, you can hide the private SMS inbox from the menu and unlock more of the settings to make it more difficult to access. What I like here is the ability to rename the SMS vault inbox to something a little less conspicuous.
Very recently I talked about Hi App Lock. This is a good option for locking individual Android apps for better privacy. You can easily use Hi App Lock to lock down anywhere you feel an onlooker may be able to access the information you’d like to keep private. Think about how often you leave your phone or tablet on your desk or in your car or backpack unattended. If your Android device was stolen, what would people be able to see and/or do with the information they find?
hide-sms-hi-lock-app
Do you send messages to someone you aren’t supposed to? Are your work text messages or images you take with your work camera confidential? No reason for you to have information leaked just because you set your phone down.
Vault is an app that’s come a long way in the past couple of years. When I first tested it, all you could do was hide images and it wasn’t all that great at it. Now Vault has evolved into more of a privacy control center. With the free version, you can encrypt your images, you can also encrypt a limited number of text messages too.
hide-sms-vault
A feature I really thought could be helpful is the option to link your Facebook account and encrypt your Facebook messages. When you send a Facebook message to someone, they will be able to read it, but the message doesn’t show up in your conversation history.
Secrets is similar to Vault because you can hide images or other files. It’s different because the Secrets doesn’t show up in the Android app drawer. Opening Secrets is done by going to your phone dialer and typing the default 1111 and pressing send. You will be prompted to enter a code then you can see your hidden files. Having an app for just your images can be nice, especially when you might have taken or received some images you might not want anyone to know about.
hide-sms-secrets
Hide SMS is just for hiding text messages. Hiding the messages is as simple as long pressing the message and opting to move the message to the hidden inbox. When a new message arrives, You will see an inconspicuous message in your notification bar saying KeepSafe updated. When hiding a current thread, the app may not move your images over. They didn’t on my Samsung S3.
hide-sms-keep-sms
People have many different reasons for wanting to keep their communications private. The above apps are there to help. I would recommend trying some of the all-in-one apps for an ease of use standpoint. When you have too many apps on your phone for similar tasks, it can get confusing and could even slow down or cause conflicts with each other

by Triple A A-@-A
Publisher: Unknown - 00:19
, ,

How to Remove Picasa Albums From Your Gallery | AMANAHAD Tech

How to Remove Picasa Albums From Your Gallery
If you’re anything like me, you get easily irritated by all the Picasa Albums that appear in your Gallery. Thanks to Google account sync, and to the fact that every image you post to Google+ somehow ends up creating its own album on Picasa, your Gallery looks like a never-ending string of albums that contain one or two images each thanks to Picasa.
If all you’d like when you open the Gallery is to see the photos that are actually stored on your device  — and the SD card if you’re using it — then follow this walkthrough to get rid of all the Picasa albums.


For a long time, I’ve used QuickPic to browse my photos on my phone because of its speed, editing options, and the fact that it didn’t show me all my Picasa albums. However, with Android becoming quite fast and efficient now, as well as integrating photo editing by default, I had less and less reasons to resort to QuickPic. The only thing holding me back from using the Gallery daily were the Picasa albums, but no more.
Gallery with locally stored albums but also Picasa albums

Step 1: Stop Picasa Web Album Sync

The first thing you’ll need to do is go into Settings on your device, look for the Accounts section and click on the Google account. Select your email address and deselect the “Sync Picasa Web albums” option.
Disable Picasa web album sync
Keep in mind that stopping the synchronization won’t affect Google+ Instant Upload for photos, and it won’t delete your Picasa images from the cloud. It will just stop these albums from sync’ing to your device and appearing in your Gallery.

Step 2: Clear Gallery Data

Now that Picasa has stopped sync’ing to your phone, new albums should not appear in the Gallery anymore. But the albums that have already been synchronized are already there. That’s why you need to clear the Gallery data.
Go to Settings, Applications Manager and swipe to the 3rd tab (All). Scroll down to Gallery and click it. There, you will be able to “Clear data”.
Click "Clear Data" to force the Gallery to refresh
Click “Clear Data” to force the Gallery to refresh

Step 3: Let the Gallery Refresh

At this point, you’re basically done. All you have to do is open the Gallery and wait for it to refresh and rebuild its thumbnails. If you don’t have a lot of photos stored on your device, this will be almost instantaneous, but you’ll need to wait a few seconds if you have a big collection of photos.
The Gallery is now clean and only shows local photo albums
It’s quite an easy thing to setup, and the benefits are remarkable especially if your Gallery is littered with Picasa albums that make it harder and harder to find the photos that are stored locally on your phone.
What about you? Do your prefer to have your Picasa albums sync’ed and visible inside your Gallery, or do you access them from Google+ and prefer this method of keeping your Gallery tid
by
     Triple  A     ( A-@-A)
Publisher: Unknown - 00:02

Saturday, 20 September 2014

, , , ,

Samsung Galaxy S3 and Galaxy S4 rumored to get Kit-Kat treatment, no time is given


Android 4.4 Kit-Kat and the new family member of the Nexus family Nexus has just become official few days back and everyone is waiting for the Android 4.4 Kit-Kat update for their Smartphones. After the release of the Android 4.4 Kit-Kat, the Smartphones manufacturer came into the race of updating their flagships to the latest Android Chocolate Bars. A few days back, a tweet revealed that Samsung testing the Android 4.4 Kit-Kat on the Galaxy Note 3 which makes clear that the Galaxy Note 3 will be the first Smartphone from Samsung to get the Android 4.4 update.

Galaxy S3 and Galaxy S4 Android 4.4 KitKat

Samsung has just released the Android 4.3 JellyBean for the Galaxy S3 and the Galaxy S4 but now we have some great news to share with you which came from the rumors that the Samsung Galaxy S3 and the Galaxy S4 will also get the Android 4.4 Kit-Kat treatment in the future but unfortunately no particular month or day is given in the rumors. Rumor also added that this update is going to be huge and will bring major changes to the system of the Samsung Galaxy S3 and the Galaxy S4. All of this information is just a rumor but it also makes a sense because the Korean OEM is doing very well on their update platform and these two devices will definitely get the Android 4.4 treatment but again we could stop here because as said by the Google that the devices that are more than 18 months older on the markets will not get the taste of Kit-Kat bars and the Samsung Galaxy S3 is now 18 months old, so here is a doubt on the Galaxy S3 Kit-Kat treatment.

We are looking to get some words on it by some official or reliable sources though this information has the ability to make the users of the Galaxy S3 and Galaxy S4 happier.

Please be noted that this information is not linked to any official or reliable sources, so don't take it too seriously.
by Triple A A-@-A
Publisher: Unknown - 12:41

Sunday, 14 September 2014

, , , ,

How To Monitor Mobile Phone Remotely – Complete Guide

How to monitor mobile phone:
This post is based on How To Monitor Mobile Phone Remotely, Mspy is basically the best & cheapest Cellphone spyware currently used in market. This review is step by step guide on how to use Mspy to monitor Mobile phones Remotely. mSpy is the latest innovation in monitoring software, It’s functionality works seamlessly across all these platforms. It give’s you much better visibility & control of what’s going on in your home and the lives of people you care about.
.
Untitled

What Is a Cellphone Spyware:

Spyware or we can say key-logger is a kinda tracking software which once installed on mobile phone will record all the data e.g sms, calls, mms, emails and other useful information which is then sent to a hacker. Attacker can easily gain access to credential and track location.
Untitled

Why Mspy:

Mspy is basically most featured Cellphone Spyware which takes full control on victim’s mobile with outstanding functionality.
Following features in Mspy
  • Listen to incoming and outgoing calls
  • Skype and WhatsApp tracking
  • Monitor Internet Activities
  • Read Chats & Instant message ( Facebook, messenger )
  • SPY on Calls, Sms & Emails
  • Track GPS Location
  • Record Surroundings
  • Control apps and Program
  • Multimedia files
  • Easy To access Remote Control
  • Completely  Undetectable
  • View Online Logs
  • Compatible with almost every Smartphones (IOS, Android, Blackberry, Symbian , Windows )
and much more. !!!
.

Download Link :

You can download Mspy from the following link Download here
Number of months are to be selected, select according to that.
Untitled
.

Can I Monitor Multiple Cellphones:

Yes by selecting Business plan from below link, Multiple Mobile Phones can be Monitored Download Mspy Business 
                                                   
.
.

How To Install Mspy on Victim’s Phone:

.
Step 1:
  • After Purchasing Mspy, You’ll get an E-mail containing password of Control panel.
  • Check out Demo Version : here
  • Logging in to your Control panel to follow Wizard’s instructions.
.
Step 2:
  • Wizard will ask for Selecting Operating System of victim’s mobile.
  • install the surveillance software on that mobile, It might takes several minutes.
.
Step 3:
  • Combination code will be shown by wizard.
.
Step 4:
  • Dial the Combination Code you received from Victim’s mobile.
.
Step 5:
  • Data captured can be viewed by the software online.
 Untitled
.
Step 6:
  • If settings are fully configured then you’ll start receiving logs in few minutes.
  • Congratulations! Target Phone has been Hacked and every single activity is now being monitored.
.
No Anti-Virus is capable to detect mSpy software. It’s main popularity reason is it’s undetectability. Once it is installed on Victim’s mobile then it cant be detected.

Untitled

Publisher: Unknown - 15:57
, , , ,

How To Download Android APK Files Directly From Google Play? | AMANAHAD Tech

  Regularly, people get applications for their android system by downloading them from Google Play Store. The downloader gets the app installed for you, without bothering you with unnecessary details like the files required for installation etc. But what if you don’t have access to internet and you want an app installed on your phone? Confidently you can’t do so without downloading stuff required for the installation. The key to this problem is simple - just get the APK package of the desired applications, and keep it beforehand for later when you need.

  It’s a package which contains all the files required for connection. In other words, it’s a ‘standalone’ installer for your app which doesn't require internet connectivity. You can get APK package of an android application from Google Play Store by simply adding an extension called ‘APK Downloader’ to your Google browser. Here we have a step by step procedure which will tell you how to add APK Downloader to your Google Chrome and subsequently, use it for getting APK packages


  For download this extension goto apk-downloader-1.4.3_2 


  After downloaded, the extension is to be added to your Google Chrome Extensions. To do so, follow these steps.
  How to install:
- For Chrome 33 or later:
1.      Extract downloaded zip to a folder
2.      Enable Developer mode in Extension page
3.      Click the “Load unpacked extension” button

4.      Locate the folder you create above and click OK

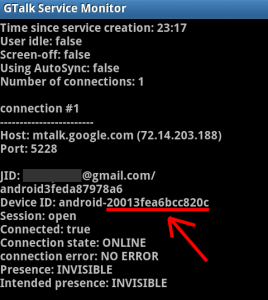
Open dial pad, call *#*#8255#*#* ( 8255 = TALK ). If it opens “GTalk Service Monitor”, find lines that begin with JID and Device ID. Your email is JID, and your device id is a string that after android- prefix
For example: if it shows android-1234567890abcdef , then your device ID is 1234567890abcdefDevice ID
After this Enter your email’s password, then press Login. If everything is ok, now you can use APK Downloader
After finished two steps above, you can start using APK Downloader. Open Android Market, view any FREE apps, then press the APK Downloader icon on address bar ( see screenshot )

Publisher: Unknown - 15:48
, , , , , , , , ,

How to Speed Up Android Smartphone (The Ultimate Guide) | AMANAHAD Tech


Android Smartphones has gained lot of popularity in recent years. Many people around the globe now owns an Android Smartphone. Everyday more and more Android Smartphones are poured into market. It is available from high end to low end smartphones But even with newer versions of Android OS , even with high end smartphones,one thing remains same, their user experiences sluggish phones in short amount of time. The Android development are still under construction. So you can either sit around hoping for a update or patch to solve lagging issues. In meantime, you can use your smartphone as paperweight or something like that till patch comes, but it is a long shot Or you can take matters into your own hand and fix the issues using steps given below.


1.Do It Daily!

  • Restart your phone daily once or twice. Yeah,it's sounds weird but restarting phone means all application process will restart too. It will remove any unnecessary process,clear clipboard and some other things which don't matter. All matters is you will have fast smartphone.
  • If your smartphone have high heating issues, keep it off for few minutes. When many processes are running same time,it increases the heat. You will experience lot of lagging under that condition. This method is not very effective but it helps.
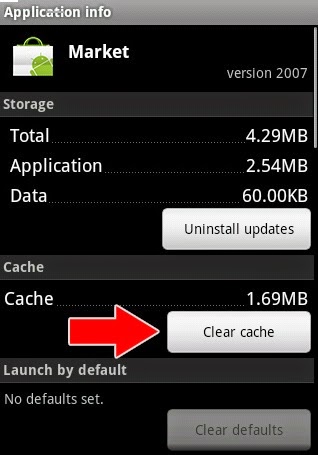
  • Clear App Cache: Clear the cache of application you using more than any other. Those apps will have more data cache than any other cache. App cache is data of particular app. You can remove it by Settings > Applications > [ Select your App ] > Clear Cache Note: Don't clear cache of any Game App. It could clear all your game progress and reset your account.

clear_app_cache
  • Check your Smartphone storage: Check your smartphone's internal storage space. Try to keep minimum 1 GB storage space free. Also check your external Storage space. If the SD card is full, remove some stuff or get new SD class with higher class.If your storage space is full, your smartphone will lag..a lot.        

2.Get Rid Of It

  • Uninstall any unused apps. Uninstalling the apps you don't use will free up some internal storage space and also removes extra processes of that app. If the app is bloatware [ what is bloatware? More info in next steps] , Disable it.
  • Remove all widgets. If you don't want to remove all widgets,try to limit widgets on your home screen. It depends on your smartphone how much widgets you can use without taking toll on it.But best option would be to delete all widgets.
  • Switch to static wallpapers. Using live wallpaper will slow down the smartphone and also it takes lot of battery power. So static wallpaper is better option than live wallpaper.
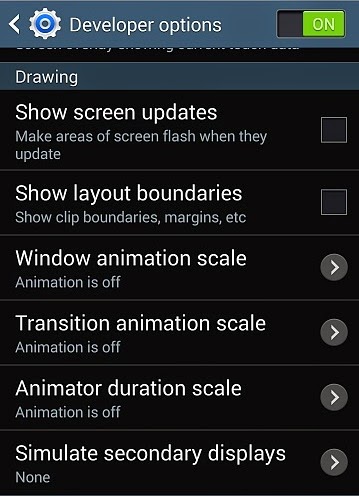
  • Disable all Animations. You can find its option under Settings > Developer's option.

disable_animation_android
  • Use stock app-launcher. Stock app-launcher is default launcher. Using any third-party app launcher with lot of animation is not good choice. If you still want to use third-party app launcher, just disable all animation. That will improve the performance.


 3.Apps to Avoid


  • Avoid any antivirus apps.
  • Avoid any battery saver apps. Usually these apps slow downs the phones and also eats precious batter power. There are other ways to save battery than those apps.
  • Carefully select any performance booster apps for your smartphone. Not all apps are suitable for your phone. Try different apps to find suitable app otherwise avoid it.
  • Avoid any third-party launcher. Any launcher with lot of effects and animation will require more resources which will ultimately reduce phone performance. So keep it simple or better avoid it.
I am not saying this types of apps are useless and doesn't work. It is just not every app is suitable for all different smartphones. Experiment with different app to find out which one is suitable for you. But it would be best not to use it.

4.Compatibility Issues

  • If you have powerful processor and high RAM in your smartphone,than avoid reading this topic.
  • Update your smartphone to latest Firmware. A new firmware version can improve the performance but remember newer is not always better.
  • If you have medium range smartphone[includes low range phones], think before updating to newer version of Android. If you are satisfied with running version of Android in your smartphone,than there is no need to update it.
  • Every newer version of Android will have more features than older version. It will use more resources than previous version and you will left out with a sluggish phone. 
  • Revert to stock Android version if possible. They are and would be the most suitable for your smartphone.
  • Update to newer version of apps.
  • Take a backup [more to that in next step] of app before updating it. So in case newer version of app is eating more resources or not compatible, you can switch back to older working version. 

5.Benefits of Rooted Phone

Rooting will give you master control over your phone. Sure it is little difficult , but it's worth it. There are various methods for rooting which you can find on net for your phone. There are different methods for rooting. Some of them requires unlocked Bootloader which will void your warranty. Read all steps of rooting process or take an expert advise before rooting your phone. It can brick your phones. A bricked phone is useless and hard to repair. The benefit of rooting is that you can always unroot your phone.So let's get started. 
  • Root your phone.You can find more about it on forum.xda-developers.com .They are the largest Android community on net.
  • You can overclock your phone processor for speed-up but it will eat more battery power.
  • Custom-ROM: They are the unofficial version of Android for your phone. Custom ROM gives many options to personalize the phone according to your will. Note that not all custom ROM s are good.Before installing any custom ROM, read all the instructions. Check all requirements. Also check for any existing bugs or any missing features. If you are okay with it than install it. Custom-ROM can increase your performance at wide scale.But again, not all are suitable for your smartphone
  • Can remove Bloatware on rooted phone.Bloatware are per-installed apps of your phone. Facebook,voice to text app ,voice dialer , google map are some of examples of bloatware. Bloatware apps are different for different phone. Not rooted phone can not uninstall it.With rooted phone,you can remove all bloatware, hence full control over phone.
  • Can install and use more advanced app. There are many good apps that requires rooted phone. Keep reading for some of examples of rooted apps.  

6.Uncategorized stuff

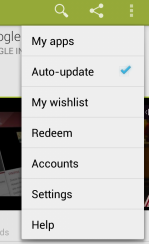
  • Turn-off auto-update of app. It will check again and again for available update.It will eat your internet, battery and also make your phone laggy. To turn it off go-to Playsore app > Menu from top left > My apps > select app . you can find tick-mark option there. 

disable_auto_update
  • Disable data synching of different social account like Facebook,Twitter. Also disable synching of  email,gmail etc. To disable it Just go to Settings > Accounts.It could be different for other Android version.
  • There is something you should check out if you are using Android version lower than 4.3. It is called Solid-State Drive TRIM.
  • Last option is - Reset your phone. Reseting the phone will clear everything from contacts to all apps. You will have than out-of-box phone.

7.Playstore

Here is a list of some app that can help you with phone lagging issues. You can download it from Google Playstore. Like I said earlier,try different apps to find suitable app for your phone.
  • App Cache Cleaner : Delete data cache of all apps at once.
  • Automatic Task Killer : An app to kill different task at once.
  • Clean Master : A free optimizer to clean junk files.
  • CCleaner : A powerful windows clean up tool now available for Android.Still in Beta phase.
  • AppMgr III : Move apps to SD card & Hide apps.A smart File Manager.
  • Watchdog : A task manager that monitor and kills process.Free and paid versions are available.
  • App Backup & Restore : Make a backup of any installed app as .apk and stores it to SD card.
  • Titanium Backup : An ultimate backup and restore app.Root Required.Free and paid version are available.
These steps will definitely fix all lagging issues. Your Android smartphone will run like a horse. Since your phone is working greatly again, you can install some popular awesome apps.
Publisher: Unknown - 15:12

Friday, 5 September 2014

,

Samsung Galaxy S 4 Tips & Tricks |AMANAHAD Tech


Discover everything you need to know to get started with your Samsung Galaxy S® 4 with these helpful tips and tricks. Learn how to Air Browse with hand gestures, utilize multiple windows at the same time, operate Samsung Hub and so much more.

Air Gestures

Wave your hand over the screen whenever you see the Air gesture indicator in the status bar to activate features such as:
• Quick glance: Get a peek at time, battery status, missed calls, and more when the screen is inactive. • Air scroll: Scroll to the top or bottom of a list. • Air browse: Move to the previous or next item of content. • Air move: Move an item to another page on the Home or menu screen. • Air call-accept: Accept an incoming call.

Camera Modes

The easy-to-use interface in the camera includes automatic modes that help you take the perfect picture every time. Choose from Auto, Beauty face, Best photo, Drama, Best face, Eraser, Panorama, Rich Tone HDR, Night, Sound and Shot, Animated Photo or Sports. In Carousel display mode, you can see descriptions of each mode so you can choose the right one.

Share with Group Play

You don’t even need to be on the same Wi-Fi network, because Group Play lets you create your own hotspot for spur-of-the-moment meet-ups.

Changing Home Screen Mode

Select the Home screen mode that best fits your personality. Basic mode displays the conventional layout for apps and widgets, while Easy mode provides a simplified Home screen experience for first-time smartphone owners.
• To change to Easy mode, touch Apps > Settings and touch the My device tab. • Touch Home screen mode and select Easy mode (Starter mode) > Apply. • The Home screen is reconfigured with a simple layout.

Using Multi Window

Activate Multi Window by touching and holding the Back key. From the tray, drag an app icon onto the screen to open it. To open a second app, drag it over the open app and drop it in the right or left side of the split-screen display. Resize the app windows by dragging the slider bar between them. Touch and hold the slider bar to see icons that let you switch the two screens or open one of the apps in full screen. While Multi Window is active, you can open the tray at any time by touching the blue tab on the side of the screen.

Out-of-Office

With the extended capabilities of SAFE devices, you can set your out-of-office message right from your device to let your colleagues know you are on vacation and offer alternative contact info.

Setting Up WatchON

Setting up WatchON is easy; you just need your ZIP code, the name of your television service provider, and the brand of your television set to start controlling your TV from your phone. Touch Apps > WatchON to get started.

Using Smart Gestures

In addition to the Air View and Air Gesture capabilities, you can also control the Galaxy S 4 through physical motions. For instance, lift the phone to your ear to dial the contact currently displayed on the screen, or cover the display with your hand to mute/pause any playing sounds. Enable Smart Gestures in Settings > Motions and gestures.

S Translator

Quickly translate typed or spoken phrases in nine languages, and hear the translations aloud. View a list of common phrases by category, such as greetings, business, emergencies, and transportation. Touch Apps > Translator.

Samsung Hub

Samsung Hub combines previous Samsung storefronts—such as Media Hub™, Music Hub™, Games Hub, and Readers Hub—into a single store with single sign-on through Samsung Account.
  1. Touch Apps > Samsung Hub.
  2. Touch Music, Video, Books, or Games to browse available titles or swipe right and left to view the main page for each type of content.
  3. Touch the Search icon to search for specific titles.
  4. When you see something you want to download, touch Buy (for paid items) or Download (for free items).
  5. Select Register credit card.
  6. Enter credit card credentials and touch Register.
  7. The credit card appears as a payment method. Touch the name of the credit card and then touch Pay.
  8. Touch Download.
  9. You can also pay with a gift card. At the payment page, select Gift cards and coupons and follow the prompts.
Publisher: Unknown - 21:33

Thursday, 4 September 2014

Samsung Reveals Prototype Wireless Game Controller For Android |AMANAHAD|

Bluetooth gaming controllers for smartphones and tablets are pretty common, but always seem to lack support from developers. However, Samsung is hoping all of that will change, as they recently revealed a new mobile gaming controller of their own, alongside the new Galaxy S 4 smartphone.
The device is still in the prototype stage, missing an official name, and bears a striking resemblance to another well-known gaming controller. It sports four colored action buttons, two offset analog joysticks, two shoulder buttons and a row of five more buttons along the top. An adjustable clamp holds varying device sizes in place atop the controller. In place of the more common rechargeable battery, Samsung's prototype game controller has space for two triple-A style batteries for power.
While showing off the device at the recent Galaxy S 4 unveiling, Samsung also revealed an accompanying arcade app that seems to provide easier access to compatible games. No price point has been established, but the wireless controller is expected to launch sometime this summer
Publisher: Unknown - 22:45
, , , , ,

How to Transfer Media from one Samsung Galaxy device to another Galaxy Device - Samsung Geeks AMANAHAD

One of our favourite things about the launch of the Galaxy S4 is the high quality support which Samsung has provided with it. Although this isn’t perfect [yet], Samsung are really moving in the right direction – trying to help consumers understand the technology they provide and simplify what might have been quite complicated processes. Along with the Galaxy S4 launch, they have provided “Samsung Smart Switch” Mobile which lets you quickly and easily transfer you data from one Samsung Galaxy Device to another.
Currently this will only work with devices such as the Galaxy Note 2, Galaxy S3 and Galaxy S4, which have NFC chips. Quite frankly – this software is awesome.

Tutorial

Samsung Smart Switch Mobile TutorialSamsung Smart Switch QR Code
Download Samsung Smart Switch onto both of your Galaxy Devices. You can find it by either scanning the QR code above, or following this link.

Step 2: 

Samsung Smart Switch Mobile Tutorial
Ensure that NFC is turned on on both Galaxy Devices and run the application.

How to Turn on NFC:

Turn on NFC by Navigating to “Settings”. On the Galaxy S3 and Note 2, you should be able to Find it by going to Settings > More Settings > NFC Toggle 
Samsung Smart Switch - NFC
One the Galaxy S4, you will be able to toggle NFC from the “Connections” tab in Settings:
Samsung Smart Switch - NFC

Step 3: Samsung Smart Switch Mobile Tutorial

Touch the back of the devices together. You should feel them vibrate and, if you have the sound on, a little “ding” to confirm that the device are in contact with each other. At this point, you’ll need to tap on the screen of either of the device to set up the WiFi Direct connection which will allow you to migrate your data. Leave the devices touching while it does this.
Samsung Smart Switch Tutorial

Step 4:

Samsung Smart Switch Tutorial
Select exactly what it is that you want to transfer. Samsung Smart Switch Mobile will allow you to transfer Contacts, Calendar, SNotes, Pictures, Music, Videos and Documents – so it’s pretty comprehensive. For music and video – it will only transfer files which are DRM Free. DRM (Digital Rights Management) is security software put into the music/video files which is supposed to stop piracy, though more often than not it just stops you being able to use content you have paid for on your own devices. Herumph.
Samsung Smart Switch Tutorial

Step 5:Samsung Smart Switch Mobile Tutorial

The final step is to press “Transfer” on the device where your content is and then press “OK” to confirm on the device you want to send the content to. Once this is done, sit back and let all the data transfer across from one Galaxy Device to Another. If you are transferring a lot of video files, music and images, this can take quite a long time – so go and put your feet up and check out some of the other cool features of the Galaxy S4 while you wait!
If you have any problem then leave comments I'll solve it.
by
AmanAhad
Publisher: Unknown - 01:12

Monday, 1 September 2014

, ,

How to Install Ubuntu on Your Nexus One/Android! AMANAHAD


 UPDATE: I’ve made a new site called AndroLinux.com to dedicate to Android on Ubuntu.

(World’s first installation of Ubuntu on an Android smartphone! WHOOHOO!)
This guide is for those of you who want to install Ubuntu as a sub-system under your Nexus One or any other rooted Android smartphone, I’ve tried to make it easy as possible for everyone.
UPDATE: Now Ubuntu is also available on HTC Evo 4G!
As you can see, I’ve used a rooted Nexus One here but you could have trouble with other Android phones as not all Android phones are built exactly alike but might work well also, you never know until you try it.
I am also working on Ubuntu on my rooted HTC Evo 4G, that should be available later this month over at HTCEvoHacks.com.
You could probably also run Ubuntu directly off your Nexus One/Android phone but that probably means not being able to use it as a phone and you probably would lose your camera.
To be on the practical side, I think it’s ideal to run Ubuntu along with your Nexus One/Android phone as I will be showing you here.
This Ubuntu install will not affect your existing Android system, the Ubuntu terminal will run in the background while the Ubuntu X11 graphical user interface will run as an app under Android VNC app.

Why are you installing Ubuntu on your Nexus One/Android phone?

Being able to have Ubuntu on your Nexus One/Android phone means that you can run native Ubuntu/linux applications off your phone!
I also see many uses in college engineering classes when they are studying Ubuntu/linux.  Instead of heading to the lab or having dual-boot on their computer, students will be able to use their Nexus One/Android phone as a test device.
Even for web designers, their Android phone can become a portable test web server to test out their new designs.
The list will go on and there’s absolutely no reason why we shouldn’t run Ubuntu or other linux systems on Android phones.
Lastly, for open-source people like me, free code is priceless, it’s going to be what’s driving the world in the next 10-20 years, if it ain’t already.
I don’t want to bore you with my philosophy so let me show you step-by-step how to install Ubuntu on your Nexus One.

How to Install Ubuntu on your Nexus One/Android Phone!

Before anything, download ubuntu.zip and unzip it:
Download ubuntu.zip
(Please feel free to mirror other places if you’d like!)
1. First, you will need a rooted Nexus One/Android phone.  If you have a Nexus One, go follow these directions and root your phone first!
UPDATE: Also, you need to install the latest Busybox, try this guide here to install Busybox.
2. Once you have a “rooted” Android phone, you will be able to run Ubuntu under Chroot.
What is Chroot?
I just found about this myself the other day while doing this but Chroot in layman’s terms is basically the ability to run other operating systems under your current system (in this case Android).  Chroot was initially developed to test new operating systems in a virtual environment but will work perfectly in this case for our project here as it will allow us to use Ubuntu as a “virtual” machine under Android system.  Yes, just think of it like Sun Virtualbox or VMWare for Android and other linux systems.
On one more note, you can only “chroot” another operating system made for your system’s architecture.  For example, most new Android smartphones including Nexus One, HTC Evo 4G, and Droid X all use ARM architecture CPU, meaning you can only use ARM-based linux systems/ports.
In this case, we are lucky because Ubuntu has an ARM-port.   It’s most likely the case that you can also “chroot” other linux devices that support ARM.  I am also working on chrooting other popular distros like Fedora, Gentoo, and more.
3. Now you understand what Chrooting is, let’s copy over the files we need for chroot.   These files include an image file of Ubuntu ARM (basically root filesystem that can be mounted onto Android phone using the command mount), setup script file (ubuntu.sh), chroot boot/launch file (bootubuntu), unionfs, fsrw, and mountonly.
Copy these six files over into your SD card’s root folder under folder name “ubuntu“.  Or you can just unzip the file I provided and copy the ubuntu folder over to your SD card’s root folder.

(Yup, I am already working on other Linux distros!  But Ubuntu is my favorite.)
The script files were modified (by myself) from other instructions on the web on installing Debian to a G1 phones (thanks to Saurik).   Btw, Debian and Ubuntu are pretty much the same linux as Ubuntu is just an extension of Debian so you should be able to easily run Debian too using the same method, just change the file names.
4. Before we go any further, make sure to “Turn off USB storage” on your phone so we can access the SD card from ADB Shell.  Let’s also make sure your USB Debugging mode is checked under Settings->Applications->Development.  (And yes, don’t forget to connect your Nexus One/Android phone to your computer via USB!)
5. I am assuming you’ve already installed the Android SDK (while you were rooting your phone) so let’s head to your Android SDK directory and load up ADB Shell.
For Windows, go to your Android SDK Tools directory such as c:\sdk\tools and type “adb shell“.

(FYI, cd is the command you can use to browse to your sdk\tools directory.  For Windows, do cd \sdk\tools and for Mac/Linux, do cd /sdk/tools.
For linux and Mac, go to your Android SDK Tools directory such as /sdk/tools and type “./adb shell” or it can also be “sudo ./adb shell” for Ubuntu.
6. Once you are in the ADB shell, you should see a “#”symbol.  Great, let’s start bootin’ Ubuntu right away.
7. Type “su” to enter superuser mode.  Btw, if you get error on this part, that means you have not rooted your phone! (or you might have to installed a rooted ROM.)
8. Next, type “cd /sdcard/ubuntu“, which will take you to the directory where you’ve copied the Ubuntu files over to.
9. Type “sh ./ubuntu.sh” to run the setup script.  You only have to run this once or whenever you change the script file bootubuntu.

10. Once that completes, type “bootubuntu” to “chroot” or boot into your new Ubuntu on your Android!

If you get the “localhost” sign, congratulations!  You’ve just installed Ubuntu on your Nexus One/Android phone!
If you didn’t get that and you got an error falling back to the ground at 200MPH back at the “#” symbol, don’t worry, I did that about a thousand times for 2 days straight, you are not alone.
Try rebooting your phone and repeat steps 5 through 10 CAREFULLY and I am sure you will get it working.  A lot of times, our eyes can lie to us while following step-by-step directions, really!
Also, if you are not using a Nexus One here, you could be running into other problems as I have still not yet been able to chroot into Ubuntu on my HTC Evo 4G.

How to Get X11 GUI up and running on your Nexus One/Android Phone!

11. I actually prefer the command line over GUI because it saves so much memory and I am pretty proficient doing things in the terminal but the GUI gives you a full desktop experience over Ubuntu so first, you will need to download the latest version of Android VNC Viewer in form of .apk file.  After downloading it on your phone (or copy it over to your SD card after you download it on your computer), open it up and install the app.
12. You will next need to install some files via Ubuntu apt-get installer.  Go back to the chrooted Ubuntu terminal and type:
apt-get update
to update your Ubuntu packages then:
apt-get install tightvncserver

to install the TightVNCServer and:
apt-get install lxde

to install the LXDE.
13. Next type:
export USER=root
vncserver -geometry 1024×800

Here you can set your password to VNCserver like I did as “123123123“.
*Note – You can also change 1024×800 to the exact resolution of your Android phone’s LCD resolution but I found that a bit higher resolution gives you better display, so the Nexus One has 800×480 but I set it to 1024×800 for better viewing.
Next, we are going to add the following to /root/.vnc/xstartup file using cat command:
cat > /root/.vnc/xstartup
#!/bin/sh
xrdb $HOME/.Xresources
xsetroot -solid grey
icewm &
lxsession

Then hit Ctrl+D twice and Enter key.

14. Next open up the Android VNC app on your Nexus One/Android phone and enter the password you set earlier in step 13 and set the Port to 5901.
15. Next hit connect and voila, you should get something like this, a cool GNome Ubuntu screen!!!
16. Now, let’s setup your chrooted Ubuntu so you can make the VNCserver run everytime you start the chrooted Ubuntu.
17. Next, let’s add some code to the /root/.bashrc file, which runs at every boot of your Ubuntu so the VNCServer runs automatically when you start the Ubuntu.
cat > front
export USER=root
cd /
rm -r -f tmp
mkdir tmp
cd /
vncserver -geometry 1024×800

Then hit Ctrl+D twice and Enter key.

Next, we will concatenate the file we just made front and /root/.bashrc into a new file called temp:
cat front /root/.bashrc > temp
Then we will copy the new file temp over the existing /root/.bashrc.
cp temp /root/.bashrc

(I used Windows command.com terminal, which keeps echoing things twice.  It only happens on Windows because of echo!)
*Note – The reason why I used cat command to do everything here is for Windows users because the vi text editor doesn’t function correctly within Windows shell.  But you can always just use your favorite Ubuntu text editor if you are using Linux or Mac.  (Just add contents of file front into the beginning of /root/.bashrc This way, I only have to write one howto manual that works for every platform.  For Windows users, you can also install SSH (do “apt-get install openssh-server“) and use an SSH client such as PuTTy.)
To check that it’s working you can exit out of Ubuntu back into Android shell:
exit
then boot Ubuntu back up:
bootubuntu
Now everytime you chroot/boot your Ubuntu, the VNCServer is start automatically at start-up.
You can use Terminal Emulator app (freely available on Android market) to start the Ubuntu chroot by entering:
su
bootubuntu

so you don’t need to connect  to ADB shell to launch Ubuntu, giving you the freedom to use Ubuntu along with Android whereever you go.
That’s it!

BOOTUBUNTU UPDATE FIX

UPDATE: For people having trouble getting it to work (thanks to people testing it at XDA Developers), try downloading the new bootubuntu file here then:
Go run the ubuntu.sh by doing on ADB shell:
su
cd /sdcard/ubuntu
sh ./ubuntu.sh
then
bootubuntu
Publisher: Unknown - 16:32