Powered by Blogger.
Showing posts with label Tricks. Show all posts

Wednesday, 8 October 2014

, , ,

Easy Way to Hack WEP/WPA/WPA2 Wi-Fi Password


 WiFi Hacking
Easy Way to Hack WiFi Password
If you are living nearby someones WiFi hotspot and every time your laptop search for connection its showing up but you don't have passwords. Or you just want to steal someones WPA/WPA2 Wi-Fi hotspot key or passwords. Don't worry...

In this tutorial I’ll show How to hack a WPA/WPA2 Wi-Ficonnection through a bootable USB.
Things you should need:


1. A USB pen drive.
2. beini.iso file. [Download it from HERE].
3. UNetbootin software to make your USB drive bootable. [Download for Windows, Linux or Mac]

Some few steps you should to do ( WEP):

1. Write beini.iso on your USB by UNetbootin. Set everything according to this image bellow.
WiFi Hacking1
2. After finishing restart your PC and boot it from your USB.
3. If you were successful to boot up then you should see something like this. Click Minidwep-gtk.
WiFi Hacking2
4. Click OK.
WiFi Hacking3
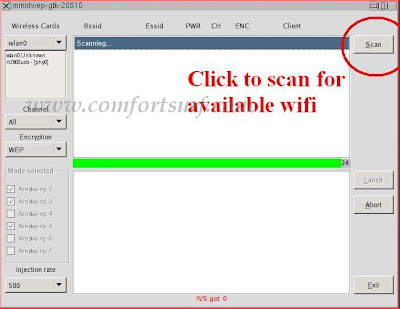
5. Now Minipwep-gtk  program will open. Click Scan.
WiFi Hacking4
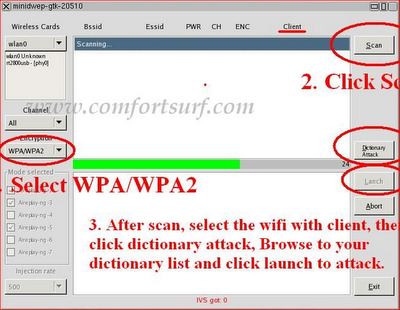
6. Select a wireless network(should have Clint) from the list. And click Lunch to start creaking process.
WiFi Hacking5
7. Sometimes its take a while according to your victim connections IVS value and password strength. So keep passions.
WiFi Hacking6
8. If it found a password, it should appear like this.
WiFi Hacking7

To creak WPA/WPA2 follow this image instruction.
WiFi Hacking8
Let me know if you have done it successfully or you have any complicity.


by
  Triple A A-@-A
Publisher: Unknown - 00:39
, , ,

Top 5 Apps to Lock Down Your Text Messages And Images | AMANAHAD Tech

Privacy is a concern for most people these days. Whether you are looking to keep your information private from a snooping coworker or a nosey boyfriend or girlfriend, there are apps to help. The problem is, some of the apps are just plain awful. What I will go over today are some good apps to use for keeping texts and images from being easily accessed.
Some of the apps in this list have some built in functionality for just such a task. Others may need to be unlocked by purchasing the pro version. Others yet are made specifically for hiding SMS messages or images from any prying eyes.
GO SMS Pro is a really popular app. In fact, it is the one I have used off and on for couple of years. One feature I didn’t really know about was the ability to have private contacts. In a nutshell, you can take a contact, a potential employer for example, and place them in your private inbox. If they send you a text message, you will need to unlock the message before it can be read.
hide-sms-go-sms-pro
When you have the premium version of GO SMS Pro, you can hide the private SMS inbox from the menu and unlock more of the settings to make it more difficult to access. What I like here is the ability to rename the SMS vault inbox to something a little less conspicuous.
Very recently I talked about Hi App Lock. This is a good option for locking individual Android apps for better privacy. You can easily use Hi App Lock to lock down anywhere you feel an onlooker may be able to access the information you’d like to keep private. Think about how often you leave your phone or tablet on your desk or in your car or backpack unattended. If your Android device was stolen, what would people be able to see and/or do with the information they find?
hide-sms-hi-lock-app
Do you send messages to someone you aren’t supposed to? Are your work text messages or images you take with your work camera confidential? No reason for you to have information leaked just because you set your phone down.
Vault is an app that’s come a long way in the past couple of years. When I first tested it, all you could do was hide images and it wasn’t all that great at it. Now Vault has evolved into more of a privacy control center. With the free version, you can encrypt your images, you can also encrypt a limited number of text messages too.
hide-sms-vault
A feature I really thought could be helpful is the option to link your Facebook account and encrypt your Facebook messages. When you send a Facebook message to someone, they will be able to read it, but the message doesn’t show up in your conversation history.
Secrets is similar to Vault because you can hide images or other files. It’s different because the Secrets doesn’t show up in the Android app drawer. Opening Secrets is done by going to your phone dialer and typing the default 1111 and pressing send. You will be prompted to enter a code then you can see your hidden files. Having an app for just your images can be nice, especially when you might have taken or received some images you might not want anyone to know about.
hide-sms-secrets
Hide SMS is just for hiding text messages. Hiding the messages is as simple as long pressing the message and opting to move the message to the hidden inbox. When a new message arrives, You will see an inconspicuous message in your notification bar saying KeepSafe updated. When hiding a current thread, the app may not move your images over. They didn’t on my Samsung S3.
hide-sms-keep-sms
People have many different reasons for wanting to keep their communications private. The above apps are there to help. I would recommend trying some of the all-in-one apps for an ease of use standpoint. When you have too many apps on your phone for similar tasks, it can get confusing and could even slow down or cause conflicts with each other

by Triple A A-@-A
Publisher: Unknown - 00:19
, ,

How to Remove Picasa Albums From Your Gallery | AMANAHAD Tech

How to Remove Picasa Albums From Your Gallery
If you’re anything like me, you get easily irritated by all the Picasa Albums that appear in your Gallery. Thanks to Google account sync, and to the fact that every image you post to Google+ somehow ends up creating its own album on Picasa, your Gallery looks like a never-ending string of albums that contain one or two images each thanks to Picasa.
If all you’d like when you open the Gallery is to see the photos that are actually stored on your device  — and the SD card if you’re using it — then follow this walkthrough to get rid of all the Picasa albums.


For a long time, I’ve used QuickPic to browse my photos on my phone because of its speed, editing options, and the fact that it didn’t show me all my Picasa albums. However, with Android becoming quite fast and efficient now, as well as integrating photo editing by default, I had less and less reasons to resort to QuickPic. The only thing holding me back from using the Gallery daily were the Picasa albums, but no more.
Gallery with locally stored albums but also Picasa albums

Step 1: Stop Picasa Web Album Sync

The first thing you’ll need to do is go into Settings on your device, look for the Accounts section and click on the Google account. Select your email address and deselect the “Sync Picasa Web albums” option.
Disable Picasa web album sync
Keep in mind that stopping the synchronization won’t affect Google+ Instant Upload for photos, and it won’t delete your Picasa images from the cloud. It will just stop these albums from sync’ing to your device and appearing in your Gallery.

Step 2: Clear Gallery Data

Now that Picasa has stopped sync’ing to your phone, new albums should not appear in the Gallery anymore. But the albums that have already been synchronized are already there. That’s why you need to clear the Gallery data.
Go to Settings, Applications Manager and swipe to the 3rd tab (All). Scroll down to Gallery and click it. There, you will be able to “Clear data”.
Click "Clear Data" to force the Gallery to refresh
Click “Clear Data” to force the Gallery to refresh

Step 3: Let the Gallery Refresh

At this point, you’re basically done. All you have to do is open the Gallery and wait for it to refresh and rebuild its thumbnails. If you don’t have a lot of photos stored on your device, this will be almost instantaneous, but you’ll need to wait a few seconds if you have a big collection of photos.
The Gallery is now clean and only shows local photo albums
It’s quite an easy thing to setup, and the benefits are remarkable especially if your Gallery is littered with Picasa albums that make it harder and harder to find the photos that are stored locally on your phone.
What about you? Do your prefer to have your Picasa albums sync’ed and visible inside your Gallery, or do you access them from Google+ and prefer this method of keeping your Gallery tid
by
     Triple  A     ( A-@-A)
Publisher: Unknown - 00:02

Thursday, 2 October 2014

, ,

Making keyloggers Undetectable using Binders and Crypters!


The biggest challenge after creating keylogger installation file, is to convince your victim to install that keylogger on his PC. Normally free remote keyloggers like Emissary keylogger or any other cheap keyloggers will create standard .exe installation file without any stealth feature. Also free keyloggers are easily detected by popular antiviruses. So Eventually your keylogging job will remain Incomplete.
You would have probably heard about binders and Crypters before, but what do they used for? and why they are used in keylogging process? its simple as their Names suggests what they do. Lets first understand these two softwares.
Crypter
It is a software that can encrypt executable (.exe) files. crypters are popularly used to encrypt viruses, RAT’s, keyloggers, spywares etc to make them undetectable from antiviruses.
The Crypter takes the original binary code of .exe file and applies many encryption on it and stores at the end of file(EOF). So a new crypted executable file is created. The new exe is not detected by antiviruses because its code is scrambled by the crypter.
Binder
Binder is a software used to bind or combine two or more files in one file under one name and extension.
The files to be binded can have any extension or icon. The user has choice to select the name, icon and various attributes of binded file.
Now that you, me and the whole world is aware of these softwares, do you think antivirus softwares will allow you to run these software on your system? ..obviously not. This is the biggest setback for crypters and binders. With increased use of Crypters and binders to bypass antiviruses, AV became more advanced and started including encryption definitions to even detect crypted or binded strings within code. So, use of crypter to hide Keyloggers became more complicated as nowadays, most of the popular crypters & Binders are easily detected by antiviruses.
So, if you are trying to crypt your keyloggers or viruses with publicly available crypters and binders, they are bound to be detected by antiviruses. This is because most FUD(fully undetectable) crypters remain “FUD” for maximum of one or two weeks, after their public release.
When any free FUD crypter/binder becomes popular it also gets the eyes of antivirus companies. The antivirus companies update their software and employ detection mechanism that detect the encryption by the crypter. To obtain FUD crypters, you either need to search for it in hacking forums or make one by yourself. Soon i will post about creating your own crypter.. stay connected.
Meanwhile you can try these latest crypters and binders that are available publicly:

1) Chrome Crypter v2.0

This Crypter is FUD (Fully Undetectable) and free. It has couple of extra features like .exe file binder and inbuilt ICON Changer. Its recommended that you name your resulting output file in the format: “filename.mp3.exe”. .exe extension will be hidden on most of the systems, so your victim will run it believing its an mp3 file.
Chrome Crypter v2
Chrome Crypter v2 – FUD.rar

2) 0crypter v5.0.8

Like ‘Chrome crypter’, this crypter also has inbuilt ICON changer and few more advanced features like: Default Browser Injection, Custom Injection Method (VBC advanced), Effective StartUp on reboot, Custom Startup, Custom Assembly Change, etc. This is not FUD, as my AVG quickly flagged the output file as Trojan virus.
0crypter free download
0crypter v5.0.8 – FUD.rar
Publisher: Unknown - 13:10

Sunday, 28 September 2014

, , , ,

Windows 8: Enable .NET Framework 3.5 (includes .NET 2.0 and 3.0) i.e. (NetFx3) feature in Online & Offline mode! | AMANAHAD Tech

I have been using Windows 8 for last few months. When Windows 8 CP released I installed CP & subsequently RP too. When I wanted to install some 3rd party application in my Windows 8 VM, I realized that these applications require .NET Framework 2.0 or 3.0 in few cases. Apparently my virtual machine does not have internet connection. Obviously the first step for us is to check the Program and Features to enable any available additional features in an Operating System. This is what you see in your Control Panel –> Program and Features. Click on Turn Windows features on or off.
Here you can see .NET Framework as a feature and by default the feature is disabled. You can enable this particular right away using this GUI Tool but in order to do that you need to be connected to internet i.e. Online Mode. Other way is using DISM Command and this can be done in an Offline Mode using Windows 8 installation media. Let’s see these 2 methods.
Method 1: When you are Online, connected to Internet.
In order to install the following window click on the .NET Framework 3.5 (included .NET 2.0 and 3.0) select it & click OK
image
Now, it will download the entire package from the internet & install the .NET Framework feature.
Method 2: When you are Offline and not connected to Internet
If you open CMD.EXE with Administrative Privileges i.e. at elevated level & run the this DISM command dism /online /get-features you will see that from the State that .NET Framework is not part of the Operating System.
image
image
So the first thing you need to do is to copy the required package to local machine before you run the command to install .NET Framework. To do that use Windows 8 ISO/DVD/USB Media. You need to copy SXS folder to local machine located at D:\sources\sxs (In this case D: your drive letter on which you have loaded Windows 8 Media)
image
You can also use the following command to copy this folder locally. xcopy d:\sxs\*.* c:\sxs /s
Once completed, in order to install this feature you can run the following command dism /online /enable-feature /featurename:NetFx3 /All /Source:C:\sxs /LimitAccess  and hit Enter
image
After completing the installation of .NET Framework 3.5 you can see that the feature is enabled in the Control Panel –> Program and Features
image
Bingo. Now you can enable .NET Framework feature on Windows 8 without needing of an internet connection.
Enjoy
Update: There was a small typo in the command, I missed including : between source:C:\. I did fix it. Thank you all for your comments & pointing that out :)


by Triple A A-@-A
Publisher: Unknown - 14:21

Monday, 15 September 2014

, , , ,

Three Easy Method to Enable Administrator Account in Windows 7

 The administrator account is a hidden, disabled and built-in account with Windows 7/Vista/xp. But a user can enable this account for some special actions. Such as troubleshooting, installing harmful software or some special networking tasks. By default, most of the user accounts are a part/member of the Administrator account. Others are standard accounts without being any part of an administrator account.


Windows disabled this account to prevent malicious programs and harmful activities on the system. So any special task of system needs administrative privilege and the annoying UAC (User Account Control) bar will pop up for the users, except the administrator account.

This post will show you how to enable Administrator account in three easy ways. Choose only one method from below to activate administrator account.

Method#1. Using command prompt:

Search cmd.exe in start menu and run cmd.exe as administrator.
Start menu > cmd.exe 


To enable Administrator account Type: net user administrator /active:yes

To enable administrator account 


Hit enter and the command should execute successfully.

Command line to disable this account: net user administrator /active:no
To disable administrator account 

Method#2. From Local Users and Groups

Go to control panel navigate to Administrative tools and computer management.
Control Panel > Administrative Tools > Computer management  
Expand the Local users and Groups arrow and select Users. Then, From the right pane, double-click on the Administrator.
Local users and Groups > Users & Administrator  
Un-check the "Account is disable" and it should be look like below.

Administrator account properties

OK it and your settings will be saved.

From here you can also disable the Administrator or other account.

Method#3. From Local Security Policy

Type secpol.msc in start menu and run it as administrator.
start menu > secpol.msc 

From this Local Security Policies, expand the security options under the Local Policies.

Find "Account: Administrator account status" from the right pane.
Local Security Policies 
Open the "Account: Administrator account status" and choose Enabled to enable it.
Administrator account status 


You can also disable it from here.

After completing any of above processes, reboot your PC or log off. Now you will see a new account "Administrator" which has no password by default. Log in to this account and enjoy the real administrator power of your PC
by Triple A A-@-A
Publisher: Unknown - 22:08
, , , , ,

How to Show or Hide Hard Disk Partition in Windows 7/Vista/xp/8/8.1

Hiding a partition or volume from my computer or explorer is preventing that partition from displaying, but it doesn't mean erasing any data or deleting the volume. Windows OS Disk management system allows hiding drives except the System drive where the OS is installed and the System reserved volume. So, anyone who has administrative privilege or the administrator of the Windows machine can do this task. And the basic trick is, without any drive letter (Ex: C:, D:, E: etc.) Windows OS doesn't recognize any drive or partition and here we are going to remove that letter temporally.


To do this task you need administrator privilege. So, why don't you activate the administrator account and use it.
How to hide a drive:
     1. Click right mouse on the computer and select Manage. Select the disk management under storage from the left pane. Or, you can also get the Disk management typing diskmgmt.msc in the run and pressing enter.
Disk Management

     2. From there click right-mouse on which drive you want to hide and select Change Drive Letters and Paths.
Change Drive Letter or Path

     3. Now select remove. Don’t worry! This action just removes the drive letter.
Remove drive

     4. Pressing on the Remove a warning message will be shown and accept it by clicking on yes. It’s just telling you that all programs installed on that drive won’t work or this drive is opened by another program.
Warning Message 

It’s done! Your selected drive is hidden now.

The hidden drive won’t be appearing to the administrator of the OS unless it is unbidden.

How to unhide the drive:
    1. Open the Disk Management as shown above.

    2. Right mouse click on the drive which is hidden/removed. Tips: the hidden drive doesn’t contain any drive letter.

    3. Choose the Change Drive Letters and Paths and select Add to add drive letter or path to the hidden drive.
Add hidden drive
Assign drive letter
     4. At last choose a drive letter to assign the drive/partition and press on OK. Wow! The hidden partition is displayed in an explorer or my computer.

That's it! No data is lost or damage. Even the installed files are working again without any errors. From now you shouldn't need any extra software to hide or unhide your PC's drives. And if it helps you, why don't you share or rate this?

by Triple A A-@-A
Publisher: Unknown - 22:08
, , , ,

Windows 7/8/8.1 Access Denied For Administrator | AMANAHAD Tech

 The Problem
You receive a Windows 7 access denied error when accessing a folder through Windows Explorer even though you have set the permissions correctly. You are an administrator and the administrators groups have full control over the folder but you can’t access it without Windows re-writing the permissions.
The cause of this is because of a new feature in Windows 7 called User Access Control (UAC). It is the combination of UAC and a bug in Windows Explorer that causes the access denied error.
The easiest solution is to simply disable UAC. If this is not possible (for security reasons) then read on for alternatives.

What is UAC?

In  a nutshell UAC is an extra layer of security on top of Windows 7. When you log in as an administrator normally you would have full unrestricted access to everything. UAC aims to prevent this by running all tasks that don’t require administrator access in a more restrictive manner. When UAC is enabled an administrator as two access tokens; a standard user token (restricted) and an administrator token (unrestricted). All tasks first run under the restricted user token. Only when a specific program or tasks requires full administrative rights does it then prompt you to run it in an elevated mode. It then launches this task using the administrator token. For the scope of this article this all you need to know. To see the full benefit of UAC on Windows 7 follow the link listed above.

How Windows 7 Uses UAC

In Windows 7 some programs will automatically prompt you to run it in an administrative context when you run them. These programs are typically ones that serve only one purpose which require administrator rights in order to run; examples of these are any of the administrative tools that ship with Windows 7. Other programs like the command prompt don’t always need to be run in the administrative context. Simply using the DIR command and browsing folder structures can be done as a normal user, it does not require you to be an administrator. So, although you are logged in as an administrator it will run it under you standard user context. If however you type something like IPconfig /renew it will error saying access denied. At this point you need to close the CMD prompt and find it again in the start menu but this time right click and choose “Run as administrator”. This will now launch the program using the administrator token where IPconfig /renew will now work.

Why You Get Windows 7 Access Denied On Folders

Something I found that isn’t well documented regarding UAC is how it treats folder permissions. If you try to access a folder where the built in administrators GROUP has access to it UAC expects you to access it using your administrative token. Say you are a member of a group called Managers and this has access to a specific folder. When accessing this folder it works as expected; you gain access. If however you are not a member of this group but a member of the built in Administrators group which also has access to the folder you still get an access denied. This is not as expected, you should still gain access. With UAC enabled, to access this folder you need to run Windows Explorer under your administrator context by manually launching Windows Explorer from the start menu, right clicking it and choose “Run as Administrator”. This SHOULD WORK but unfortunately doesn’t due to the bug mentioned at the beginning of this article resulting in an access denied message.
It is important to note that this ONLY affects the Administrators group. As already mentioned for example if I create a new group called “staff” and added this group to the NTFS permissions of the folder I would be able to access this fine without having to elevate the program as long as I am a member of this group. This is ONE of the workarounds to this problem; for all folders you need access to create a new group and use this to assign permissions instead of the administrators group. This will allow you to access the folders without running Windows Explorer in the administrative context.

Windows Explorer Doesn’t Work With UAC

Yes you heard that right. I had to do a lot of research to find this out. This affects Vista, 2008 and Windows 7. Of course MS haven’t officially acknowledged this but you can prove this yourself by doing the following:
  • Log in as an administrator and set permissions on a folder so that ONLY the Administrators group has access to it.
  • Open two command prompts; one as normal and the other under the administrative context.
  • Now try to DIR to this folder in both command prompts and read the contents. You will find that the CMD window running under the administrator context is the only one that can access the folder. This is behaving correctly as explained above.
  • Now open MS Word, Excel, whatever in the administrative context. Save a file in this folder. This proves Word is running in elevated mode – The point of this step is to illustrate that ANY program (not just CMD) can access a folder where only Administrators have access to if you run it under your administrator context. Close Word.
  • Now open Word in standard context (no admin) and try to open the file. You get an access denied. Again behaving exactly as it should.
  • Now open two Windows Explorers; one as normal and the other under the administrator context.
  • Try accessing the folder and BOTH OF THEM will fail. This proves Windows Explorer (reasons beyond me) does not run under the administrator context.
A bug?? I think so! So how do we access the folder under Windows Explorer? You can’t, well at least in this context. MS seriously screwed up here in my opinion. A lot of folders only allow the Administrators group access but you will also gets an access denied error without tweaks if UAC is enabled!

How Do We Prevent Access Denied On the Folder?

In Windows 7, access denied errors on folders can be eliminated using a a few methods. The easiest one as mentioned at the start of this article is to turn UAC off. Folder access will then behave exactly like XP. If this is not possible what I found works is to create a new group in Active Directory and call it something like “All-Folders-Access”. Add your administrator account to this group and then give this group full control permissions to the same folders the administrators groups have access to. This will allow you access to the folder with Windows Explorer. This is time consuming but the only solution if you want to keep UAC in use.
Your third option is to re-write the permissions on the folder and let Windows 7 do this for you. This is fine to do on normal folders but I would not recommend it on special folders like Windows, System32, user profiles etc. These folders have special permissions assigned to them. Overwriting these can cause serious problem and possibly a re-installation.
The 4th and final work around is probably your best option as it allows you to keep UAC enabled with no downsides to it. With the introduction of UAC came additional group policies in Windows 7 to manage it. These are located in Computer Configuration Windows Settings Security Settings Local Policies Security Options:
windows 7 UAC
This last solution is probably your only option for special folders like profile folders.By default only the  user has access to their own profile. There is another group policy that will add the administrators group to each user profile when it is created thus allowing administrators access but of course this won’t work with UAC on.
From the printscreen above if you enable the first option it will basically disable UAC for the built-in administrator account. This prevent the Windows 7 access denied error on these special folders as you no longer need to elevate Windows Explorer therefore bypassing the bug. This keeps UAC on for all other accounts and is the most secure work around of the 4 provided. If you have other administrator accounts which  require access to these folders you will need to enable the 3rd option (highlighted above). This will affect anyone who is a member of the administrators GROUP rather than just the built-in administrator account. This kind of defeats the point though….You have effectively turned off UAC for all administrators so you might as well disable it outright. I would suggest enabling it for the built-in account only and use other administrator accounts for your administrative duties. Only when you come across this problem you could log in as the built-in administrator and then amend permissions accordingly.

by Triple A A-@-A
Publisher: Unknown - 21:53
, ,

How to Repair a Corrupt Windows 7 Installation | AMANAHAD Tech

Every operating system needs an occasional repair job, and Windows 7 is no exception. Whether the source of the problem is corrupt data, a particularly brutal piece of malware, or some other serious issue, you'll occasionally have to reinstall your copy of Windows. Wiping your hard drive and performing a fresh installation can be a huge headache; but fortunately there's a way to repair a corrupt Windows 7 installation while keeping all your programs, personal data, and user accounts intact. With Windows 7 you can perform an in-place upgrade installation to repair a flaky existing install. Though technically designed to upgrade older Windows operating systems like Vista, the in-place upgrade installation option can also be used to repair an existing installation of Windows 7.
The in-place Upgrade installation involves multiple stages, starting with copying installation files to the destination drive and gathering existing files and settings.
Note that you must perform the in-place upgrade process from within Windows; if your PC can't fully boot to the Windows desktop, this repair guide is not for you. A few other limitations come up later in the article, so be sure to read the entire guide thoroughly before attempting to repair your corrupt copy of Windows 7. Performing a repair installation should be your last resort, and you should consider it only if you have already removed spyware from your PC, reinstalled your drivers, and unsuccessfully tried to restore from an earlier (working) version of Windows 7 using System Restore.

Prepare Your PC for Windows 7

Before performing a repair installation, you should take a few precautionary measures to ensure that the process goes smoothly. The first step is to back up all of your critical files to an external storage device. Though the repair process is unlikely to fail or to render any of your files unrecoverable, it's always a smart idea to back up your data.
After you've backed up your system's important data, we recommend uninstalling any third-party security software such as firewalls or antivirus applications. You can always reinstall them after completing the repair process; but since you'll be initiating this process from within Windows, you need to remove any security applications that actively scan files. You should also download and store all of the drivers that your system needs to function--especially the network controller, which tells your network adapter how to access the Internet.
After backing up all of your drivers, clean out all of the temporary files and junk data that have accumulated in Windows 7 over the course of prolonged use. To do this, click the Start button, and in the Search field type Folder Options; then press Enter. In the Folder Options window, click the View tab and select Show hidden files, folders and drives; then click OK.
Next, initiate a Disk Cleanup by opening the Start menu and selecting Computer; right-click your primary drive (the C: drive by default) and open the Properties menu. Select the Disk Cleanup utility in the lower-right portion of the menu, and select Clean up system files. The Disk Cleanup utility should take a few moments to rescan the drive. Next, click the More Options tab, and select Clean Up in the 'System Restore and Shadow Copies' section at the bottom of the menu. In the dialog box that appears, click the Delete button; then navigate back to the Disk Cleanup tab, confirm that all items in the Files to Delete list are checked, and click OK. The Disk Cleanup utility should clear out outdated system files, temporary data, and other digital detritus. Depending on how much junk data is on your drive, this step may take anywhere from a few seconds to a few minutes.
After running the Disk Cleanup utility, you should clean out a few folders manually. Open the C: drive again, and double-click the Windows folder. Scroll down the list of folders and delete any files in the Prefetch and Temp folders. Be sure to delete only files within those two folders and not the folders themselves. Next, navigate back to the C: drive, and double-click the Users folder. Within the Users folder, double-click first the folder for your particular username, and then the AppData folder (if you don't see the AppData folder, you must not have selected 'Show hidden files, folders and drives' earlier), the Local folder, and finally the Temp folder. Delete all of the files in this Temp folder as well; then restart your system


Install Windows 7 (Download 100% original window 7 click here)

Having completed the prep work, you can safely begin the Windows 7 repair installation. You'll need a Windows 7 installation disc that matches the version of Windows already installed on your system, and you'll need at least 10GB of free space on the drive where you intend to install the new version. The installation media must be able to deploy a clean Windows installation, which means that custom recovery discs from your system manufacturer or another OEM probably won't work.
To begin the repair installation process, insert the installation media and run Setup (if it doesn't launch automatically). In the Setup window, click the Install Now button, and you'll have the choice of continuing the installation with downloadable updates or without them. If your Internet connection is working, you should probably choose to download the updates, but you can choose whichever option suits your fancy. Next you must accept the terms of the license and then choose whether to perform an Upgrade installation or a Custom installation. You're repairing a corrupt install, so choose Upgrade (the Custom option won't save your personal files or settings).
In the initial phase of the installation process, you must choose the 'Upgrade' option to perform a repair install.

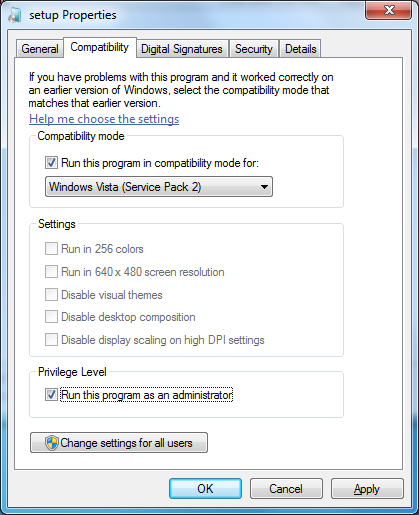
After you've selected the Upgrade option, the installer will perform a compatibility check; your system should pass with flying colors, since you were already running the same version of Windows 7, but double-check to confirm that there aren't any red flags. Once the compatibility check is done, press the big Next button, and the Upgrade/Repair installation process will begin. If the Upgrade option is unavailable for some reason, you can still perform a repair by using a simple workaround: Right-click the Setup file before you run it, and select the Properties menu. From there, navigate to the Compatibility tab, and check Run this program in compatibility mode for:. Then select Windows Vista (Service Pack 2) from the drop-down menu. Be sure to also check the box at the bottom labeled Run this program as an administrator; then click OK. Run the Setup utility again, and the upgrade installation option should be available.
Setup Properties
In the Compatibility tab of Setup Properties, arrange for the program to run in compatibility mode for Windows Vista Service Pack 2.
The next few stages of the repair process don't require any user intervention. The installer will gather information about your system, copy the necessary installation files, and then move any personal files or programs over to the fresh version of Windows 7. This process isn't especially fast (a typical repair install took about 40 minutes on our test machine), but the amount of time required will vary from system to system depending on how much data needs to be transferred from one Windows 7 installation to the other.
Though most of the data and programs installed on your original copy of Windows 7 should make the move the new copy, a few things (such as custom themes and sounds) will not. You'll have to reinstall those after completing the fresh install.

Clean Up After the Windows 7 Install

Once the upgrade installation process is complete, you'll be prompted to activate your fresh install and answer a few basic setup questions (time and date, network settings, and so forth). At the end of this setup process Windows, will assess your machine's performance to generate an appropriate Windows Experience Index rating, and then perform a few final updates and repairs to complete the installation. Once the entire installation process is complete, you should poke around in your new version of Windows 7 to verify that all of your files are intact and all of your applications are working properly. Run Windows Update to ensure that your fresh copy of Windows 7 is entirely up to date.
To wrap up the installation process, you need to clear out the old junk data left over from your corrupted version of Windows 7. Windows will store this data in two system folders, labeled $INPLACE.~TR and $WINDOWS.~Q. If everything is working properly, you can delete these two folders, along with some other archived data. Follow the steps we outlined earlier to perform a disk cleanup, select Clean up system files, delete the two folders, and you're done. Congratulations, you've successfully brought your Windows 7 PC back from the brink of corruption! Make sure to keep this guide handy, in case you ever need to repair a corrupted copy of Windows 7 again.
Clear out old files and folders in your fresh install of Windows 7.

Secret Windows Fixed.
Publisher: Unknown - 21:44
, , , ,

How to easily Burn Discs Using Windows or File Explorer in Windows 7 & 8 | AMANAHAD Tech

What program do you use to burn your data to discs? If you're thinking Nero, Roxio, Power2Go or any other third party application and you're running Windows 7 or 8, you might be interested to know that you have a free option built right into your operating system. Windows Explorer and File Explorer have the ability to burn your data to a CD, DVD or Blu-ray disc. Stop downloading, installing or (shudder) paying for third-party software; instead, read on to learn how to use the built-in tools made available by Windows.

Getting Started - How to Start the Disc Burning Process

To get the burning started, you'll need to insert a burnable disc into your drive. Once the disc spins up, Windows will recognize it and ask what you want to do. The AutoPlay prompt looks different in different versions of Windows, but the options provided are similar.
Here's how it looks in Windows 7:
Burn a Disc, CD, DVD, Blu-Ray, Windows Explorer, File Explorer, Windows 7, Windows 8
And here's how it looks in Windows 8:
Burn a Disc, CD, DVD, Blu-Ray, Windows Explorer, File Explorer, Windows 7, Windows 8
Whether you're in Windows 7 or Windows 8, you'll want to click or tap "Burn files to disc."
If you have AutoPlay disabled, you won't see the pop-ups shown above. Instead, you'll have to open File/Windows Explorer and double-click (or tap) your disc drive in the Computer section.
Burn a Disc, CD, DVD, Blu-Ray, Windows Explorer, File Explorer, Windows 7, Windows 8
Once you've selected "Burn files to disc" or double-clicked your drive, you'll be greeted by a dialog that gives you two options for burning your disc.
Burn a Disc, CD, DVD, Blu-Ray, Windows Explorer, File Explorer, Windows 7, Windows 8
Make your selection depending on how you intend to use the finished product:
  • Like a USB Flash Drive - This burns the disc using the Live File System, which allows you to add or remove files at will like you would a flash drive. Discs burned in this manner are only usable on computers running XP or a newer version of Windows.
  • With a CD/DVD Player - This options burns your files and closes the disc allowing it to be played in a CD/DVD player or on any computer. Files can still be added after the disc is closed, but you won't be able to remove files already burned.
If you need help deciding which format to select, check out this page provided by Microsoft.

How to Burn Discs for Use Like a USB Flash Drive

If you opt to burn a disc which files can be added to or removed from at will, select "Like a USB flash drive" and click or tap Next. Windows will take a some time to format the drive. Depending on the type of disc you want to burn, this process can take a while. However, you can do this also on normal discs, not only rewritables.
Burn a Disc, CD, DVD, Blu-Ray, Windows Explorer, File Explorer, Windows 7, Windows 8
Once the disc is formatted properly, you can use File/Windows Explorer to open the disc. When you look at its root location, you will see a message that says: "Drag files to this folder to add them to the disc."
Burn a Disc, CD, DVD, Blu-Ray, Windows Explorer, File Explorer, Windows 7, Windows 8
Find the files or folders you wish to burn and either drag and drop them to the disc or copy and paste them. When you add files, they will automatically be burned to the disc.
The file copying dialogue actually shares the status of the disc burning operation.
Burn a Disc, CD, DVD, Blu-Ray, Windows Explorer, File Explorer, Windows 7, Windows 8
Once files are burned to the disc, you can go ahead and remove them if needed. Just select a file, right click (or press and hold) and hit Delete. In Windows 8, you can find the Delete button also on the ribbon, in the Home tab.
Burn a Disc, CD, DVD, Blu-Ray, Windows Explorer, File Explorer, Windows 7, Windows 8
When asked if you're certain you want to permanently remove the file, click or tap Yes.
Burn a Disc, CD, DVD, Blu-Ray, Windows Explorer, File Explorer, Windows 7, Windows 8
The files removed from a disc aren't sent to your Recycle Bin. They're well and truly gone after deletion.
When you've finished adding or removing files from your disc, you'll want to close your session. This allows you to remove the disc and continue using it like a flash drive on another computer.

How to Close a Disc Burning Session in Windows 7

You have two options to do this in Windows 7. If you want to keep the disc in the drive after closing the session, click "Close session", on the top of the Windows Explorer window.
Burn a Disc, CD, DVD, Blu-Ray, Windows Explorer, File Explorer, Windows 7, Windows 8
If you intend to remove the disc after completion, click Eject.
Burn a Disc, CD, DVD, Blu-Ray, Windows Explorer, File Explorer, Windows 7, Windows 8
Even when you click Eject, Windows will close your session before releasing the disc.
Burn a Disc, CD, DVD, Blu-Ray, Windows Explorer, File Explorer, Windows 7, Windows 8

How to Close a Disc Burning Session in Windows 8

In the File Explorer window, go to the root of the disc you just burned and deselect any files or folders you may have highlighted. Next, click or tap the Manage tab on the ribbon.
Burn a Disc, CD, DVD, Blu-Ray, Windows Explorer, File Explorer, Windows 7, Windows 8
Click or tap Eject.
Burn a Disc, CD, DVD, Blu-Ray, Windows Explorer, File Explorer, Windows 7, Windows 8
A notification is shown, that Windows 8 is preparing to eject the disc. Wait for the session to be closed.
Burn a Disc, CD, DVD, Blu-Ray, Windows Explorer, File Explorer, Windows 7, Windows 8
Each time you close a session, approximately 20 MB of data is used from your disc. Also, Windows 8 does not provide the option to close the session without ejecting the disc.

Burning a Disc for Use in a CD or DVD Player

If you want a disc that is more widely usable among your non-Windows devices, select "With a CD/DVD player" and click or tap Next.
Burn a Disc, CD, DVD, Blu-Ray, Windows Explorer, File Explorer, Windows 7, Windows 8
Adding files to the disc is essentially the same as previously described, the only difference is that the files aren't automatically burned to the disc as you add them, just to a temporary files folder.
First, make sure that you add all the files you want burned to the disc. Once you start the burning process, the procedure is the same in Windows 7 and Windows 8. You'll just have to click the right button to get started for the operating system you're using.
In Windows 7, you'll then need to click "Burn to disc."
Burn a Disc, CD, DVD, Blu-Ray, Windows Explorer, File Explorer, Windows 7, Windows 8
In Windows 8, click or tap "Finish Burning", in the Manage tab.
Burn a Disc, CD, DVD, Blu-Ray, Windows Explorer, File Explorer, Windows 7, Windows 8
Before the burning process starts, you'll have the chance to provide a name for the disc and select the recording speed. Make your selections and then click or tap Next.
From here on, this procedure is the same in both Windows 7 and Windows 8.
Burn a Disc, CD, DVD, Blu-Ray, Windows Explorer, File Explorer, Windows 7, Windows 8
You'll need to wait while your files are recorded to the disc. The amount of time required for this step depends on the amount of data, the type of disc, your hardware configuration and the speed you selected.
Burn a Disc, CD, DVD, Blu-Ray, Windows Explorer, File Explorer, Windows 7, Windows 8
Once done, you'll be given the option to create another disc with the same files. If you want to make another copy, click or tap "Yes, burn these files to another disc."
Burn a Disc, CD, DVD, Blu-Ray, Windows Explorer, File Explorer, Windows 7, Windows 8
If not, just go ahead and click or tap Finish.

How to Delete Temporary Files from Disc Before Burning

When burning a disc for use with a CD or DVD player, the files you add to the disc before burning are temporary files. Once you burn them, you'll be unable to remove them from the disc, but you're free to delete them prior to completing the burning process.
To remove individual files, simply select the files you want to remove, right-click (or press and hold) and hit Delete. It's just like deleting a file from any other folder in File/Windows Explorer.
In Windows 7 you also have the option to click the "Delete temporary files" on the top toolbar, in the Windows Explorer window.
Burn a Disc, CD, DVD, Blu-Ray, Windows Explorer, File Explorer, Windows 7, Windows 8
This removes all temporary files from the disc with a single click.

How to Add Files and Folders to Completed Discs

Once you've completed your disc, regardless of what format you chose, you can re-insert your disc and continue to work with it.
With a disc burned for use as a flash drive, you can add new files as often as you want as well as delete files already burned to the disc. Just keep in mind that each closed session removes 20 MB of usable space from the disc.
With discs burned for use with a DVD or CD player, you can add files, but you won't be able to remove them once they're burned. Adding files to a closed disc works exactly like adding them to a new disc, you'll just notice that your progress bar changes to "Adding data to the disc image..." rather than "Burning the data files to the disc..."
Burn a Disc, CD, DVD, Blu-Ray, Windows Explorer, File Explorer, Windows 7, Windows 8

How to Erase Re-Writable CDs/DVDs in Windows 7 & Windows 8

Some discs, including CD-RW, DVD-RW or BD-RE, can be erased regardless of which format you use to burn them. File/Windows Explorer has the ability to wipe these discs for you. The procedure to get started varies from Windows 7 to Windows 8, but the steps after you get started are the same.
In Windows 7, open Windows Explorer and go to the Computer section. There, select the disc you want to erase, without opening it. Click "Erase this disc" on the top toolbar.
Burn a Disc, CD, DVD, Blu-Ray, Windows Explorer, File Explorer, Windows 7, Windows 8
In Windows 8, open File Explorer and go to the Computer section. There, select the disc you want to erase, without opening it. Select the Manage tab on the ribbon and then click or tap "Erase this disc."
Burn a Disc, CD, DVD, Blu-Ray, Windows Explorer, File Explorer, Windows 7, Windows 8
The resulting wizard will provide you the option to select "Close this wizard after this disc is erased." If you don't want a notification when the job is complete, select it before you click or tap Next.
Burn a Disc, CD, DVD, Blu-Ray, Windows Explorer, File Explorer, Windows 7, Windows 8
You'll need to wait while the disc is wiped for you. The time the procedure takes depends on the amount of data on the disc, the type of disc and your drive.
Burn a Disc, CD, DVD, Blu-Ray, Windows Explorer, File Explorer, Windows 7, Windows 8
If you haven't checked "Close this wizard after the disk is erased" you will see a notification dialog explaining that the disc was successfully erased. Click or tap Finish.
Burn a Disc, CD, DVD, Blu-Ray, Windows Explorer, File Explorer, Windows 7, Windows 8
If you have checked "Close this wizard after the disk is erased," the wizard will simply close when the job is done.

Conclusion

As you can see, burning data using File/Windows Explorer is quick and easy. However, as many manufacturers include bundled burning software, many users fail to ever notice this feature or make use of it. It's a shame because, for most user's needs, File/Windows Explorer can easily handle all data burning requirements. If you're using third-party software, give it a try, you might be able to save yourself some time, money and disc space.

Publisher: Unknown - 21:29