Powered by Blogger.

Friday 28 March 2014

Recover Images from a Damaged SD card

A friend turned up today with a curly question. She’d been using a SD card in her point and shoot camera for some time and now the card had stopped functioning. If she put it in her computer she was told to format the disk to use it – sensibly she didn’t do this. However, she was sure she’d lost the shots she’d taken on her recent vacation.
She took the card to a camera store and was quoted $25 to look at the card and then $15 for every 25 pictures recovered from it. Even though she only wanted the most recent images – some 30 or so – she’d have to pay for all the images they recovered. As she had over 1,000 images on the card – the math wasn’t pretty – over $600 to get her images. The shop owner explained the process was time consuming and complex – hence the cost.
For my friend, the thirty or so photos just didn’t justify the expense. Luckily she called by to ask if she should she simply put the disk in the trash or was there an alternative? I grabbed the disk and sent her to get coffee – before she got back I had her images off the damage disk and burned to a DVD.

Here’s what I did:

The program I used is called Zero Assumption Recovery or ZAR. You can find it atwww.z-a-recovery.com. I opted for this program because it allows you to recover digital pictures from digital camera memory free of charge – for other uses it is a for fee program.
Start out by downloading an installing the ZAR Recovery software. Insert the damaged disk in the card reader and launch the software. When prompted that antivirus software may impact performance, click to accept the warning and go and disable your antivirus software.
zar_photo_recovery_step1.jpg
When prompted, click the Image Recovery (Free) option.
zar_photo_recovery_step2.jpg
The program looks for devices that are installed. This is probably the most confusing portion of the exercise because you’ll need to identify which of the devices in the list is your camera card. It’s not really that difficult and, in my case, Disk 4 shows as an SD card with 1,876 MB of data on it – pretty clearly it is the SD card. Select the disk and click Next.
zar_photo_recovery_step3.jpg
Wait as the program analyzes the disk. You’ll see a list of the recovered files. In my case I wanted all of them because not only did I not know which images she wanted but this dialog really isn’t the place to start getting fussy about which images you want and which you don’t – it’s simplest to take them all. So click the Root checkbox to select all the images.
zar_photo_recovery_step4.jpg
Click Next and you can then select the folder into which the recovered files will be placed. Because I selected the Root folder on the SD card these images will all go automatically into a subfolder called Root. Make sure you always recover files onto a disk other than the one they came from – it sounds self-evident but the busted SD card is not the place to put the recovered images.
I left all the options set to their defaults and simply clicked Start Copying the Selected Files. The software copied 1099 files to my hard drive in a few minutes.
zar_photo_recovery_step5.jpg
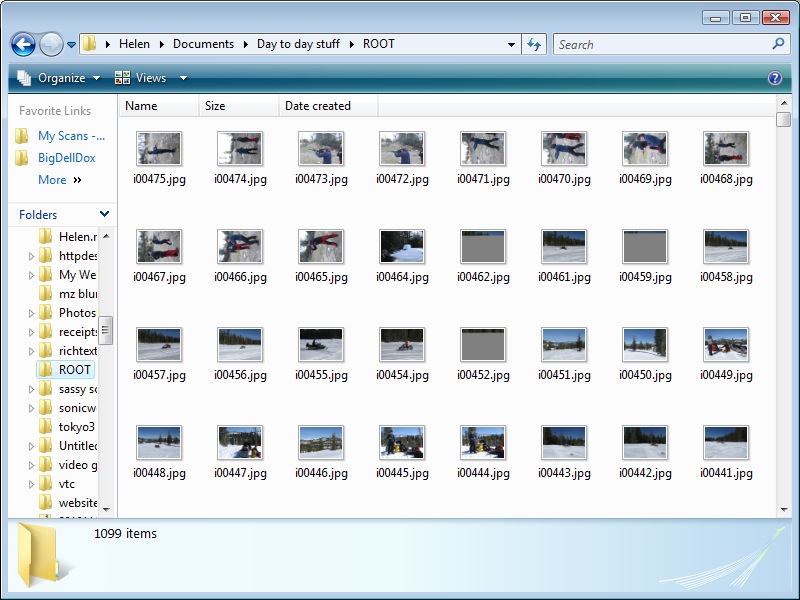
Open the folder in Windows Explorer and set it to view thumbnails to see what you have. I found a handful of images were unreadable and a few images were only half full of data with half the image missing but well over 1000 of the files were there and most of those my friend remembers taking on her vacation.
The moral of this post is to never throw out a camera card until you’ve tried to recover the data from it. There is good and free software out there that can do the recovery for you and it isn’t difficult or time-consuming to attempt it yourself. Oh! and don’t format a card if it has images on it that you want to download – even if your computer prompts you to do so – it’s not being helpful and the results might reduce your chance of recovering your images.
Publisher: Unknown - 22:38

How to Repair a Corrupt SD Card


  • How to Repair a Corrupt SD Card thumbnail
    Various SD Cards
    SD flash memory cards are convenient for portable data storage and moving data from one computer to another. They are also commonly used in digital cameras to store pictures and to make them easily transportable to computers and printers. Occasionally, you may find that you cannot access the data on a card. This can range from mildly annoying to catastrophic.
    Note that there is no guarantee that you can retrieve your data from your card. If the card is physically or electronically damaged, it may not be repairable. But here are some things to try if you can't access your data from an SD card.


    Thing You'll Need  
  • Computer with SD card reader or external USB card reader

  • Instructions

      • 1
        Determine the type of SD card you have. If it is 2GB or less, then it is a standard SD card. If it is 4GB or greater, then it is a high capacity or SDHC card. (There are some 4GB standard SD cards but most are SDHC). An SDHC reader is required to read the high capacity cards since the memory allocation formatting is different. If your data is on an SDHC card, it may be intact but you'll need the SDHC device to read it. Some devices, such as readers and cameras, may have software downloads available to upgrade the device to read the SDHC cards. Go to the device manufacturer's website to determine whether such an upgrade is available.
      • 2
        Insert your SD card into the card reader. If no drive letter is assigned to it, then the computer isn't reading it. In some cases, the reader may be assigned a drive letter but when you click on it you get the message "Please insert disk into drive E:" indicating that it isn't reading the card.
        Sometimes a particular device may not read an SD card while other devices will. If you don't have another device, ask a friend to try reading your card.
  • 3   You may find that your computer accesses the card, but won't read the files on it. Try several different files on the card. If some of them read and some don't, then one or more files may be corrupt. There are numerous file recovery programs available; some of them are free. If certain vital parts of the file are corrupted it won't be recoverable. Sometimes scanning the SD card will fix things. It usually won't correct a bad file but it may be worth a try. To do this, locate the card in "My Computer" or Windows Explorer" and right-click on it. From the pop-up menu, click on "Properties." A new window showing a pie chart displays the used and available space on the disk. Select the "Tools" tab, then click on the "Error Checking" button. Click the check box for fixing file system errors and click the "Start" button. The process should only take a few seconds.
  • 4
    In some cases, none of the files can be read. Sometimes the directory will list the file names but the files can't be accessed. In other cases, the file names are garbage characters or they may not show up at all. Right-click on the drive letter and select "Properties." The pie chart will show the used space on the card. If it shows all or almost all free space, then either the files have been deleted or the directory has been erased. In this case, a file recovery or undelete program may help (but don't count on it).
  • 5
    If you card reads okay but you can't save a file, the card may be write protected. On the edge of the card is a small slide switch usually labeled "Lock." If this switch is slid away from the connector end of the card, then it is "locked" or write protected. To save or modify files on the card, the switch must be in the unlocked position or toward the connector end of the card.
  • 6
    If you still can't read or write to the card, your files are probably lost. There are some disk diagnostic tools available, but some of them won't work on memory cards. If you have resigned yourself to the loss of your files, you may still use the card by reformatting it. To do so, right-click on the drive letter and select the format. This will erase everything on the card so be sure you have copied everything you can to another drive. When the card is reformatted the directory structure is recreated so you should now have full access to the card. If the card still won't work, it's time to discard it.
  • Publisher: Unknown - 22:28
    , ,

    How to Disable Charms Bar Hint in Windows 8?

    If you are using Windows 8 Release Preview or previously released Windows 8 testing builds such as Developer Preview or Consumer Preview or may be recently released Windows 8 RTM build, you must be aware of new "Charms Bar" feature of Windows 8. Its similar to a dock utility and automatically appears on screen as soon as you move your mouse cursor to top-right corner or bottom-right corner of screen.
    It provides quick access to following 5 system components: Search, Share, Start Screen, Devices and Settings.
    You can also access Charms Bar using "Win+C" keyboard shortcut. Although Charms Bar was designed to help Windows 8 users in quickly accessing these system tools but sometimes it becomes quite annoying when you move the cursor to top-right corner of screen to close a window or other tasks and Charms Bar automatically appears on screen.
    So today in this tutorial, we are going to share a simple Registry tweak which will help you indisabling Charms Bar hint in Windows 8. It'll not disable Charms Bar but it'll turn Charms Bar hint off, so Charms Bar will not appear as soon as you move the cursor to top-right or bottom-right corners. But it'll appear if you move the cursor to top-right corner and then move it downwards. Same case will happen with bottom-right corner. Also the hotkey "Win+C" will also show Charms Bar.
    So if you apply this Registry tweak, you'll not accidentally get Charms Bar on screen. It'll only appear when you actually want it.
    So without wasting time, lets start the tutorial:
    1. Press "WIN+R" key combination to launch RUN dialog box then type regedit and press Enter. It'll open Registry Editor and go to following key:
    HKEY_CURRENT_USER\Software\Microsoft\Windows\CurrentVersion\ImmersiveShell\
    2. Under ImmersiveShell key, create a new key EdgeUI.
    3. Now select newly created key "EdgeUI" and in right-side pane, create a new DWORDDisableCharmsHint and set its value to 1
    Disable_Charms_Bar_Hint_Windows_8.png
    4. That's it. It'll immediately disable Charms Bar hint feature. You'll not need to log off or restart the system.
    NOTE: If you want to enable the Charms Bar hint feature again, simply delete the DWORD "DisableCharmsHint" or set its value to 0
    PS: If you don't want to modify registry and want a ready-made registry script to do the task automatically, download following ZIP file, extract it and run the extracted REG file. It'll ask for confirmation, accept it:
    Thanks to our reader "DaNieL" for sharing this tweak...
    UPDATE: You can also turn off "Right Edge Swipe" option in "Control Panel -> Mouse" settings to disable Charms Bar.
    Do you like Charms Bar feature of Windows 8 or you hate this annoying thing? Feel free to share your opinion in your comment..
    Publisher: Unknown - 20:43
    ,

    How to Save a Virus Infected Computer AMANAHAD

    When your PC starts to slow and freeze it has most likely accumulated some very bad parasites. Here’s how to get rid of them

    .

    Windows based operating systems are known to attract a lot of malware that are usually the cause of system slowness and programs freezing. Malware includes viruses, Trojans, worms, rootkits and various kinds of spyware that can slow your computer until it’s is unusable, not to mention some other nasty effectsl. Symptoms also may include unexpected images or messages popping up, or unexpected random sounds, programs starting unexpectedly or other strange behavior. The computer can become so unresponsive it is difficult to operate well enough to work on solutions. Many people feel forced to buy a new computer or replace a hard drive as a result. This article describes a method of repairing your Windows XP or Windows 7 computer if this happens to you. If your computer is running, there is a way to begin fixing your computer that at the same time will be a check for a mechanical problem by following the steps below:
    You will need a connection to the Internet to download Anti-virus software and for other possible tasks to complete this procedure.

    STEP ONE - Opening a New Account.

    If the problem is malware related, a New Account will provide a safe 'base camp' on the computer for attacking the problem.
    A. Turn off your computer using the standard shutdown procedure:
    • Windows 7 - Click on START – SHUTDOWN
    • Windows XP - Click on START – TURN OFF COMPUTER
    Be patient; let Windows go through its normal shutdown even if it means walking away from the computer until it finally shuts down. If the computer is so slow that it eventually freezes up even in shutdown, then hold down the on/off switch of the computer until it shuts down.
    B. Power up the computer until it is fully operational despite how slow it is running. Be patient while following the next steps.
    NOTE: If your computer is just too slow to work with or does not operate at all, try logging in to Safe Mode to complete Step One below. If your computer still will not login under Safe Mode you are likely to have a mechanical problem and need a technician's help.
    C. Open the Control Panel and click on the following links or buttons to create a New User Account:
    • a. Windows 7
    1. Click on START > CONTROL PANEL > USER ACCOUNTS AND FAMILY SAFETY
    2. Under USER ACCOUNTS > ADD OR REMOVE USER ACCOUNTS
    3. Name the new account and click to add ADMINISTRATOR rights.
    4. Click on CREATE ACCOUNT
    5. Click on the New Account Name in the next screen,
    6. Under MAKE CHANGES… Click on CREATE A PASSWORD
    7. Create an easy-to-remember Password for now
    • Windows XP
    1. START > CONTROL PANEL > USER ACCOUNTS
    2. Click on CREATE A NEW ACCOUNT
    3. Make sure COMPUTER ADMINISTRATOR is selected and Click on CREATE ACCOUNT Button
    4. In the User Accounts window Click on the New Account Name
    5. Click on CREATE A PASSWORD
    6. Create an easy-to-remember password for now
    D. Once the New User Account has been created shut down the computer normally using the methods in A. above.
    E. Power up the computer again normally and when the login screen appears, login to the New User Account.
    NOTE: If your computer seems to run significantly better logged into this New Account then the following solution is very likely to work for you and the problem is NOT mechanical. If it does not then there may be a mechanical problem with the hard drive or a Registry problem with the Operating System requiring other steps and potential loss of data. It is wise to keep an unused secondary account in place for an access point to deal with future problems that may arise.

    STEP TWO - Cleaning your Internet Connection

    A. Open the Control Panel again following the same instructions for either Windows 7 or Windows XP:
    1. Click on START > CONTROL PANEL and choose INTERNET OPTIONS
    2. If you are using Control Panel Categories, click on NETWORK AND INTERNET CONNECTIONS Category to choose INTERNET OPTIONS
    3. In the INTERNET OPTIONS Window click on the ADVANCED tab at the top of the window.
    4. In the Advanced tab Click on the RESET... Button near the bottom of the Window.
    5. In the next window (Reset Internet Connections) click in the check box toDELETE PERSONAL SETTINGS and then click on the RESET Button here.
    NOTE: Cleaning your Internet Connection is an important first step because in most cases you will need to use the Internet to get the most current anti-virus software and potentially for other tasks involving removal of old Anti-Virus software. Also some of the symptoms being experienced are often caused by BHO's (Browser Helper Objects) and other add-ons that Internet Explorer has picked up while in use. Many sites are able to attach these objects to the Internet Options through IE by tricking the user into choosing to install them or even surreptitiously attaching them. Not only Internet Explorer uses these Internet Options but any other browser, such as Firefox or Opera, use them as well. Since most computer applications now have Internet capability as a part of their programming they are also affected by these objects. While not recommended here, it is possible to examine and disable each of the add-ons and options individually.

    STEP THREE - Downloading and preparing to install the Anti-Virus software.

    If the computer is showing these symptoms the current anti virus solutions that are being used are ineffective and must be replaced. Installation of a new Anti-Virus program cannot take place until all other Anti-Virus software has been removed. Many computer owners do not realize how significantly the maliciousness of malware has escalated in the last few years and have been getting by with free or even no Anti-Virus software. Kaspersky Labs’ Anti-Virus software is used in the procedure below as the author's personal preference and should not be considered an endorsement beyond that. Instructions for any well-regarded Anti-Virus software program will be similar to those below.
    A. If your computer is still running after performing the previous two steps continue below. If not, power on the computer until it is fully operational. An Internet connection must be present and online throughout the entire Download and Installation process.
    B. Open your Internet Browser and go to the download site of a reputable Anti-Virus software vendor. The link below goes to Kaspersky Labs 30 day free trial software. It will provide full program protection for free for 30 days and can be used to immediately clean up malware issues. Note that his link is to the USA site, English language version; there are other geographic sites for other countries and languages. This program will work with Windows 7 or Windows XP, 32 or 64 bit.
    1. Click on the DOWNLOAD Button
    2. Provide a valid email address on the following page and click DOWNLOADagain until a RUN/SAVE option screen is presented.
    3. Choose SAVE from the Download options and make a note of where the application installation file with a name similar to "kav[year]_[version number]us.exe” will be stored on your computer.
    CBEFORE INSTALLING AND RUNNING THE ANTI-VIRUS SOFTWARE, all old Anti-Virus software must be removed if there is one installed. If you do not have an Anti-Virus program installed, skip this step. There are two options for this Uninstall in order of priority:
    OPTION 1 for either Windows 7 or Windows XP
    1. Click on START > ALL PROGRAMS
    2. Look for the Anti-Virus program in the Program List
    3. Look in the Program’s sub-menu for an Uninstall menu command
    4. Follow all Uninstall procedures and default options until it is completely uninstalled
    OPTION 2 for a Windows Uninstall
    • Windows 7
    1. Click on START > CONTROL PANEL
    2. Click on PROGRAMS
    3. Under PROGRAMS AND FEATURES, Click on UNINSTALL A PROGRAM
    4. Once the Currently Installed Programs list is populated, find your Anti-Virus program, select it and click on the UNINSTALL link in the List Header
    5. Follow all Uninstall procedures and default options until it is completely uninstalled
    • Windows XP
    1. START > CONTROL PANEL
    2. Click on ADD OR REMOVE PROGRAMS
    3. Once the Currently Installed Programs list is populated, find your Anti-Virus program, select it and click on the REMOVE Button.
    4. Follow all Uninstall procedures and default options until it is completely uninstalled
    D. If there are any other Anti-Virus applications installed, repeat C. above until they are all removed.
    NOTE:. POTENTIAL ISSUE – The current Anti-Virus uninstall Menu command will almost always successfully uninstall the program. In most cases a standard Windows Uninstall will work. However it is possible that the prior Anti-Virus program has been corrupted and may not be entirely removed by either of these methods. If so it will have to be removed by other means. AVG Free and Avast! and other similar programs can be found by searching the Internet with the search terms: "UNINSTALL [Program Name]. Look for an uninstall utility program provided by the company that publishes the program such as http://www.avast.com/uninstall-utility for uninstalling Avast! or http://free.avg.com/us-en/faq.num-1338 for uninstalling AVG Free. This can be a daunting but necessary task. For instance, AVG Free is known to often not uninstall its Link Scanner; in which case the program must be run in Maintenance mode from the Uninstall window and the Link Scanner unchecked, before the uninstall process will complete. Finding the procedures that are needed for a clean uninstall of the program must be completed. In the very worst cases manually editing the registry to remove the application may be required and should only be attempted by a person experienced in editing the system registry.

    STEP FOUR - Installing the Anti-Virus application and removing viruses, Trojans, rootkits, spyware and other malware from the computer.

    A. Locate the "kav....exe" Kaspersky Labs installation file saved during STEP THREE above. Double-click, or right click on the file and choose OPEN or RUN to begin the Installation process. This will generally take several minutes and should not be interrupted. If there are any programs that will interfere with the Kaspersky Labs installation the program will find them and present a notification window requiring that they be uninstalled before proceeding. Uninstall them using the directions in D of STEP THREE above.
    B. Once installation is complete, the program will update its databases of malevolent software to current automatically. Open the program from the STARTmenu or from the icon tools in the lower left corner of your screen. In the main Kaspersky Labs window, Click on SCAN MY COMPUTER and then choose START FULL SCAN. Depending upon the amount of data involved this can take a few hours.
    C. During the Scan, malware programs that are found are noted and either fixed or disinfected and held for deletion or quarantine, however they are no longer affecting your computer. Scam results can be seen by clicking on the REPORTSlink in the main screen.
    D. At the completion of this process, all accounts on the computer should be accessible and operate at normal speed. The computer will be protected through the trial period while you make a final choice on your Anti-Virus protection.
    NOTE: It is unfortunate how toxic the Internet environment has become but there is no longer a substitute for a well-reviewed, retail version of a reputable Anti-Virus program. Check reviews in PC Magazine, CNET or other dependable sources to help in your choice. The cost of purchasing these programs is still very inexpensive compared to the loss of important data, access to the rich resources of the Internet, and the time and effort to reverse the effects of malware infection.
    don't forgot to leave a comment
    Publisher: Unknown - 04:51

    Tuesday 18 March 2014

    How to Delete Facebook Chat History AMANAHAD

    1

    When seeking to clear Facebook Chat history, you must make a distinction between one of two actions: removing the immediate history from an instant message window temporarily, or permanently deleting the log of your conversations between you and another person on Facebook. In this illustrated tutorial, you will learn how to do both.
    Clearing Facebook Chat History from the IM Window
    The first action we will cover is how to clear your chat window of old chat history. Some people would like to do this for the purpose of starting a new chat without the distraction of old text hovering above, while others seek to hide the information from potentially prying eyes. Here's how to clear the Facebook Chat history from the IM window:
    1.        Start a Facebook Chat IM with another user.
    2.        Locate the cogwheel icon in the upper right corner of the IM window.
    3.        Choose "Clear Window" from the drop-down menu.
    Your chat window should now be free of any previous messages sent. While this is a temporary solution to keeping your past conversations from appearing on screen, this does not permanently delete the records.
    2

    While we learned how to temporarily delete Facebook Chat history from an IM window in part one, this section of our illustrated tutorial focuses on permanently removing your chat history in three steps.
    To begin, locate your Messages inbox by clicking the word balloon icon located in the upper left hand side of the screen. Then, use the Messages search function to locate the chat contact whose messages you wish to delete. Then follow these steps:
    1.        Open the chat record you wish to delete or modify.
    2.        Locate the "Actions" button in the upper right corner of the Messages inbox.
    3.        Select "Delete Messages..." to continue.
    Please note, this function will only allow you to delete the chat history records of a single Facebook Chat user and you. If you have multiple records you must delete between you and other users, you must repeat these steps until all the records have been removed.
    3

    Next, Facebook Chat users have the option of modifying chat history by removing individual records or deleting the entire chat history permanently. To delete all the records, click the blue "Delete All" button, located in the yellow rectangle above the chat transcript, to continue.
    To remove individual records, click the checkbox next to each line of the chat history, as illustrated in the screenshot above, and click the blue "Delete Selected" button to continue.
    If you wish to cancel this action without deleting any records, click the silver "Cancel" button.
    4


    Next, a pop-up window will appear prompting you to delete the Facebook Chat records you have selected. Be forewarned, once you have enabled the deletion of these files, you can not reverse the action. If you are sure you can delete these records, click the blue "Delete Messages" button as illustrated in the screenshot above.
    If you have additional chat history to delete, simply repeat the steps as documented, starting in step two.

     by 
    Publisher: Unknown - 09:55

    How to Hide a Facebook Message by AMANAHAD

    Tired of a cluttered inbox on Facebook, or have some messages you don’t want other seeing, at least for now? Follow these simple steps to hide messages on Facebook.

    Steps
    Log into your Facebook account.


    Click on the Messages icon located on the top left side of your homepage screen.


    Select the message/conversation you would like to hide.


    Click on the drop down menu called “Actions”, located on the top center of your screen.


    Click on the option that says “Archive".

    • Doing this will hide this message/conversation from your normal inbox. Instead it will be located in a section of your account called “Archived” messages.


      If u like it share it with Facebook google twitter ...etc
      by 

      Publisher: Unknown - 09:21