Powered by Blogger.

Thursday, 30 October 2014

, ,

How To Set Galaxy S3 Notification LED Color and Flashing Frequency | AMANAHAD Tech

how to set galaxy s3 notifications
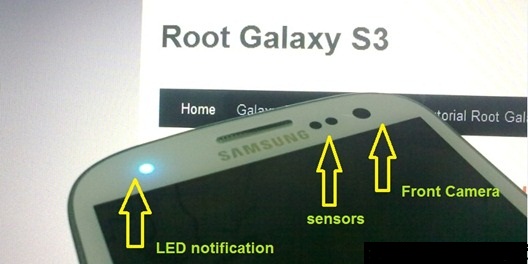
We know that Samsung galaxy s3 today is very popular. And the graphic sells of galaxy s3 from mei until june 2012 has sell out for more than 10 millions. In my opinion galaxy s3 also has an awesome design. Galaxy S3 has a LED notification that followed by a sensor and a front face camera On the top of it. the part that i very like most is LED notification. Galaxy S3 LED notification will make you easy to know the status of your phone. whether you receive email, Gmail, miss call, low battery and more. And it will provided to you without press the power button (turn on s3 screen from sleep) and enter password, you can get all of the status just by looking at flashing frequency and the LED notification light color.

to enable LED notification is very easy just go and set at settings>LED indicator. On there, you can enable the LED Light up when device is connected to charger, when you has missed call, battery is low, messages or any application events.


It sound good right?. But unfortunately this galaxy S3 LED notification default system setting doesn't allows you to set flashing frequency and the LED notification color. If you have rooted your galaxy s3 (see tutorial how to root Galaxy S3), will let you go set the LED notification by go to the system file and manually set it. But if you don’t want to root your galaxy s3 because it will remove your warranty, you can use application- Light Manager to set the LED notification and flashing frequency on your Galaxy S3. Light Manager is an application that you can find on google play store that will allows you to give control of your the flashing Frequency and notification LED colors. I have tested it, this is free application, Light Manager on my Galaxy S3, it works perfectly. hope you enjoy will love it too :D.

download light manager


Download Light Manager

Important: If you want install Light Manager apk, remember to do this before, please go to Settings > Security and lock screen > Unknown Sources to allow installation of non-Market apps.

by Triple A A-@-A
Publisher: Unknown - 13:35

Tuesday, 28 October 2014

,

Top 10 Movie Mixing Software Awesome |AMANAHAD Tech

What only hardware mixers were capable of back in the 1980s and 1990s is now already possible with personal computers. And it did not require much – just radical developments in video mixer software technology. But then, that was already a major achievement in itself, isn’t it? What follows is a listing of 10 contemporary innovations that provide the best and most affordable solutions to video production including some programs that are meant for the processing of live video feeds.

10. TubeMix 310 TubeMix 3

TubeMix 3 runs on Windows platforms. It is a DJ-style program that employs two embedded players. While you use one to play videos, you may very well use the other for mixing. The controls are easy to use and with this tool you would have a smartly put together video mix in a jiffy.

9. DJ Mixer Pro9 DJ Mixer Pro

VJs and DJs, both pro and amateur, would find this tool very handy indeed. The interface is intuitive, revolutionary in its mixing tools, and very easy to use. It is capable of producing very exciting live mixes. Whatever audio-visual material you have to work on, this software would surely make a dynamic video mix to get you lots of likes, or whatever passes for likes in certain platforms.

8. DeejaySystem Video Mixing Software8 DeejaySystem Video Mixing Software

Fans of this tool swear up and down that this is the “most stable” video mixing program in the market right now. DJs prefer to work with a high quality kit and it appears that they get it from this compact package right here. The software is designed for the use of professional VJs and DJs for both automated and live mixing. It seems that the creators of the software have reached the mark, and a notch higher.

7. Modul8 VJ Software7 Modul8 VJ Software

Modul8 VJ Software doesn’t only possess a smart name, but it also is smartly designed to provide users with a flexible, intuitive video mixing tool. It is particularly set up for real time video streams, interactive installations, and improvisational work as well. One of its advantages over others is that it can be used effectively by both newbies and veterans on both Intel and Power PC processors.

6. Trinity DV Mixer6 Trinity DV Mixer

Trinity Technologies of Mumbai, India has this relatively recent offer for those who absolutely love to do live online video mixing but can’t afford to avail of the more expensive hardware required. If you have feed from four cameras, prefer seamless switching, like to see the feed without video monitor and with graphics overlay, then Trinity DV Mixer is the choice for you.

5. CutFour DV3 Software5 CutFour DV3 Software

With CutFour DV3 software you can preview all input channels without needing external monitors. It has many impressive features for a live video mixing tool and the modified user interface is much better in all respects. The output to expect is high digital video quality and probably that is all that really matters in the end.

4. vMix 20114 vMix 2011

For Windows users, we’ll probably recommend vMix before any other program. This new release works best with Windows 7, XP, and Vista. The main strength of vMix is on live high definition video mixing which is probably what many of those who have the inclination prefer. The best thing about vMix is that it is affordable. You don’t need to save more for expensive hardware when you can already get enough for affordable software.

3. ClubDJ ProVJ3 ClubDJ ProVJ

DJ’s generally love ClubDJ ProVJ even if it is kind of complex – or maybe they love it because it is rather complex and it is a complete solution. If you’re not that into DJ or VJ stuff, then what you need to know is its karaoke mixing capability. Of course, it is a great video mixing tool as it already is.

2. VDMX2 VDMX

VDMX is particularly proud of its fontsynth™ technology. Before we move on, this software is only compatible with Mac. With that said, it has the flexibility and the multi-faceted features of video mixing hardware. The interface assures efficiency in the process of mixing (fewer steps towards the same goal). Its main features are: (1) mixing and improvisation of live video performance, (2) seamless streaming production, (3) precise cueing mechanisms for stage performances, and (4) supports various types of studio work.

1. Virtual DJ Pro1 Virtual DJ Pro

What can the other contenders do when you have a BeatLock engine running things for you? That particular feature made us decide to give Virtual DJ Pro the number one spot on this list. Mixing tunes is less bulky in terms of weight these days. And this compact package and very simple controls proves, once and for all, that great things come in small packages.
If you have a few video files just waiting for the right software mix, all you need to do know is decide which of the above video mixer software appeals to your tastes and preferences.


by Triple A A-@-A
Publisher: Unknown - 11:02

Sunday, 26 October 2014

, ,

[Official Firmware] Samsung Galaxy S3 Neo+ GT-I9301I I9301IXXUANC6 Official 4.4.2 KitKat Firmware | AMANAHAD Tech


[Official Firmware] Samsung Galaxy S3 Neo+ GT-I9301I I9301IXXUANC6 Official 4.4.2 KitKat Firmware


[Official Firmware] Samsung Galaxy S3 Neo+ GT-I9301I I9301IXXUANC6 Official 4.4.2 KitKat Firmware


Manufacturer: Samsung
Model: Galaxy S3 Neo+ GT-I9301I
Android Version: 4.4.2 KitKat
PDA: I9301IXXUANC6
CSC: I9301IPHNAND1
Modem: I9301IXXUANC6
Changelist: 1036356
Status: Official
Downloads:


"Learn How To Flash An Official Firmware For Samsung Devices"

Well guyz this is the complete tutorial/guide that "How an Official Samsung Firmware is Installed/Flashed on a Samsung smartphone/tablet" , the method is very easy to perform and I have made it more easy for the newbies who don't know what is flashing, Odin etc. Some time the phone software update is late or not available in the area so with this tutorial you can Install the latest Official Samsung released firmwares on your device.


1. Drivers Setup
Well for connecting any device to PC it is must to first install its drivers for the device than connect that. so for Samsung Devices you should install these both.


2. Odin
This is a software through which we can flash a custom .tar etc files. Now it is must to have this software on PC
a. Odin (second link if first didnt work) All versions all available in folder.


3. Flashing A Firmware
To flash an official firmware for Samsung Device. first you should put your phone in download mode. By pressing Volume Down + Power Button + Home Button (varies with deviceat the same time for some time when the Warning! screen appears. then leave them and press Volume Up button so download mode starts. as shown in image.
                          [the first Warning!]                                        [After pressing Volume Up button]

When the second screen appears so connect your phone/tablet to PC. and then Open Odin tool. any version. as shown in image
[ this is a 3.4 version of odin you can try any one ]


When you connect your phone so there will be a message shown in message box i.e <ID:0/010> Added so it means that your phone is connected properly if Added not shown so try it again, then check on PDA check box and click PDA button and pick up that firmware file which is .tar/.md5 etc and wait if it was checking it. then click Start. the progress will be done and your phone will be restarted several times during flashing. after completion Pass message will be shown in above boxes. thats it.


by Triple A A-@-A
Publisher: Unknown - 19:35

Wednesday, 8 October 2014

, , ,

Crack WIFI Password Easily with easy Steps |AMANAHAD Tech

 Step to Crack Wi-fi Password:

Steps:

1. Boot your system with a backtrack 5 live dvd ora pendrive.

2. Goto Backtrack > Exploitation Tools > Wireless Exploitation Tools > WLAN Exploitation > fern-wifi-cracker

3. This is will open a fern wifi cracker window. Now the First step is to select the interface. Here in my case i have selected wlan0 interface .

4. To scan for Access Point click on the 2nd button ( wifi icon ).

Once you get the Access Point ,various AP’s of WEP and WPA are detected.

Fern wifi cracking

Now I am going to crack the WEP Encryption .

In my case , i have selected one Access Point and click on the Attack button.

Access Points fern wifi cracking

Once you click on the Attack button , it will start collecting packets.
attack collect packer

WEP KEY FOUND

Once your IVS Packet count reaches 10000 or greater than that , its automatically crack the key and display it on the screen .

Password Found

KEY DATABASE

To see the database , click on the Key Database button .

WPA CRACKING : For WPA cracking the steps are same except you just need to specify the dictionary file (a file containing list of passwords) for the attack.
Enjoy..


by Triple A A-@-A
Publisher: Unknown - 00:50
, , ,

Easy Way to Hack WEP/WPA/WPA2 Wi-Fi Password


 WiFi Hacking
Easy Way to Hack WiFi Password
If you are living nearby someones WiFi hotspot and every time your laptop search for connection its showing up but you don't have passwords. Or you just want to steal someones WPA/WPA2 Wi-Fi hotspot key or passwords. Don't worry...

In this tutorial I’ll show How to hack a WPA/WPA2 Wi-Ficonnection through a bootable USB.
Things you should need:


1. A USB pen drive.
2. beini.iso file. [Download it from HERE].
3. UNetbootin software to make your USB drive bootable. [Download for Windows, Linux or Mac]

Some few steps you should to do ( WEP):

1. Write beini.iso on your USB by UNetbootin. Set everything according to this image bellow.
WiFi Hacking1
2. After finishing restart your PC and boot it from your USB.
3. If you were successful to boot up then you should see something like this. Click Minidwep-gtk.
WiFi Hacking2
4. Click OK.
WiFi Hacking3
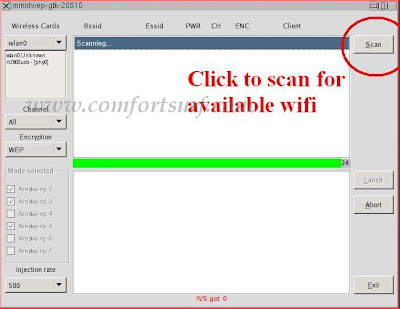
5. Now Minipwep-gtk  program will open. Click Scan.
WiFi Hacking4
6. Select a wireless network(should have Clint) from the list. And click Lunch to start creaking process.
WiFi Hacking5
7. Sometimes its take a while according to your victim connections IVS value and password strength. So keep passions.
WiFi Hacking6
8. If it found a password, it should appear like this.
WiFi Hacking7

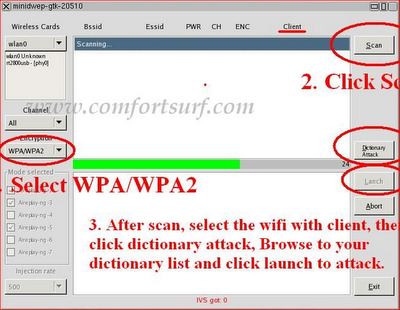
To creak WPA/WPA2 follow this image instruction.
WiFi Hacking8
Let me know if you have done it successfully or you have any complicity.


by
  Triple A A-@-A
Publisher: Unknown - 00:39
, , ,

Top 5 Apps to Lock Down Your Text Messages And Images | AMANAHAD Tech

Privacy is a concern for most people these days. Whether you are looking to keep your information private from a snooping coworker or a nosey boyfriend or girlfriend, there are apps to help. The problem is, some of the apps are just plain awful. What I will go over today are some good apps to use for keeping texts and images from being easily accessed.
Some of the apps in this list have some built in functionality for just such a task. Others may need to be unlocked by purchasing the pro version. Others yet are made specifically for hiding SMS messages or images from any prying eyes.
GO SMS Pro is a really popular app. In fact, it is the one I have used off and on for couple of years. One feature I didn’t really know about was the ability to have private contacts. In a nutshell, you can take a contact, a potential employer for example, and place them in your private inbox. If they send you a text message, you will need to unlock the message before it can be read.
hide-sms-go-sms-pro
When you have the premium version of GO SMS Pro, you can hide the private SMS inbox from the menu and unlock more of the settings to make it more difficult to access. What I like here is the ability to rename the SMS vault inbox to something a little less conspicuous.
Very recently I talked about Hi App Lock. This is a good option for locking individual Android apps for better privacy. You can easily use Hi App Lock to lock down anywhere you feel an onlooker may be able to access the information you’d like to keep private. Think about how often you leave your phone or tablet on your desk or in your car or backpack unattended. If your Android device was stolen, what would people be able to see and/or do with the information they find?
hide-sms-hi-lock-app
Do you send messages to someone you aren’t supposed to? Are your work text messages or images you take with your work camera confidential? No reason for you to have information leaked just because you set your phone down.
Vault is an app that’s come a long way in the past couple of years. When I first tested it, all you could do was hide images and it wasn’t all that great at it. Now Vault has evolved into more of a privacy control center. With the free version, you can encrypt your images, you can also encrypt a limited number of text messages too.
hide-sms-vault
A feature I really thought could be helpful is the option to link your Facebook account and encrypt your Facebook messages. When you send a Facebook message to someone, they will be able to read it, but the message doesn’t show up in your conversation history.
Secrets is similar to Vault because you can hide images or other files. It’s different because the Secrets doesn’t show up in the Android app drawer. Opening Secrets is done by going to your phone dialer and typing the default 1111 and pressing send. You will be prompted to enter a code then you can see your hidden files. Having an app for just your images can be nice, especially when you might have taken or received some images you might not want anyone to know about.
hide-sms-secrets
Hide SMS is just for hiding text messages. Hiding the messages is as simple as long pressing the message and opting to move the message to the hidden inbox. When a new message arrives, You will see an inconspicuous message in your notification bar saying KeepSafe updated. When hiding a current thread, the app may not move your images over. They didn’t on my Samsung S3.
hide-sms-keep-sms
People have many different reasons for wanting to keep their communications private. The above apps are there to help. I would recommend trying some of the all-in-one apps for an ease of use standpoint. When you have too many apps on your phone for similar tasks, it can get confusing and could even slow down or cause conflicts with each other

by Triple A A-@-A
Publisher: Unknown - 00:19
, ,

How to Remove Picasa Albums From Your Gallery | AMANAHAD Tech

How to Remove Picasa Albums From Your Gallery
If you’re anything like me, you get easily irritated by all the Picasa Albums that appear in your Gallery. Thanks to Google account sync, and to the fact that every image you post to Google+ somehow ends up creating its own album on Picasa, your Gallery looks like a never-ending string of albums that contain one or two images each thanks to Picasa.
If all you’d like when you open the Gallery is to see the photos that are actually stored on your device  — and the SD card if you’re using it — then follow this walkthrough to get rid of all the Picasa albums.


For a long time, I’ve used QuickPic to browse my photos on my phone because of its speed, editing options, and the fact that it didn’t show me all my Picasa albums. However, with Android becoming quite fast and efficient now, as well as integrating photo editing by default, I had less and less reasons to resort to QuickPic. The only thing holding me back from using the Gallery daily were the Picasa albums, but no more.
Gallery with locally stored albums but also Picasa albums

Step 1: Stop Picasa Web Album Sync

The first thing you’ll need to do is go into Settings on your device, look for the Accounts section and click on the Google account. Select your email address and deselect the “Sync Picasa Web albums” option.
Disable Picasa web album sync
Keep in mind that stopping the synchronization won’t affect Google+ Instant Upload for photos, and it won’t delete your Picasa images from the cloud. It will just stop these albums from sync’ing to your device and appearing in your Gallery.

Step 2: Clear Gallery Data

Now that Picasa has stopped sync’ing to your phone, new albums should not appear in the Gallery anymore. But the albums that have already been synchronized are already there. That’s why you need to clear the Gallery data.
Go to Settings, Applications Manager and swipe to the 3rd tab (All). Scroll down to Gallery and click it. There, you will be able to “Clear data”.
Click "Clear Data" to force the Gallery to refresh
Click “Clear Data” to force the Gallery to refresh

Step 3: Let the Gallery Refresh

At this point, you’re basically done. All you have to do is open the Gallery and wait for it to refresh and rebuild its thumbnails. If you don’t have a lot of photos stored on your device, this will be almost instantaneous, but you’ll need to wait a few seconds if you have a big collection of photos.
The Gallery is now clean and only shows local photo albums
It’s quite an easy thing to setup, and the benefits are remarkable especially if your Gallery is littered with Picasa albums that make it harder and harder to find the photos that are stored locally on your phone.
What about you? Do your prefer to have your Picasa albums sync’ed and visible inside your Gallery, or do you access them from Google+ and prefer this method of keeping your Gallery tid
by
     Triple  A     ( A-@-A)
Publisher: Unknown - 00:02

Thursday, 2 October 2014

Top 9 Slimmest/Thinnest Android Smart Phones from 5.5mm – Too Slim to Handle | AMANAHAD Tech


Mobile phones have completely transferred into a smart phone device which can be used as a device to perform all of your digital needs with flexibility. From time to time specifications and hardware parts are improved to dual core, quad core processing. Other important thing is that apart from this improvements, the devices still maintains the same thickness.
Within this year we have seen many smart phones debut claiming the world’s thinnest smart phone but here we go through the slimmest smartphone in the Android platform and listed here are the few devices.

Gionee Elife S5.5 – 5.5mm

Gionee-Elife-S5.52
A new addition to the list, and this sits right on the top with a thickness of 5.5mm, becoming the world’s thinnest smartphone from the company Gionee. The device has a 5-inch Full HD AMOLED display and a 1.7GHz Octa Core Processor.

Vivo X3 – 5.57mm

Vivo X3
This Smart Phone has broken all the records and has now come to the number 1 spot by offering a thickness of just 5.57mm which is amazing. The device does look like a music player and not a phone but well its a Android 4.1 based Phone. It comes with a HD Display of 5″ with a resolution of 1280 x 720p. The device comes with a price tag of $410 and is something which looks a value for money. Check Price on Amazon

Huawei Ascend P6 – 6.18mm

Huawei Ascend P6 Smart Phone
The Ascend P6 got launched this year at a decent price of $500 with the best feature of this being the thickness which is at just 6.18mm making this reach the top of the charts. It comes with a 1.5 Ghz Quad Core Processor, 2GB RAM and a 32Gb Internal Memory. Over all the other smart phones this one is recommended if you want to have a truly slim device. Check Price on Amazon

ZTE Athena – 6.2 mm

ZTE Athena teases the ultra-thin Android segment and this device easily beats Motorola Droid Razr, Oppo Finder and Huawei Ascend P1 S. ZTE Athena measure a thickness of 6.2 mm and it’s spotted with Kevlar back.
Going through the specifications of the ZTE Athena, this would be seen with 4.3 inches touchscreen display. Its powered with multi core Cortex A 15 processor and boast with 64 GB of internal memory storage capacity. This would see with Android 4.0 Ice Cream Sandwich OS.

Vivo X1 – 6.55mm

Vivo X1 SmartPhone
The Vivo X1 Android Smart Phone came with just 6.55 mm thickness which is quite thin to handle and yes thats the reason its being added in this list. The phone comes with a 4.7″ IPS Display with a 1.2 Ghz Cortex A9 Processor. With a good battery capacity of 2000 mAh its something which you should miss. Even though the device is hard to find for purchase out of China, its something which you should consider importing because of the $400 around price of this device.

Oppo Finder – 6.65 mm

Oppo FinderThen we spotted Oppo Finder all the way from China which measures a thickness of 6.65 mm. This device is now available for pre order but for sale in China only. Going through the specifications of it, it includes 1.5 Ghz dual core processor with 1 GB of RAM and Android 4.0 Ice Cream Sandwich along with 4.3 inches Super AMOLED Plus display. This would be seen with 16 GB of the internal storage capacity. Oppo Finder is a high end smart phone and it comes from nowhere to challenge of slimmest Android smart phone.
Oppo Finder got the attention from international users as the world’s slimmest phone but their talks trended for certain days only as ZTE Athena. Check Price on Amazon

Huawei Ascend P1 – 6.68 mm

Huawei Ascend P1 SMotorola Droid Razr enjoyed the success of the world’s slimmest Android smartphone for a considerable amount of time for almost 8 months as the Ascend P1 S debut by Huawei stating that the device would measure a thickness of 6.68 mm and takes down the crown as the world’s thinnest Android smartphone. This device was rushed for the Mobile World Congress 2012 launched in Spain this year and it still to be launched in several parts of the world.
Just when Huawei Ascend P1 S was announced in January 2012 at CES 2012 and still this device is not yet available with no confirmed dates. Still Huawei isn’t clear about this smart phone and the launch of it is gets delayed.

Vivo X3L – World’s thinnest 4G smartphone – 6.75 mm

Vivo X3L
The X3L is another slim beauty from Vivo, and this has got the thickness of 6.75 mm, making it the slimmest 4G smartphone in the market. The device is launched in China and it comes with the 5-inch 720p display, Snapdragon quad-core chipset with 2GB RAM.

Motorola Droid Razr – 7.1 mm

Motorola Droid RazrThe competition among the thinnest Android smartphone started when the Motorola released Droid Razr in competitor of Galaxy Nexus just a day before the launch. The Droid Razr got a critical success as the device was thinnest, slimmest and provided hand some of features but eventually both the devices here didn’t make any bigger impact. For most of the reasons Motorola Droid Razr is known for it slim design with thickness at 7.1 mm.
When it debut, the device dethrones the previous title holder Sony Ericsson Xperia Arc by 1.6 mm which is a major consideration in terms of the design. However the run of Droid Razr didn’t last long as many other manufacturers have realized the design should be important criteria along with the hardware and the software design.
Motorola Droid Razr is with 4.3 inches Super AMOLED capacitive touchscreen display. The device measures dimensions of 130.7 x 68.9 x 7.1 mm and weights 127 grams. This is with dual core 1.2 GHz Cortex A9 processor and 8 mega pixel camera makes this smartphone best use of all the features.
GIONEE Elife E6 – 7.9 mm
The Smart Phone which was launched on 3rd October in India has come up with some amazin hardware, consisting of a 5″ Retina Display, 13 Mp Camera and powered by a 1.5 Ghz Quad Core Processor. The device comes in a good looking unibody form factor with a strong built. The best part is that even though it comes with a 2Gb Ram and the mentioned specifications above, its priced at just around Rs 22000 [USD 400] which makes it a recommended to buy device.
Sony Ericsson Xperia Arc – 8.7 mm
Sony Ericsson Xperia ArcSony Ericsson Xperia Arc when debut in January 2011 it was promoted as the world’s slimmest Android smartphone measuring the thickness 8.7 mm but at that time, thickness wasn’t an important part as the evolution from single core to dual core was on high, thus thickness got shadowed. But the Xperia ARC is the device which arose the needs the device to be slim enough even though the features are on high end.
Sony Ericsson Xperia Arc equipped with 4.2 inches LED backlit LCD display screen with Qualcomm MSM8255 Snapdragon 1 GHz dual core processor and upgrade to Android 4.0 Ice Cream Sandwich available. Various other features like 8 mega pixel camera and others made this smartphone as the top end device.
So with each of these device we have learnt that the thinnest smart phone available is Motorola Droid Razr but several manufacturer have teased their product but their device is not yet available in the market. So Motorola Droid Razr is till the world’s slimmest smart phone available.

by Triple A A-@-A
Publisher: Unknown - 13:39
, ,

Making keyloggers Undetectable using Binders and Crypters!


The biggest challenge after creating keylogger installation file, is to convince your victim to install that keylogger on his PC. Normally free remote keyloggers like Emissary keylogger or any other cheap keyloggers will create standard .exe installation file without any stealth feature. Also free keyloggers are easily detected by popular antiviruses. So Eventually your keylogging job will remain Incomplete.
You would have probably heard about binders and Crypters before, but what do they used for? and why they are used in keylogging process? its simple as their Names suggests what they do. Lets first understand these two softwares.
Crypter
It is a software that can encrypt executable (.exe) files. crypters are popularly used to encrypt viruses, RAT’s, keyloggers, spywares etc to make them undetectable from antiviruses.
The Crypter takes the original binary code of .exe file and applies many encryption on it and stores at the end of file(EOF). So a new crypted executable file is created. The new exe is not detected by antiviruses because its code is scrambled by the crypter.
Binder
Binder is a software used to bind or combine two or more files in one file under one name and extension.
The files to be binded can have any extension or icon. The user has choice to select the name, icon and various attributes of binded file.
Now that you, me and the whole world is aware of these softwares, do you think antivirus softwares will allow you to run these software on your system? ..obviously not. This is the biggest setback for crypters and binders. With increased use of Crypters and binders to bypass antiviruses, AV became more advanced and started including encryption definitions to even detect crypted or binded strings within code. So, use of crypter to hide Keyloggers became more complicated as nowadays, most of the popular crypters & Binders are easily detected by antiviruses.
So, if you are trying to crypt your keyloggers or viruses with publicly available crypters and binders, they are bound to be detected by antiviruses. This is because most FUD(fully undetectable) crypters remain “FUD” for maximum of one or two weeks, after their public release.
When any free FUD crypter/binder becomes popular it also gets the eyes of antivirus companies. The antivirus companies update their software and employ detection mechanism that detect the encryption by the crypter. To obtain FUD crypters, you either need to search for it in hacking forums or make one by yourself. Soon i will post about creating your own crypter.. stay connected.
Meanwhile you can try these latest crypters and binders that are available publicly:

1) Chrome Crypter v2.0

This Crypter is FUD (Fully Undetectable) and free. It has couple of extra features like .exe file binder and inbuilt ICON Changer. Its recommended that you name your resulting output file in the format: “filename.mp3.exe”. .exe extension will be hidden on most of the systems, so your victim will run it believing its an mp3 file.
Chrome Crypter v2
Chrome Crypter v2 – FUD.rar

2) 0crypter v5.0.8

Like ‘Chrome crypter’, this crypter also has inbuilt ICON changer and few more advanced features like: Default Browser Injection, Custom Injection Method (VBC advanced), Effective StartUp on reboot, Custom Startup, Custom Assembly Change, etc. This is not FUD, as my AVG quickly flagged the output file as Trojan virus.
0crypter free download
0crypter v5.0.8 – FUD.rar
Publisher: Unknown - 13:10