Powered by Blogger.

Friday 29 August 2014

,

Install and Operating DOSBox in Windows [Guide, Setting up, Mounting CD Help] AMANAHAD

Having trouble working with DOSBox? Not sure how to get your DVD drive to work? Maybe this guide can help you to get it all to work.

First thing you do, obviously, is download DOSBox. You can get the latest version here: DOSBox, a x86 emulator with DOS
You probably want to go for the first option, the Win32 installer.
After installing you can run the program but you won't be able to run anything yet. First thing you do is mount some drives.


Mounting drives
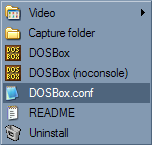
If you go to the DOSBox folder in the start menu you will see a couple of options, click the DOSBox.conf option.


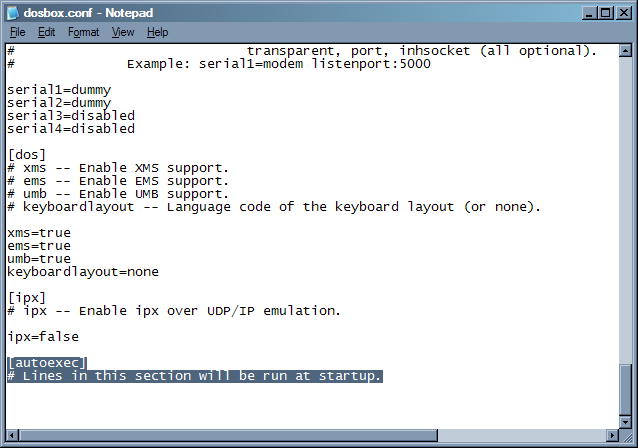
Notepad will open the file now. In this file you can configure all your DOSBox settings. If you scroll all the way to the bottom of the file you will see this:
[autoexec]
# Lines in this section will be run at startup.


People familiar with MS DOS will know that the autoexec.bat file was used to make the people run certain commands on startup. Here we will enter some commands to mount the drives needed to run your DOS games.

The command to mount a drive is simply mount c c:\. The first c is the drive letter you will be using for the drive in DOSBox, the c:\ part is where the drive is located in Windows. So for example if in Windows your hard drive is located at D:\ and you want to have it as let's say H:\ in DOSBox, you enter mount h d:\.
Most people have their hard drive as C:\ in windows though and want it the same for DOSBox so you'd be using mount c c:\.

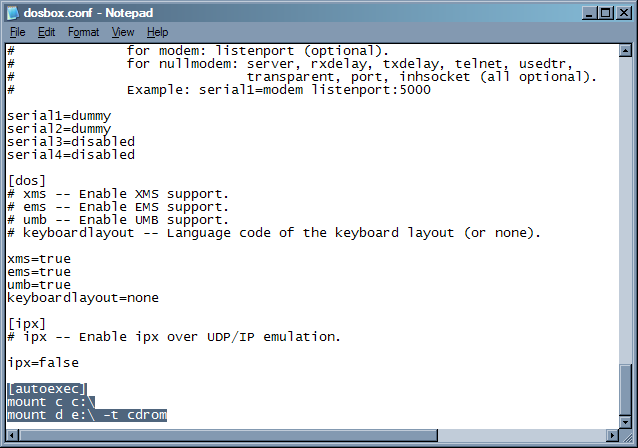
You can add as many hard drives as you want like this. Adding a CD-Rom or DVD-Rom drive works a little differently though. The first part works the same, if your DVD drive in windows is E:\ and you want it as D:\ in DOSBox you enter mount d e:\. It's not working yet though. To make it work you need to add -t cdrom to the end of that line, so to finish it off it will look like this: mount d e:\ -t cdrom.
Having added both a hard drive and a CD/DVD drive your DOSBox.conf file should look something like this:


This is all you need really to make your games work. If you have some MS DOS knowledge you will know the commands to run a random game. If not, keep reading.


DOS Commands
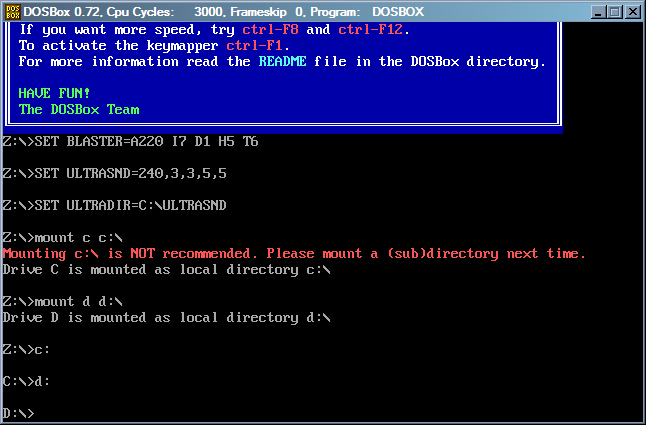
For those of you who have not worked with MS DOS, I will explain some of the basic commands. When starting DOSBox you will notice it says Z:\>.
The Z:\ is the drive you are in at the moment. Z:\ is a drive DOSBox uses so you won't get very far with that. To change drive, let's say you want to go to the C drive, which is your hard drive if you have it set up like I did in the last step, simply type C: <enter>. You will now be in your C:\ drive, notice the Z:\ has changed into C:\. You can do the same to go to your DVD drive, just type D: <enter>.


Alright, now let's say you want to play Commander Keen 5. You have unpacked the game to a folder called Keen5 on your hard drive (C:\keen5). First you go to your C: drive. Then you go into the keen5 folder. To do this you type cd keen5 <enter>. the cd command is used to enter a folder. If you want to get back out of the folder and back to just C:\, you simply enter cd..<enter>.

Now you should see C:\KEEN5>, which means you're in the folder in which you unpacked Commander Keen 5. Now to run the game. To run a game or program under DOS, you need to know the name of the file. If you don't know there's an easy way to check. To see the contents of the folder you are in, simply type dir <enter>. This will show all the files inside you folder you are in at that moment.


Sometimes, the number of files inside a folder is too large to fit on the screen though and you will only see the bottom part of the list. If this is the case, you type dir/p <enter>. This will pause the list every time the screen is full. If you want to see the next part of the list you simply press a key and you will see the next part.

Now to run a game you will have to run an executable file for the game. Usually, it's an EXE, BAT or COM file. If you look at the picture of the file list, you can see at the left of the screen the names of the files. Next to that are the file extensions. This is what you need to be looking at. You will notice KEEN5E EXE, which is the executable file for this game. So to run the game you type keen5e <enter> and the game will start. These are the basics to make any game run. Just change the folder and file names to those needed for the game you want to play and everything should work.


Extra stuff
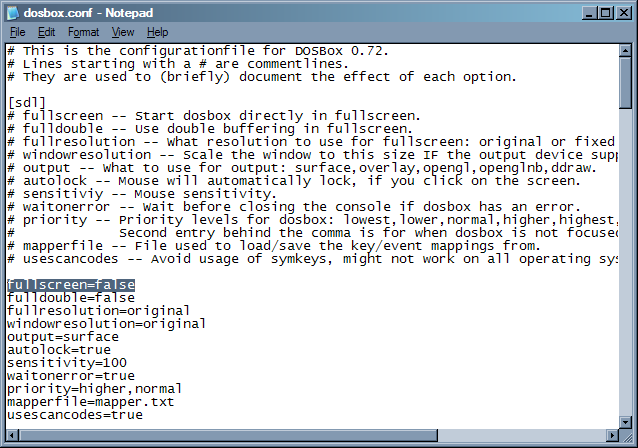
There are some small things you might want to know when playing a game under DOSBox. When starting, DOSBox will start in a window, you can simply change to fullscreen by pressing ALT+ENTER. You can also make it launch in fullscreen mode by making a small change to the DOSBox.conf file. When opening DOSBox.conf, in the middle of the screen you will see a line which says fullscreen=false. To make DOSBox launch in fullscreen you change this to fullscreen=true.


Another thing you might want to know is the CPU cycles DOSBox uses. If you are playing a game and it's running slower or faster than it should, it might help to play with the CPU cycles a bit. Pressing CTRL+F12 increases the cycles and CTRL+F11 decreases them. By playing with this a bit you might get a game to work more smoothly.

If you own a DOS game on CD-Rom, sometimes you might notice it doesn't work and it tells you it can't find the CD. There's something you can do that might help, it doesn't always work though. When mounting the CD/DVD drive, you can add something that will tell DOSBox what the CD is called. If you go to My Computer in windows, the CD will have a name. Let's say our CD is called Keen5. In DOSBox.conf you will see mount d e:\ -t cdrom. To this you add -label KEEN5 -ioctl. This will tell DOSBox the CD that is in the drive is in fact that CD. So now the line should look like this:
mount d e:\ -t cdrom -label KEEN5 -ioctl, KEEN5 being the label of the CD, change this to the label or name of the CD you have in your drive. Don't forget to remove this part again after playing the game, because when running other games from a CD Rom, they might not work if DOSBox thinks the Keens 5 CD is in the drive.


These are kind of the basics to get a random DOS game to run. Hopefully you can get all your old games to work now. If your having any problems, just post a reply and I will try to help.

if you Like share it on http://facebook.com, GOOGLE+ & Tweeters 

by

AmanAhad
Publisher: Unknown - 22:20

Tuesday 26 August 2014

Root Galaxy S4 GT-I9505 on Android 4.2.2 XXUDMH8 Jelly Bean Official Firmware [GUIDE] AMANAHAD

Samsung rolls out Android 4.2.2 XXUDMH8 Jelly Bean official firmware for Galaxy S4 GT-I9505

Root Galaxy S4 GT-I9505 on Android 4.2.2 XXUDMH8 Jelly Bean Official Firmware [GUIDE]
Root Galaxy S4 GT-I9505 on Android 4.2.2 XXUDMH8 Jelly Bean Official Firmware
Samsung recently rolled out its latest Android 4.2.2 I9505XXUDMH8 Jelly Bean Over-The-Air (OTA) firmware for Galaxy S4 GT-I9505 users in the UK. Those who have already updated their devices to the latest official firmware can now root the same manually, using our step-by-step guide.
Rooting the device offers several benefits such as bloatware removal, enables access to root permissions for installing third-party root apps, custom ROMs and various system tweaks for optimum system performance.
IBTimes UK reminds its readers that it will not be held liable for any device damage during or after firmware installation. Users are advised to proceed at their own risk.
Pre-requisites
  • Therooting tool for I9505XXUDMH8 official firmware and instructions provided are limited to Galaxy S4 GT-I9505 model. Verify device model number by navigating to Settings > About Phone.
  • Back up data and settings using recommended custom recovery tool such as ClockworkMod (CWM) or TWRP to prevent the risk of losing data.
  • Download and install correct USB drivers for Galaxy S4 GT-I9505 on computer.
  • Ensure USB debugging mode is enabled on phone by navigating to Settings > Applications > Development or Settings > Developer Options.
  • Double-check the device has at least 80% battery charge to prevent unexpected device shutdown (due to battery drain) while installing ROM.
How to Root Galaxy S4 GT-I9505 on Android 4.2.2 XXUDMH8 Jelly Bean Official Firmware
Root Galaxy S4 GT-I9505 on Android 4.2.2 XXUDMH8 Jelly Bean Official Firmware [GUIDE]


Step 1 - Download CF-Auto-Root Android 4.2.2 Package for Samsung Galaxy S4 to your computer and extract the zip file.
Step 2 - Download ODIN v3.07 which is needed to root XXUDMH8 official firmware on your phone.
Step 3 - Power off the phone and boot it into Download Mode. To do so, press and hold the Volume Down, Home and Power buttons together until the construction Android robot icon with a triangle appears on screen. Then hit Volume Up to confirm entry into Download Mode.
Step 4 - Launch ODIN on computer and connect your phone to it, while the phone is still in Download Mode.
Step 5 - When the phone connects successfully, one of the ID: COM boxes will turn yellow with the corresponding COM port number. This process may take some time. So, leave it alone.
Step 6 - Choose the file that needs to be flashed or installed on your phone. This file is obtained from the extracted file in Step 1.
  • Click 'PDA' checkbox and selectthe file'CF-Auto-Root-jflte-jfltexx-gtI9500.tar.md5'.
Step 7 - In ODIN, ensure Auto Reboot and F. Reset Time options are selected.
Step 8 - Click Start button in ODIN and root installation process will begin, which would take just a few minutes to complete.
Step 9 - Once the root installation is completed, your phone will reboot into Recovery Mode automatically and install the root package files. At this point, your device ID: COM box will also turn green displaying a PASS message.
Step 10 - Finally, when the home screen appears, disconnect the phone from computer.
NOTE: If the device fails to boot into Recovery Mode automatically (as given in Step 10) and root your device, then repeat the entire procedure from start.
OPTIONAL: If the issue still persists, repeat the entire tutorial, but make sure that "Auto Reboot" option is NOT checked in ODIN. Then after installation (Step 9), do the following:
Step 11 - Remove the battery to Power OFF the phone forcefully.
Step 12 - Boot (turn ON your phone) by pressing Volume Up, Home and Power buttons together to enter Recovery Mode manually. This will initiate the root install process on your phone.
Samsung Galaxy S4 GT-I9505 is now rooted on Android 4.2.2 XXUDMH8 official firmware. Check for the SuperSU app in your apps list to verify.
To ensure the root package has installed correctly and working, verify with Root Checker [AMANAHAD] app.

after Done please comment
also if you have any problem problem then also comments OR contact me
If you like share it with your friendz.............

Triple A
A-@-A
AMANAHAD
Publisher: Unknown - 14:24

How to Verify Root Access with Root Checker [AMANAHAD]

We have countless guides and tutorials on how to root Android phones and tablets with 90% success rates and most users never have any issues with the clear steps given and easily root their Android devices. However, we totally agree that there should be a way to verify that you have correctly followed the root method and your Android devices is now with root access.
Root Checker solves that problem. It is a very small Android app that will check whether your Android phone or tablet has root access or now – thus verifying if you followed all the steps correctly or not. It will also give you a quick check Superuser or SuperSU app is working without any problems on your Android device.


How to Verify Root Access with Root Checker

It is very easy to use this app with no complicated UI and buttons. We have explained a in a few simple steps how to use and verify root access on your phone or tablet with Root Checker.
Step 1 - Download Root Checker from Google Play Store and install on your phone/tablet.
Step 2 - Open Root Checker app.

Step 3 - Tap the “Verify Root Access” button.

Step 4 - Wait while the app checks for root access. If prompted with the following screen, tap the ‘Grant’ button.


Step 5 - That’s it. The results will be shown on your screen now.

If you get a message similar to the above screenshot, that means your Android phone or tablet has been rooted successfully and now you can install and use any Android app that requires root access

By
AmanAhad
Triple A
Just Say All To Triple A
for more information contact me
Publisher: Unknown - 14:22

Monday 25 August 2014

How to Hack Wi Fi Using Android [Rooted Require] by AMANAHAD

Root a compatible device. Not every Android phone or tablet will be able to crack a WPS PIN. The device must have a Broadcom bcm4329 or bcm4330 wireless chipset, and must be rooted. The Cyanogen ROM will provide the best chance of success. Some of the known supported devices include:
  • Nexus 7
  • Galaxy S1/S2/S3/S4/S5
  • Galaxy y
  • Nexus One
  • Desire HD
  • Micromax A67
 Download and install bcmon. This tool enables Monitor Mode on your Broadcom chipset, which is essential for being able to crack the PIN. The bcmon APK file is available for free from the bcmon page on the Google Code website. To install an APK file, you will need to allow installation from unknown sources in your Security menu. Step 2 of this article goes into more detail.

Run bcmon. After installing the APK file, run the app. If prompted, install the firmware and tools. Tap the "Enable Monitor Mode" option. If the app crashes, open it and try again. If it fails for a third time, your device is most likely not supported.
  • Your device must be rooted in order to run bcmon.
Tap "Run bcmon terminal". This will launch a terminal similar to most Linux terminals.Type airodump-ng and tap the Enter button. AIrdump will load, and you will be taken to the command prompt again. Type airodump-ng wlan0 and tap the Enter button.

Note the MAC address that appears. This is the MAC address for the router. Make sure that you have the right one if there are multiple routers listed. Jot this MAC address down.
  • Also note the Channel that the access point is broadcasting on.

Start scanning the channel. You will need to collect information from the access point for several hours before you can attempt to crack the password. Type airodump-ng -c channel# --bssid MAC address -w output ath0 and tap Enter. Airodump will begin scanning. You can leave the device for a while as it scans for information. Be sure to plug it in if you are running low on battery.
  • Keep scanning until you reach at least 20,000-30,000 packets.
Crack the password. Once you have a suitable number of packets, you can start attempting to crack the password . Return to the terminal and type aircrack-ng output*.cap and tap Enter.


Note the hexadecimal password when finished. After the cracking process is complete (which could take several hours), the message KEY FOUND! will appear, followed by the key in hexadecimal form. Make sure that "Probability" is 100% or the key will not work.
  • When you enter the key, enter it without the ":". For example, if the key was 12:34:56:78:90, you would enter 1234567890.
And Just Say All To Triple A


A-@-A
Publisher: Unknown - 23:03

Change a Dynamic Disk Back to a Basic Disk


Applies To: Windows 7, Windows Server 2008 R2
Basic disks support only primary partitions, extended partitions, and logical drives. Basic disks have been supported in operating systems since MS-DOS, while dynamic disks have been supported in operating systems since Windows 2000.
Backup Operators or Administrator is the minimum membership required.
noteNote
The decision to convert a dynamic disk to a basic disk has implications that should be considered carefully. For more information about basic and dynamic disks and how to choose which type to use, see how-to-convert-simple-volume-to-primary.html.

noteNote
Before you convert disks, close any programs that are running on those disks.

Changing a dynamic disk back to a basic disk


To change a dynamic disk back to a basic disk using the Windows interface
  1. Back up all volumes on the disk you want to convert from dynamic to basic.
  2. In Disk Management, right-click each volume on the dynamic disk you want to convert to a basic disk, and then click Delete Volume for each volume on the disk.
  3. When all volumes on the disk have been deleted, right-click the disk, and then click Convert to Basic Disk.

Additional considerations

  • The disk must not have any volumes nor contain any data before you can change it back to a basic disk. If you want to keep your data, back it up or move it to another volume before you convert the disk to a basic disk.
  • Once you change a dynamic disk back to a basic disk, you can create only partitions and logical drives on that disk.

To change a dynamic disk back to a basic disk using a command line
  1. Back up all volumes on the disk you want to convert from dynamic to basic.
  2. Open a command prompt and type diskpart.
  3. At the DISKPART prompt, type list disk. Make note of the disk number you want to convert to basic.
  4. At the DISKPART prompt, type select disk <disknumber>.
  5. At the DISKPART prompt, type detail disk <disknumber>.
  6. For each volume on the disk, at the DISKPART prompt, type select volume= <volumenumber> and then type delete volume.
  7. At the DISKPART prompt, type select disk <disknumber>. Specify the disk number of the disk that you want to convert to a basic disk.
  8. At the DISKPART prompt, type convert basic.


Value Description
list disk Displays a list of disks and information about them, such as their size, amount of available free space, whether the disk is a basic or dynamic disk, and whether the disk uses the master boot record (MBR) or GUID partition table (GPT) partition style. The disk marked with an asterisk (*) has focus.
select disk disknumber Selects the specified disk, where disknumber is the disk number, and gives it focus.
detail disk disknumber Displays the properties of the selected disk and the volumes on that disk.
select volume disknumber Selects the specified volume, where disknumber is the volume number, and gives it focus. If no volume is specified, the select command lists the current volume with focus. You can specify the volume by number, drive letter, or mount point path. On a basic disk, selecting a volume also gives the corresponding partition focus.
delete volume Deletes the selected volume. You cannot delete the system volume, boot volume, or any volume that contains the active paging file or crash dump (memory dump).
convert basic Converts an empty dynamic disk into a basic disk.

Additional considerations

  • The disk must not have any volumes or contain any data before you can change it back to a basic disk. If you want to keep your data, back it up or move it to another volume before you convert the disk to a basic disk.
  • Once you change a dynamic disk back to a basic disk, you can create only partitions and logical drives on that disk.


A-@-A
Publisher: Unknown - 22:34

How to Convert Simple Volume to Primary Partition?

Dynamic disk volumes can be divided into simple volume, spanned volume, striped volume, mirrored volume and RAID-5 volume. The simple volume can be created on a single dynamic disk as with partition of Basic Disk, but its space can be inconsecutive. Many people may make the system partition becomes mirrored volume to another disk, but have to break the mirrored volume to be simple volume because of some other needs. The simple volume exists on a dynamic disk but if we can convert it to the primary partition?
Once, you could have converted or changed basic disk to dynamic disk, after doing so, all partitions on basic disk will become simple volume and not primary partition though your windows is working correctly, but you cannot create a primary partition or logical partition on the dynamic disk, so you could need a way to convert simple volume to primary partition.
Windows built-in Disk Manager provides the feature of reverting dynamic disk to basic disk, but it requires you to delete all volumes on the dynamic disk, otherwise, the "Convert to basic disk" is grayed out as following.

Convert to Basic Disk unavailable
In the above case, The third party software, AOMEI Dynamic Disk Converter can assist you to convert or change simple volume to primary partition without any data loss.

Securely convert/change simple volume to primary partition.

AOMEI Dynamic Disk Converter directly and safely convert/change dynamic disk to basic and simple volume to basic primary partition with all data protected, and also it can sector by sector clone spanned, striped, mirrored and RAID5 volume on dynamic disk to basic disk partition (supports both Windows 7/8/Vista/XP and Server 2003/2008/2011/2012). At the same time, the simple volume can be fleetly cloned to primary partition through it. Here will step-by-step guide you to convert/change simple volume to primary partition through the conversion software.
1. Launch AOMEI Dynamic Disk Converter. After skipping the welcome page you will see its main interface below, and choose Method 1 (Convert a dynamic disk back to basic disk), and then click the Next button.

AOMEI Dynamic Disk Converter
2. Now, all dynamic disks will be shown in the following list box, please choose the dynamic disks which you want to convert. For a instance, here choose the Disk 1 and Disk 2 (all simple volumes), and click the Next button to continue.

Choose Dynamic Disks
3. And then, the program prompts you confirm the conversion from dynamic disk into basic disk. By ticking the option "I have decided to execute this operation..." and clicking "Proceed" button to start work. The process of the conversion will take 3 to 10 seconds only.

Confirm
After the conversion process being complete and restarting computer, the simple volumes have been changed to primary partitions by AOMEI Dynamic Disk Converter. Work well!


A-@-A
Publisher: Unknown - 22:29

Regarding Basic Disk convert to Dynamic Disk


Dynamic Disk is first introduced in Windows 2000 by Microsoft. This new type of disk can maximize all your servers' performance, especially on maximizing use of disk space. Convert basic disk to dynamic is recommended when you are running more than one hard disk. Because the dynamic disk allows you manage several hard disk at the same time.

How to convert basic disk to dynamic disk

With the new disk type introduced in Windows OS, new function is also be added in Windows built-in Disk Management. Only a few button click the conversion from basic disk to dynamic could be completed.
  1. Log on Windows as Administrator Privilege, and click Start Menu ->Run, and then type "diskmgmt.msc" to open Windows Disk Management. (you could also right->click “my computer”->“management”->“disk management”)
  2. Right-click the basic disk which you want to convert to dynamic, and click "Convert to Dynamic Disk" menu item (You must right-click the gray area that contains the disk title on the left side of the Details pane. For example, right-click Disk 1). The graph is below:

  3. Select the check box that is next to the disk that you want to convert (if it is not already selected), and then click OK as follows:


    And then click OK button to open the following dialog, you can view about details:


    So, click Convert button to work this conversion
  4. Click “Yes” when you are prompted to convert, and then start this conversion, in addition your computer could be restarted during the process.

    After converting to dynamic disk, then you could manage it free. To manage dynamic disk, although the built-in Disk Management could do some basic job, such as create volume/delete volume/format volume, however, for more advanced task, it could not be handled enough. Therefore, we need a better dynamic disk tool to assist us managing dynamic disk well. AOMEI Dynamic Disk Manager is the one that special designed for dynamic disk management. It could not only provide you the basic function as before but also several advanced features such as: ,resize volume (include operation on system volume), move volume slice, and convert disk between basic disk and dynamic disk, convert GPT disk to MBR. Here you could view its fresh interface:


Notice before convert basic disk to Dynamic


  1. Disk Space Issues while converting Basic Disk to Dynamic Disk. The disk space issues means is about the 1MB space at the disk end. Dynamic Disk uses the 1MB free space which is intended to track all information about dynamic volumes on the system. The basic disk must contain the 1MB space that is not partitioned at its end. This space is required to record the information for dynamic disk. If the 1MB space does not is found by Windows, the system generates errors related to insufficient disk space for this conversion. To solve the problem, we suggest you shrink the last partition by using like Partition Assistant, in order to empty the 1MB free space for upgrading a basic disk to a dynamic disk
  2. For a clustered server platform, a basic disk can't be converted into a dynamic disk. For example, If Windows 2003 Enterprise Edition or Windows 2008 Datacenter Edition is configured as a cluster, and then the shared storage system can't be upgraded as a dynamic disk.
  3. To the people who had added the ghost point on there hard disk, dynamic disk could not be supported by ghost; it could only work on basic disk.
  4. For a removable external disk, can't be converted to dynamic disk. A simple reason is that set up a spanned volume or striped volume on the removable disk, if the disk was removed from the system, the spanned or striped volume would be broken.
  5. 5. For the laptop, or the people who has only one hard disk, even if the disk can be converted to dynamic disk, we still do not recommend doing so. The main reason for the two, first, the laptop really should not be running on a server platform anyway; second, most laptops only have one hard disk, and dynamic disk could gain a few benefits on the single disk environment.
As you see there are some situations that we do not suggest you convert disk to dynamic, do not worry about this, you could also manage your disk under basic disk, by using AOMEI Partition Assistant which is regarded as the latest “Partition Magic” by most computer users.

A-@-A
Publisher: Unknown - 22:28

Saturday 23 August 2014

,

Download Widnows 7 10000 % Orignal No Servay and Add Direct Link by AMANAHAD

Download Windows 7 SP1 ISO ( x86 / x64 ) Image


Note : Since most of these files are above 2GB in size , we advise you to use a Download manager like Free Download Manager to download these Windows 7 ISO images. After downloading these images you can burn these Windows 7 ISO images on a DVD or create a bootable Windows 7 USB flash drive to install Windows 7 on your PC.

There are two options to choose from during the Windows 7 installation process:

  • Upgrade. This option replaces your current version of Windows with Windows 7, and keeps your files, settings, and programs in place on your computer.
  • Custom. This option replaces your current version of Windows with Windows 7, but doesn’t preserve your files, settings, and programs. It’s sometimes referred to as a clean installation for that reason.
Thanks and JUST SAY ALL TO TRIPLE A
Publisher: Unknown - 23:18
,

iPhone No Service After Factory Unlock Troubleshooting Guide by AMANAHAD


Now a days many people facing No Service problem on their iPhone, especially 3GS owners with iPad Baseband or after using Ultrasn0w unlock. Also there can be on iPhone No Service after restore or update, activation or deactivation with Redsn0w or SAM tool, even after jailbreak.

The problem is not in unlocking. In other words it is better that your iPhone shows No Service than Invalid Sim card or Sim card is not supported.
fix iphone no service unlocked
If iPhone is still locked to AT&T it will never accept other Sim. If you see No Service that means that iPhone accepted the Sim and there are can be tons of other reasons but not in unlocking and here I’ll try to describe most of them.

Most Common iPhone No Service Errors and How To Fix Them

1. The easiest method, and I can confirm that it works in most cases, to reset network settings:
  • Insert unsupported Sim card, open Settings on iPhone, go to General -> Reset -> Reset Network Settings.
  • Also some say you can try to Erase All Content and Settings but before it do a backup and I heard that it could harm your device.
reset network settings iphone
2. In Setting you will see AirPlane mode which you can also use to fix No Service on iPhone as well:
  • Insert Sim card and turn on/off Airplane mode several time while it will pick the signal.
3. Also while your iPhone is on, pop the Sim card out and turn off the power. Insert Sim card and turn iPhone On. Or, turn iPhone on, pop up the Sim card, turn iPhone on and insert Sim card. It worked for many.
4. Go to Settings – General – Cellular/Network and turn on Cellular Data, Enable 3G, Data Roaming and wait for the signal. If they already on – turn it off and wait for the signal.
Note: Some say that you need just reboot iPhone holding two buttons and you will get service.
5. No Service iPhone problem can be after activating and deactivating iPhone using just app as SAMPrefs (SAM unlock tool) or Redsn0w. In this case follow steps in method 6.
6. If methods above don’t work to fix No Service on iPhone, you can try the third method which is the best because it works in 90% cases:
1). Insert non-AT&T Sim card in iPhone and connect it to iTunes using USB.
2). When iTunes detects your device perform a backup and after backup just click Restore.
Note: First try just Restore, without holding Shift/Option. Also you can try to restore putting iPhone first into DFU mode.
3). Wait till the program finish restore and you will see two options in iTunes:
  • Restore from a backup;
  • Set up iPhone as a new phone.
unlock at&t iphone
so choose Set up as a new.
4). After installing iPhone as a new you will need to pass activation steps, so do it with non-AT&T Sim card inserted and wait for the Signal.
If nothing, read and perform methods (1,2,3,4) described above.
7. iPad baseband. There are many iPhones 3GS still running iPad baseband (06.15.00) which you or previous user installed on iPhone for Ultrasn0w unlock. That could be the reason of No Service as well.
First check the baseband of your iPhone: Settings – General – About- Modem Firmware and if you see 06.15.00 – this is iPad baseband and you need to downgrade it. You need redsn0w tool for this. Do steps below:
  1. Download Redsn0w (blog.iphone-dev.org) and run it as Administrator if on Windows.
  2. Use Redsn0w to enter DFU mode: in redsn0w go to Extras – Just Boot and follow on screen instructions to put the device into DFU mode.
  3. When your device will successfully enter DFU launch iTunes and restore iPhone in iTunes.
  4. Enter DFU again.
  5. Now download the latest iOS version (getios.com).
  6. In redsn0w go to Extras – Select IPSW and choose the iOS file you downloaded.
  7. Go back to the main window of redsn0w and click Jailbreak.
  8. Choose Downgrade from iPad baseband and uncheck Install Cydia and click Next.
That’s it. After the process you will have service and can make calls.
8. Very often when you try to cut the Sim card yourself many do it wrong and iPhone can’t detect the Sim. You better order the Sim of the carrier you want to use on iPhone.
9. Sometimes there is really no service of the carrier you want to use in the area you are. There can be just no coverage. Or the Sim you try to use is not active anymore. In these case you need to contact the carrier.
10. Other reason of No Service on factory unlocked iPhone is the antenna of your device. Yes, it could also be a hardware issue and your iPhone has a bad antenna and it can’t catch the signal. In this case just contact or go to the Apple Store and ask them to check it for you. If it would be antenna they would give you the new iPhone.
That’s it. All this info was found on different forums, blogs and from the own experience of our clients. Just try every of them and read every no service fix very carefully. Also you can always contact Apple care or the carrier of the Sim card you need to use.
And remember, if iPhone got No Service issue it doesn’t mean that it is not unlocked. If device would still be locked it never accept and activate iPhone with other Sim card.


A-@-A
Publisher: Unknown - 01:23